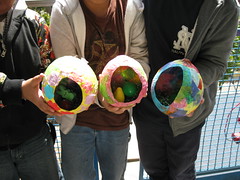
Last Easter we made the Family Fun Easter Egg Dioramas in the Crayon Box. This year, I decided to put a little twist on that project and create winter scenes.

They are very time consuming, but very affordable and adorable!
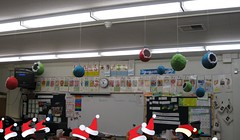
See how festive hanging from the ceiling!
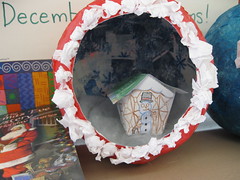
Here is a close up- super cute!
Here is the quick tutorial- if only the project were as quick...
Supplies:
Balloons -rounder the better
Snowflake tissue paper ( I found mine at the $ store.)
Scrap paper- white/manila is best
Bold tissue paper
Glue, flour, water
White tissue paper
Bottle cap
Silver paint
drill or nail
Pipe cleaner
This paper house pattern
Crayons
White tissue paper
hot glue
Batting- I bought a "snow blanket" at the $ store and it was enough for the whole class.
patience!
Inflate balloons just so they are round.
Cut/tear snowflake tissue paper into small pieces.
Mix flour, glue and water into a thin paste.
Paper mache balloon with a layer of snowflake tissue paper making sure to over lap a lot.
Allow to dry overnight.
When dry, cover first layer with a new layer of paper machae and scrap paper. Overlap a lot and make sure there are no gaps. This is the strength layer. (With 29 Crayons paper mache-ing- I was praying for strength at this point!) Dry over night or until you have the courage and patience to go on. For me that was about a week. Just being honest.
When dry and sane, paper mache final layer of bold colored tissue paper. At this point I had run out of flour and was just using thinned Elmers glue. Dry overnight.
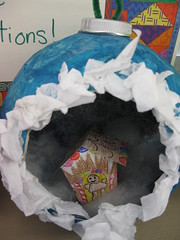
Take a sharp scissor and poke a hole in the center of the balloon. From that starter hole cut out a circle to make the window. Carefully peel out the balloon and discard. Now you can see the snowflake background! Patch the small hole at top with a bit of tissue.
To make the hanger on top, I spray painted milk and water bottle caps. When dry I drilled two holes in the top. Then I took about two inches of pipe cleaner and threaded it through the holes. I twisted the bottoms under the cap and hot glued it to the top. This was the only part the kids couldn't do at all.
Finally, decorate! The kids used white tissue paper to make snowball trims. They printed colored and assembled gingerbread houses. Not pictured are snowmen made from cotton balls that some added later.
I loved having these around the classroom and hope the parents were happy with their little handmade gift. Most of the kids were excited about the project. Red crushed his and trashed it on the way out the door. He's not into art. I tried not to take it personally, but it made me sad. Then as we were leaving the coolest 5th grade teacher told the kids how awesome the project was and that was just icing on the cake.
This might make a great activity for Brownies or some other *small* group during the winter. However, take my word, it's too late for Christmas this year.
Happy Saturday!
5 comments:
Love this! Can't wait to use it when I'm back working again! You are such a clever crafter to think to use wrapping paper on the inside!
Very cool idea! You're right - they look great hanging up together.
those look great :D
As a future educator, I absolutely love your blog! Keep up the good work.
Those are really cute!
Post a Comment