Monday, November 30, 2009

Bragging About My Trash To Treasure: Altered Wine Bottle

I have been so inspired by these altered bottles on Restyled Home.  Then I discovered this altered bottle flickr set. And when I discovered (where have I been?) the Graphics Fairy, it was all over.
Altered Wine Bottle
You can click on the pictures to get a better look.

Over Thanksgiving weekend I had the time to get creative and try new things. This picture hardly does the bottle justice.

I wake up early. I usually leave for work around 6:30 am, so sleeping in is still early. Anyway, in the quiet of the dark morning, at an hour most Hollywood folks never see, I crept into the upper garage and went through the building's glass recycling bin looking for the perfect wine bottle. The feasting of the previous days left me with lots to choose from! Thankfully nobody caught me.

I soaked the labels for a while and scraped them off. A little dab of Citra-Solv and all that sticky stuff was gone. (Citra-Solv works much better than Goo Gone and smells so good!)

I quick visit to the Graphics Fairy for this and this and I was on my way. Unfortunately, I am out of color ink for my printer. Sometimes these kind of limits are helpful though. With all the amazing clip art at GF, color ink would have made it harder to choose an image! Frankly, I probably won't replace that ink cartridge any time soon. For the same price, I enjoyed some yummy sushi the other night and sushi will always trump ink in my book.
Altered Wine Bottle Back


This is the back.


Anyway, Modge Podge, Martha Stewart Cristal Fine White Glitter, ribbon and some Christmas picks from Joannes and I had my bottle! This would make such a nice hostess gift for wine loving friends. I am sure to make more of these! I have ideas to make a bottle for wishes, a bottle for Love Potion # 9 and maybe some birthday bottles. The possibilities are endless and the price is so right!

 
Check out all the creative things people do with her images here.
Check back on Tuesday for more Trash to Treasure at Reinvented.

Sunday, November 29, 2009

Pretty Wreath, an Ugly Door, Ice Skates & ABC Contest Winner

What's that saying about making a silk purse out of a sow's ear?

Well my Eddie Ross $ store ornament wreath turned out kind of pretty. I loved all the ones I saw on so many blogs "around town." Still, this just doesn't really feel like me.
Door
And, my door is still ugly. Not much of a metamorphosis yet, however I am the only one on my floor to hang anything. And, this is my first year to decorate my door at all. Maybe others will follow suite? That could be a really nice change!

Remember those ice skates my Thrifting Fairy Godmother lead me to? Well, I had planned on hanging those on the front door. However, I didn't have a good spot for the wreath inside, so the skates came in and the wreath went out. I like the way they look hanging on my recycled drawer front coat rack. I spiffed them up with some new ribbon and a few picks from Joanne's. I had wanted a pale blue for the ribbons, but this is the blue color they had in the thin grosgrain. The skates are so heavy they really required strong ribbon. Now I love the bright color. Try as I might, I am not really a pastel kinda girl.
Christmas Skates
I think these will stay up all winter long.
Skates
That turquiose and red makes me happy!

Letters! I've got letters (of the abc kind) and for such a last minute idea they were a hot little contest with 65 comments! So thanks for your enthusiasm!


reelinitin said...


I can't seem to get my comment to post but these are so cute I am going to try one more time! holly hollydonahue at hotmail dotcom
Holly, persistence pays off!

I'll email you shortly. In other news, Thanksgiving was a lot of fun. We went to two different random collections of "orphaned friends" and had a great time. The rest of the weekend was a crafting Lollapolluza. So stay tuned!

I am sharing my door and my skates on Metamorphosis Monday!

Wednesday, November 25, 2009

Tuesday, November 24, 2009

Play Kitchen Build Along: Lesson 4 the Details

Here we are finally to the really fun stuff!

After you have painted and assembled your kitchen it's time to add the details. (This is also where I confess that I am a bit behind! I haven't painted the counter top yet. So these are old pictures.)

Stove Top

Burners- I trace a roll of masking tape and paint a silver or gray circle. Then I use bits of dowel painted black for the burners. This year I am using bits of chopsticks for the burners. I use Elmer's wood glue to secure the burners and then coat the counter and burners with several coats of low VOC varnish. The varnish is what makes the counter smooth, so be generous!

Other Burner Ideas:
Painted margarine lids
Modern Painted Cooktop
Wooden disks
How cute -dots!
CD's

Knobs
For the oven knobs I have used wooden wheels from Michaels, soda caps painted silver, and these things that go on the bottom of chairs.  I drill a hole into the counter top (tool free- use your nail to make a hole then remove the nail) and screw them in so that they are on tight but still have room to turn.

For the sink knobs I have used bits of dowel with a hole drilled, and wooden people shapes. I install these like the oven knobs, but I add a washer to help hold them up a little higher.

Faucet
In the past, I have screwed in the letter J by drilling holes in the counter and in the J. This can cause the J to crack, so from now on I am going to use Gorilla Glue instead. To "clamp" it down while it dries I will tape it in place until the glue dries.

Curtain-
Cut some dowel a bit longer than your opening this will be your curtain rod. Or use a small cafe curtain rod. Measure your opening and add a few inches to the length. This way you will have some gathering. You do not want to skirt too full or it will be hard for kids to open. Hem it up with either hem tape or by sewing. Or use fray check and don't worry about it! Then sew a tube and slide it onto the dowel (rod) and you are done. Screw the rod into the kitchen! If you don't sew, you can cut slits (like button holes) and thread the curtain onto the rod- similar to grommet curtains.

Chalkboard- I have always cut and used an old baking sheet. I got a bunch of them at a Craigslist curb alert and since I am all about using what I have, that is what I have used. I buy a cheap wooden frame at the dollar store and frame the metal. Then I paint it with primer and chalkboard paint and glue it on to the side of the kitchen. For the green kitchen I was tempted to leave the pan as is and paint it. I thought it would look really vintage to have the pan shape. And, now that I have learned about steel "roof flashing" at HD and may never cut another pan again. So easy!
Play Kitchen: for Church Fundraiser
This play kitchen had that great indented area and so I painted a chalkboard right on the side and called it a day. It's not magnetic, but it works.

Wow! So that was only four lessons! (Of course, I am not done yet, so I think it was wise to get a head start.) Was anyone so industrious that they are finished? Do you have any questions? I am so looking forward to seeing your finished kitchens! Please let me know so I can feature your finished results!


* If you make a play kitchen from this free tutorial, I'd really appreciate if you would add a picture to my Play Kitchen Build Along flickr group and link to this tutorial on your blog! Thanks!

Monday, November 23, 2009

Scrap Paper Doll Kits

This trash...
Scraps
made the scrap fabric alphabet I shared yesterday (with a giveaway)... and generated even smaller scraps which I  recycled into a little Hanukkah gift for my dear friend Bella.

Scrap Paper Dolls
Again this isn't an original idea, I was inspired by Carrie at This Mama Makes Stuff. I made my own paper doll templates so that I could have boys, girls, even a kitty and a pup.
Get my paper doll templates here.  I made about 5 copies of each paper doll on card stock. Then I bagged up those small scraps and some fancy bits and bobs.  I put everything in a gift bag and stapled a sample/ label to the bag.

This is going to be my go-to kiddie gift this Christmas. My "Florida Four" ages 4-7 are getting one too. I hope to find just the right box for theirs.

I'm linking up with Kim for Trash to Treasure.


Sunday, November 22, 2009

ABC...Easy as 3.5 Hours of Work

Look See


Scraps


Scraps to Gift


IMG_1591


Fabric Letters
This is not an origional idea. I got the idea from Chez Bebe although I did put my own spin on it.
Tips

1. I made the letters all lower case. Most kids have a lot of exposure to the capital letters. When I taught kindergarten it was the lower case letters that were hardest for the kids to master.

2. I used a solid color for the back. This will help kids to see which side (the pretty side) faces up and will help with reversals which are so common for little kids. Also, it makes it much easier on the eyes to cut them out with a high contrast thread on a solid back.
IMG_1594
3. I drew my letters free hand. I used Sharpie markers on the front for some and chalk on the dark back for the ones that are the same front and back. They are not at all perfect and I am just fine with that.

4. To save time I cut the scrap fabric, batting, and backing all at once, layered and pinned them together. This took an hour or maybe more because I linger over fabric. Then the next day I sat down with a movie (Bride Wars -meh) and happily sewed along. It took about 2-2.5 hours. This would be a great project to spread out since it's easy to pick up where you left off.

5. I didn't have magnets so I left them out. It's gonna be a frugal Christmas in these parts.

6. This is a gift for my sister-in-law who is far too busy (teaching kindergarten and working for a theater company) to read my blog. For that I am very thankful. It's nice to be able to share at least one gift here before the holidays! Anyway, since it's for her class I made a bunch of extra letters so the kids can make words.
My Little Side Table Ironing Station
Oh, and since I was humming right along here, I decided to make a set to give away!
Contest
Just leave a comment and I'll draw a winner on Sunday.
Bag for Fabric Alphabet Letters


Updated: See what I did with the little scraps leftover from this project here.

I am linking to Met. Monday. Be sure to visit over there for lots of other "Before and Afters."


Thursday, November 19, 2009

Christmas Idea: Cheater Water Color Portraits


This tutorial appeared last year on my teaching blog. Since I am taking a break with that blog, I thought I would update it and move it over here.

Last year at school for the Red Ribbon Week Door Contest I was inspired by a family portrait idea from Family Fun magazine. It was part of their frugal handmade gift ideas article. Their idea involved using vellum paper to trace a photo before painting it.  I came up with my own Cheater Self Portraits that used fewer supplies and worked out well for fourth graders with little experience with water colors. We won the contest which was bragging rights enough for me, but the Crayons were excited about the prize- a Battleship board game too.

Here's my tutorial for Watercolor (Cheater) Self Portraits:


Supplies:
drawing paper cut to 8.5" X 11"
water colors
a digital picture
a computer with internet access

1. Take a picture with your digital camera. I think a close up or a relatively simple scene would work best. (This picture is not of a student but, from an ad.)

2. Go to Picnik and upload the photo(s) for free! Choose their "create" menu and then scroll down the special effects until you find the one that is called "Pencil Sketch." Apply that effect to your picture.

3. Print the picture out on the drawing paper. (Any kind of drawing paper-thicker than photocopy paper.) At work I have access to a laser printer. At home I used an inkjet and I found worked well even with water colors. Just be sure to let the print out dry a bit before beginning.

4. Paint the picture with water colors. Nothing fancy here, you know -the kind that come in a thin tin at school.  Less is more. It's nice to let a little of the print come through. It makes the details like a nose, much easier.

I gave my students two copies so that they could practice controlling the paint and mixing colors. I had to help some with the eyes since the pictures were so small. I would go with a larger 5"X7" to make it easier, but I had to fit 25 portraits on my doors. It took two hour long sessions to complete.

 Water Color Girl
Here is one that I made for my colleague. It was pretty easy for me to do this in an hour or so. You can click on the picture to see it larger at Flickr. There you can see the printed details that show through. Nowadays with so much online photo sharing, it would be pretty easy to sneak and download a friend's picture and surprise them with a framed watercolor. For more frugal ideas, head over to the Shabby Nest's Frugal Friday. For more Christmas ideas, head on over to the Inspired Room.


Sizing Things Up

A few days ago the Play Kitchen Build Along was featured on Ohdeedoh. Pretty exciting.

I got one comment:

"I've been wanting a play kitchen for my son for about a year now (he's 2 1/2) - he loves his IKEA pot set &; helps me in the kitchen all the time. But we have NO ROOM for anything like the size of that oven in the photo. I saw a great idea to create a 2-burner "stove" by transforming a plastic storage container (his measuring cups/spoons &; pots can be stored inside and he can flip it over for a pretend stove). Great idea - fits our space and budget. Sorry, kid. When mommy gets the Viking, you can have a huge play stove. haha..."

Boy do I understand space constraints! My own kitchen is only about 7' X 3'. Space is a major factor in most decisions around here.I truly shudder to think where we will store toys when the day comes. Wouldn't it be sad if the kitchen maker's own kids had the shoe box kitchen? (Not a bad option for apartment dwellers!)
Simple Blue Kitchen
What's funny to me is that she called this play kitchen "huge." I guess it looks big in the picture, but my balcony is small. This end is only about 3.5' wide. Here is a shot that captures the real size of the balcony well.

In the Balcony Workshop
As you can see, my head is touching the sliding door. The other end of that board is sticking out through the railing. My work table is actually the play kitchen I am building and there is about 2 inches between the cabinet and the railing.

The reason I bring this up is-things in blogs are not always really as they seem. For example, that awkward pose that Cliff captured, makes my thigh look skinnier than it is in real life.

Just keeping it real.

Tuesday, November 17, 2009

Play Kitchen Build Along- Lesson 3- Assembly & Body Paint

Welcome back! I hope that these tutorials are user friendly and that you are encouraged!
This week, it's time to assemble and paint. I kind of did a little of both along the way.


First up the oven door:
Thought I Was Clever

I thought I was so clever clamping the door in place to easily drill holes and screw the hinges on. However, the hinges were too small for the shape of the drawer and it didn't have room to open!


The Oven
The flat edges of this drawer front and larger hinges made for an easy and smooth opening. So, larger hinges could have been a posible solution. However, I didn't feel like a trip to the hardware store, so I considered other options.

Predrilled For Hinges
In this picture you can see how the edge is sort of carved out. My solution was to cut a thin strip of wood the length of the oven opening (I angled the edges with my miter box and saw.) Attach the screws outside of the kitchen (much easier than trying to squeeze a screwdriver in a tight place) and then glue the strip to the front of the kitchen like this. Notice I left the hinges on.
New Hinge Set Up
I used Gorilla Glue and clamped it well and let me tell you, it's strong! As always, you can click on any picture to look at it larger in flickr. I recommend looking at the Play Kitchen Build Along flickr set because there are more notes with each picture. I also used a flat L bracket thing in the middle just for extra hold. You can see that in this picture. I don't think it was necessary, that Gorilla glue is strong!

Once I had this in place, I screwed the door on to make sure it worked before painting. I didn't take a before painting picture of it, but here it is painted.
Oven Hinges
You can see that the door doesn't open all the way flat. I am OK with that.
Inside the Oven
I never really liked was how the first pink kitchen oven opened. I was always a bit concerned that this door could bonk a child on the head. One kid opens the door and gets distracted while another kid is looking in the cubby below. Ouch! It hasn't happened, but it could. Note- now that I see this old picture, that door also has those carved out edges, but it has the bigger cabinet hinges that make it work.

If you are building your oven door from scratch, read the notes with this flickr picture.
Oven Door Construction
A good look at this picture shows how the door was made and atached.

Shelves
My top shelf had those gaps I talked about here. So I cut some wood strips to fit inside and Gorilla glued them in place. That's what is under the paint cans. If you click on this picture- there are notes about support L brackets too.
Cabinet on it's Side

Once I did that, I primed the whole thing. I hate crouching down to paint tiny areas. The balcony is a tiny area to begin with. So I primed and painted everything before I assembled anymore. This way I could turn the cabinet upside down to paint parts and on it's side to reach others.
All Primed!

It's much easier to paint the shelves before you put them in! Decide what color you want your oven and bottom shelf. Paint them up and then glue them in.
Painting the backer board
Here is a picture of the half painted backer board. I held it in place with one hand and reached through the sink to draw a line delinating the oven from the cupboard parts.

Back to installation-the front edge of the oven shelf will rest on the front crossbar left from the original dresser. The back needed supports and I used L brackets. First I screwed the bracket in place.
L Brackets to hold the shelves
Then I put a bit of tape to block the hole. My shelf material was too thin to screw into, so I used Gorilla glue again. The tape just blocked drips from falling on the wood below. Before it all dried, I removed the tape. Believe me once dried, that glue would hold the tape forever! It worked well, I put the shelf on top, weighed it down and removed the tape. I wiped the bottom of the bracket with a paper towel to remove any extra.

Weights for Gorilla Glued Shelves
The bottom shelf had front back and middle supports from the dresser construction, so it glued in easy peasy.

Now that it was painted I installed the oven door. (See above oven door picture.) I didn't have any trouble there. My extra edge plan worked beautifully. However, in spite of the extra leaning slant the door now has, it won't stay shut on it's own. In the past some ovens have just stayed shut because of their snug fit. I have also used claps to hold doors shut that came with the origional cabinet. For this oven I think I am going to use a strip of black velcro.

Back Splash
Vintage Play Kitchen
This backsplash was made from a scrap of plywood. I traced the edge of the kitchen counter to get the curvy line for the top. It is screwed into the top edge of the back.
Simple Blue Kitchen
For this kitchen I took a strip of 1"X3" wood and screwed it into the back.
For my current kitchen I am doing the same thing.
Bit of Futon Wood Recycled
This funky L shaped strip of wood came from my old futon. When it broke I dismantled it and saved the wood for other projects. In every case I try to reclaim scraps!

I plan to spray paint the counter with Rust-Oleaum American Accents Stone Spray Paint for a faux granite finish.

A couple of notes about this stone spray paint.
-I love it! It really looks like granite.
-Base color is really important.The wood must all match before applying that stone spray paint because the  white becomes the background color with the flecks of gray and black on top. The base color does show through!
- I use saran wrap to wrap and protect the whole cabinet body while I paint it on. I just wrap the whole thing up similar to the way moving companys wrap your sofa.
-Make sure to tape off the sink hole!
-Several light coats work best.
-It will take a full can to cover.

So, how is it going? As usual, please leave questions in the comments and I will update the posts with answers for everyone to see. Next week- the fun stuff- burners, knobs and assorted detail work.

Why I make play kitchens...
Introduction
Lesson 1
Lesson 2


* If you make a play kitchen from this free tutorial, I'd really appreciate if you would add a picture to my Play Kitchen Build Along flickr group and link to this tutorial on your blog! Thanks!

Sunday, November 15, 2009

Looking for a Jacqueline


I was at Goodwill the otherday when they announced that all children's clothing was going on sale for $0.99. I went looking for a few t-shirts for this project. This is what I found. It so reminded me of my friend Viv's little girl. Viv's daughter spends her summers at the Jersey Shore and she is a real girly girl. I haven't seen her in many years, but I figured if the size four was too small, I would cut the shoulder seams and add wide ribbon ties to make it work. I just knew Jacqueline would love the flip flops. And, I am sure she would have if she wasn't Jacklyn. Dang!


I seemed to remember something about her daddy saying, ""Jacqueline reminded him of girls who wouldn't date him in high school" when they were picking names. I totally had doubts buying it, but just couldn't leave it at the store. It is absolutely pristine white soft terry cloth. Not a speck of stain anywhere. Jacqueline, much like Viv's Jacklyn, obviously didn't like getting messy. Which makes it all the more perfect for her. Double dang!

I thought of making some sort of sand patch to go over the name, but have instead decided to offer it up here.

Do you know a Jacquline who is a size 3 who can wear this next summer?

Just email me at janeclifflittle at yahoo dot com and I will send it to on. This adorable beach cover up deserves some love.

Tuesday, November 10, 2009

Play Kitchen Build Along: Lesson 2 Demo, Shelves & Oven Door, Backsplash & Sink (Tools Version)

If you are interested in the no tool transformation, you will do considerably less demolition. I will have a separate post below this one for you. It's too confusing to try to mix tutorials. However, I do recommend reading both because a hybrid of the two ways may be best for you.

Demo & Cleaning

My Nightstand to Play Kitchen
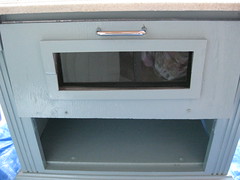
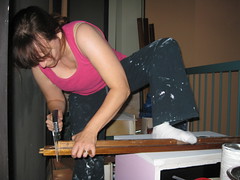
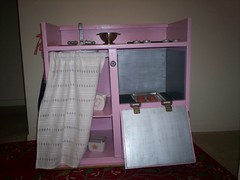
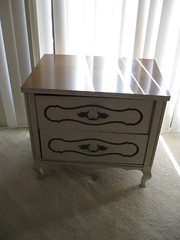
This is my current nightstand.
First up, take out the drawers and set them aside.If you have doors remove those and set them aside as well. It is just easier to build the shelves when you have it all open for an easy in and out.
Drawers Removed
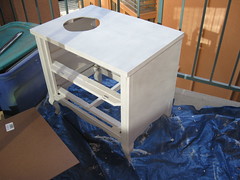
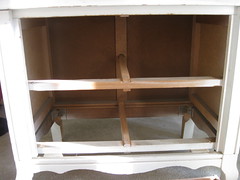
This is the view from the front with the drawers removed.
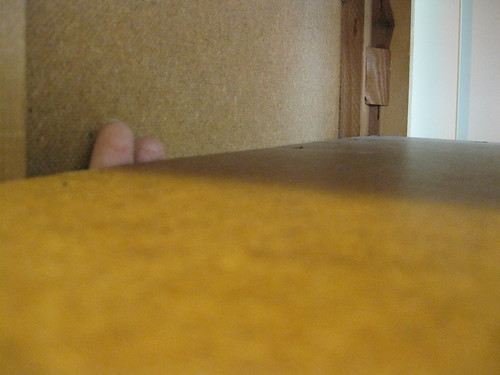
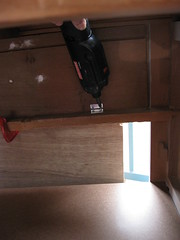
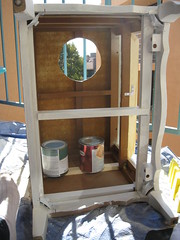
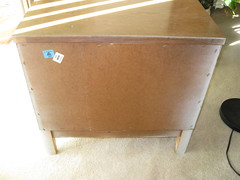
This is the back and this is where we will start with the "demolition."
Nightstand Back

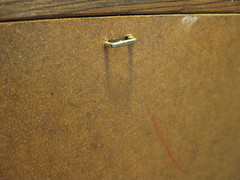
I believe that this soft particle board type wood is called hardboard or sometimes fiberboard. It's very smooth on one side and has a rough texture on the other. Time and neglect can make this board crumble, so removing the staples or the finish nails carefully is important. Loose staples are good, just slip a screw driver in there and pry them out. We want to save this board to reuse at the end.
Loose Staples are Good

Tight staples are much harder. You may have to use your screwdriver to pry the actual wood away. This makes holes. We can fill those later, but it's nice not to have to.
Screw Driver to Pry

As you can see, I had a hard time removing my board. I actually wonder if it had either was glued, painted or rotted on. Large chunks broke off. Fortunately, this is the back. Wood filler, primer, paint and eventually a wall will all cover this up.
Board Removed
I keep a small bowl handy to collect the staples as I remove them. These things are dangerous.

Next up, cleaning! Now is the time to vacuum and scrub your cabinet. During this project you will learn a great deal about how these kinds of cabinets are made. You will also learn about people's gum disposal habits, the critters that live in neglected and unloved furniture, and often popular stickers of the early '80's. Also, if you have any loose parts in need of some Gorilla Glue as I did, now is the time to shore things up.

Next up, shelf talk.
 
In the above picture you can see a vertical piece in the middle of the back. I took that out. It was cracked and crumbly and of no need.
View From the Back Looking Forward
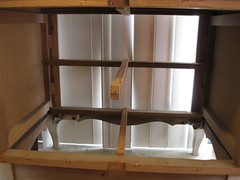
This view is looking forward from the back. There are two supports going across the middle that used to hold the drawers. The top one is in my way, so I yanked on it, twisting slightly to loosen it. Then I pryed it off with my screwdriver. This piece was higher than the front horizontal bar which will hold the shelve and the oven door. It would have kept my shelf from laying flat.

Measuring for the shelf
The Shelves
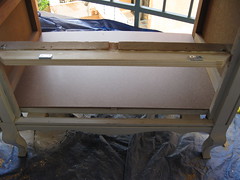
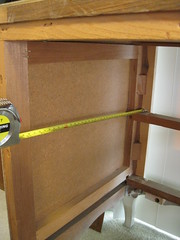
OK, so now it's time to talk about measuring for the plywood, particle board, (or even cardboard shelves*) you will buy and get cut at your local hardware store. Both Lowes and HD will cut the boards to measure if you buy them at their stores. Here I am measuring from front to back along the side.I will also measure the opening across the back.

There is another consideration here. Many cabinets I have used have this similar framing. They use 2"X1" boards to create a frame and then cover the frame with thin board.

Mind the Gap
This is the gap that comes from the way the cabinet is framed. If you do not mind the gap, measure your length and width and get boards cut for that. I have always felt that ovens should be airtight. I know that's picky for a kiddy oven, but the gap bugs me. I assure you no child would care!No Gap
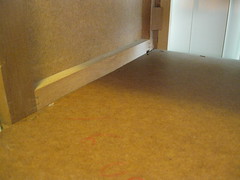
But if you are like me, you can have a bit of 2"X 1" cut to fit in there too. So if you need to, measure for that. This takes care of the gap!

I had two shelves cut and I will bought a scrap of 1" x 2" board like this to fill that gap and possibly provide extra support elsewhere if needed. I got just enough for $0.50 at the HD scrap section. I didn't even know there was such a thing until I was waiting for the guy to cut my boards. People were coming up to him with random wood and saying, "Fifty cents?" He would then spray a dash of green spray paint on their board to alert the clerks. Needless to say, I was all over that! I got some great scrap wood for all sorts of projects.

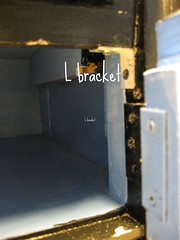
I will also need some "L" brackets because I have no supports in the back to hold the back of the top shelf up. I can pick those up at the hardware store easily.

Installing the shelves is not that hard, but I usually hold off and paint them first. That way I don't have to contort myself as much getting down into the bottom half and such. I will discuss that next week when we do a rough build to make sure everything fits before painting.

* If you are really on a tight budget, I see no reason why you couldn't get some large cardboard boxes and glue two layers of cardboard together. I would use a generous amount of  regular white glue. You could trim the edge with clear packing tape or duct tape to make it smooth and then spray paint it all the color you want. I think it would be strong enough for play. Just a thought.


Updated: Tara asks a question in the comments about using the wood from the bottom of the drawer for the shelf. I am all for reusing the original wood and saving $! In the past, I have not been able to use the drawer bottom because it has been too difficult to neatly remove it from the drawer sides. Often it is glued in there. Or it has been a smidge too small to fit. By all means, if you can get it out neatly and it covers enough to be a shelf-use it!
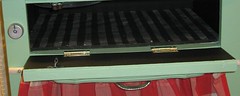


The Oven Door

A Couple of Options
Plans for the Oven Door
1. I almost always use one of the drawer fronts for my oven door. It's very economical and it's already sized to fit. Sometimes I have had to saw the front off  and then yank out the bits of wood left over. But, most of the time, I can use my hamer to bang on the sides until they become loose and I can pry it all apart.
This drawer practically fell apart on me.
Drawer Front Removed

I removed the fancy handle and will replace it with a more oven friendly handle.
Filling the Holes

I taped the holes on the back and used Elmers wood filler to fill in the holes from the front.

What if you don't like the drawer style?
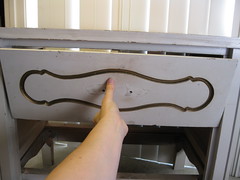
This kitchen was built in a different manor, however, I used one bottom door to make the oven door. I didn't like the formal carving, so I had Lowes cut a thin board to cover it up and I glued that on top of the door.

The other option is to have some plywood cut. This can be done when you buy the shelves. I did this for the blue kitchen since I wanted to save the drawer fronts for another project. Or maybe they were too hard to remove, I can't remember now.

Oven Door Construction

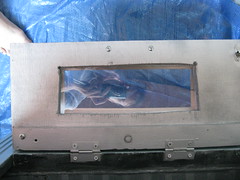
Since I was having wood cut anyway, I went ahead and had two pieces cut. I then used my drill and saw to cut a window in both pieces. (It's very homespun.)I sandwiched a bit of old plastic from a poster frame in between the layers.I also added a length of 1" X 2" board to create depth for the hinges to attach. Then I used a dollar store picture frame to trim it out. At the time, I did not have a miter saw. So I cut the dollar store frame in the middles so that it would be to size. I glued it on and sanded the uneven parts down. Again, it's very homespun looking on the inside, but the outside looks good.

Oven Window

And, now that I think of it, you could always make the oven door out of cardboard. A few layers thick should do really well and would be especially light weight for kids. Options people! I am all about options!
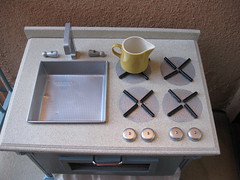

The Sink Hole
Make A Pattern for the Sink Hole
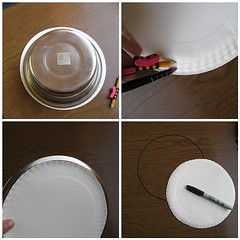
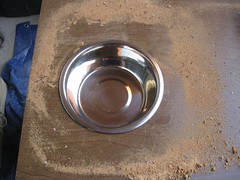
First up, you need a bowl with a good lip all around the edge.
I have measured these bowls in so many ways, but this way worked great and it's what I did this week.
First I traced the top of the bowl onto a paper plate. (It was handy, any paper would do.)
Then I used my compass to mark an even 1/2" trim and cut out the smaller circle. Next, I checked to make sure it fit well into the inside of the bowl. Then I traced it right onto the "counter top" with a sharpie.

Cutting the Sink Hole

Before I Had  A Saw...
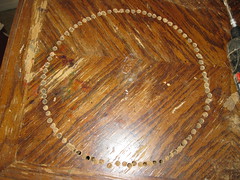
Before I had a jigsaw, I made two play kitchens using a drill to make smaller and smaller holes around the circle I marked. Then I used my hammer and a flat screw driver to tap the in between parts like a beaver until the circle of wood came out. It works. I did it twice. The chewed up edges are safely covered by the rim of the bowl. Still, I am not sure why I didn't just ask our building maintenance guy to give me a hand? I am sure he has a jigsaw. Guess I'm just a do it yourself-er and I made do. And so can you if need be.

Then when I realized I was in the "business" of making play kitchens, I invested in a jig saw. I have used it to make many things since then and I am glad I have it. To get the blade into the circle you have to cut a pilot hole. I used my drill to make a few holes next to each other so the blade would fit.

This year, my drill bits were breaking and in need of replacement. When I went to the store I found this type of drill bit that makes a big hole. I bought it and it's made a big difference in how quickly I can get the job done. This is important to me and my neighbors who are just feet away from all the noise.


Pilot Hole

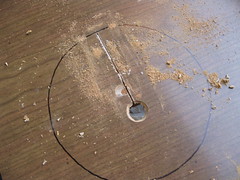
From the pilot hole, I cut lines that make "pie slices" for a lack of a better word. Eventually, I can curve the blade around (well within the circle- you can always cut more, hard (but not impossible) to put back.
Cutting the Hole

The Bowl Fits!
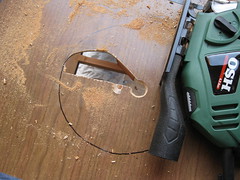
I try to really take my time and go slow here, and before long- the bowl is in!

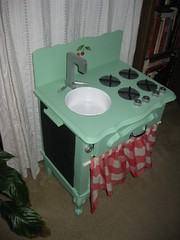
The Backsplash- Two Ways
1. For the green kitchen, I had leftover plywood from the shelves. I actually took the board and held it under the curve of the counter top and traced the fancy counter top. Then I cut along that curve and later screwed the board to the back of the kitchen for a backsplash.
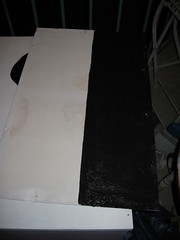
2, For the blue and black kitchens, I used a 1"X 2" board that was the same length of the counter to make a low backsplash.

For this kitchen, I found a great scrap at the HD scrap pile and I am going to do a mid height, rectangle with just rounded corners for the backsplash.

OK, so that was a lot! As always, the photos can be enlarged by clicking on them. There are additional photos and notes on flickr. Leave any questions you have in the comments and I will address them for everyone to learn from.

Tool Free Options Here


Lesson 1 -Supplies
Why I make the play kichens -here


* If you make a play kitchen from this free tutorial, I'd really appreciate if you would add a picture to my Play Kitchen Build Along flickr group and link to this tutorial on your blog! Thanks!