I haven't been too crafty this pregnancy. Maybe making a person takes all the creative energy I have? Mostly I "pin" all the things I'd like to make.
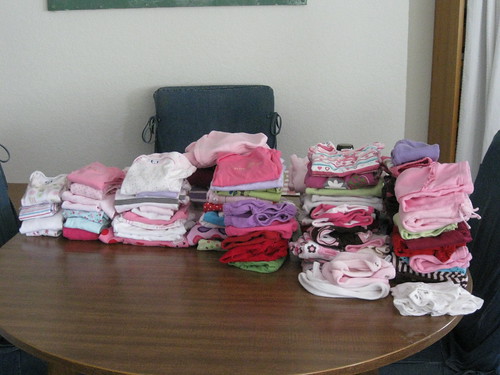
Recently, this donation of newborn clothing from one of my former colleagues forced me to take baby storage seriously. Holy onesies Bat Girl! Just in time, the CSI girls announced their closet makeover challenge and that motivated me to put some fun in functional.
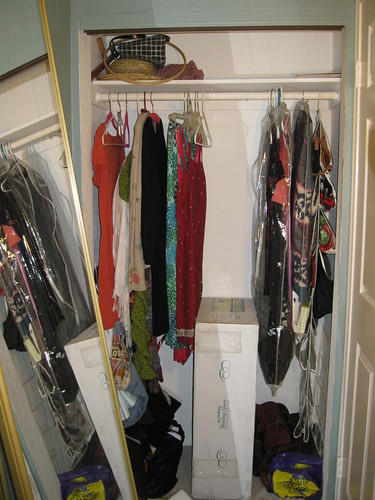
Before....
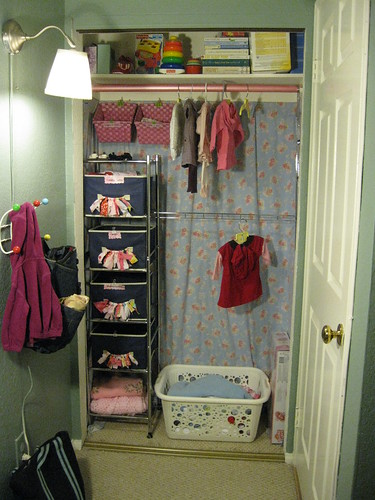
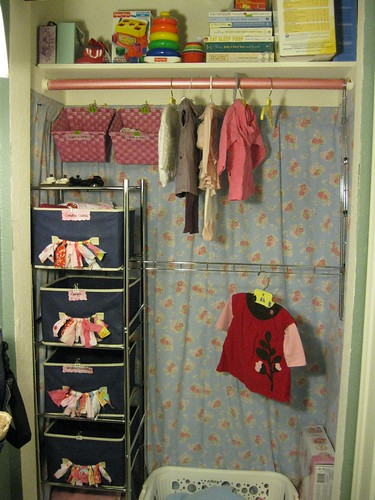
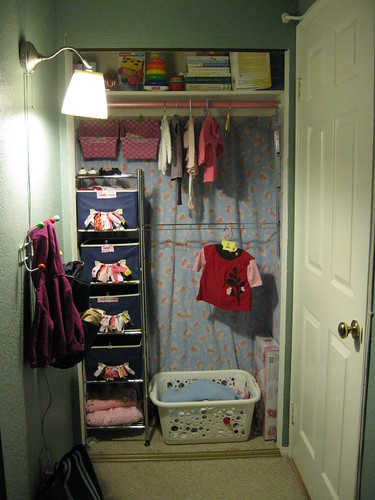
After!
We have decided to have our wee one sleep in our room for the first 6 months or more. We have a lot of out of town family coming to help us. So, maintaining the guest room for their visits seemed wise. Fortunately for us, we have a large master bedroom/bath with a big nook in the front of the room. It even has it's own little closet!
After I removed the ill fitting mirrored doors, I cleaned out the whole closet. My wedding dress preserved in that big box will go under the bed my dad made. My good dresses have been stashed in Cliff's closet for now. Most of those shoes and purses will get donated. Sadly, my feet are growing and the boots barely fit. Sigh. At the end of the day, it wasn't too hard to give up this closet for a while.
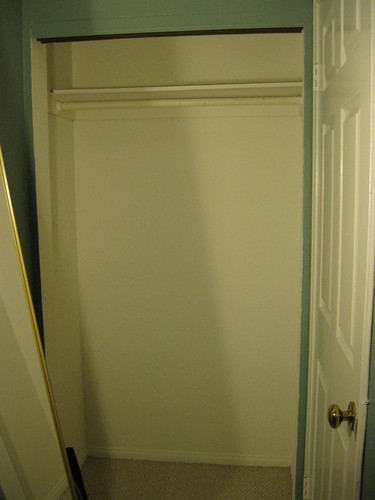
Here you can see the closet empty. There are a few issues. First off, it's directly behind our bedroom door and not three feet to the other side is a wall. It's an awkward spot. To get into the closet you have to close the bedroom door completely. Also, it's a very dark spot as you can see in these pictures.
I briefly considered a curtain door, but decided to leave the whole closet open for ease of use. Also, I want to look at all those beautiful baby things. They are so sweet and so many were gifts from friends who share in our joy. Actually, there is nothing about this time that I want to hide behind a curtain. I want to savor it all. Since it would be visible, I wanted to make it cheery. To make temporary "wallpaper" I hung a favorite sheet that I had been saving for just the right project.
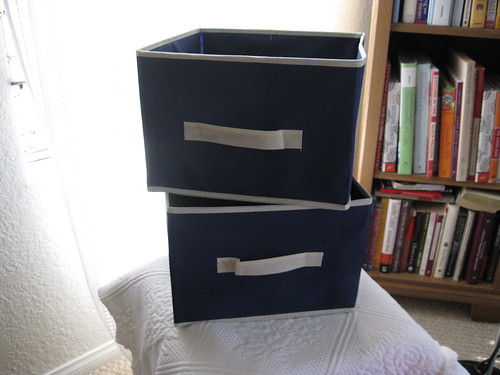
The metal shelf was a hard worker in our pantry at the old apartment. After we moved it became semi-retired in Cliff's closet holding a baseball cap, a gym bag, and a pair of shoes. I knew I could do better, so I recommissioned the shelf here. Lucky for me, the 99 Cents Only store had these nice collapsible fabric bins. I had seen similar bins at Target and K-Mart for nearly $8! Score!
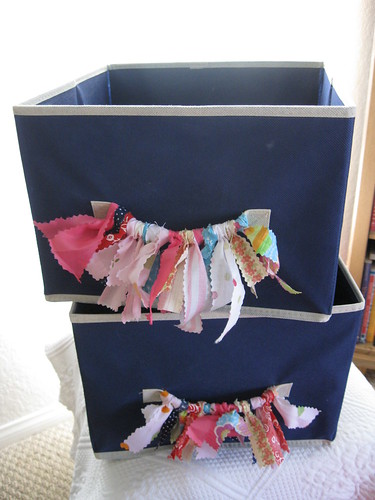
The thing about dollar store purchases is limited selection. In the size I wanted, navy blue was the take-or-leave-it color. While navy probably wouldn't have been my first choice, I do like navy and pink together. I simply looped fabric scraps to make these girly pulls.
I really like the effect.
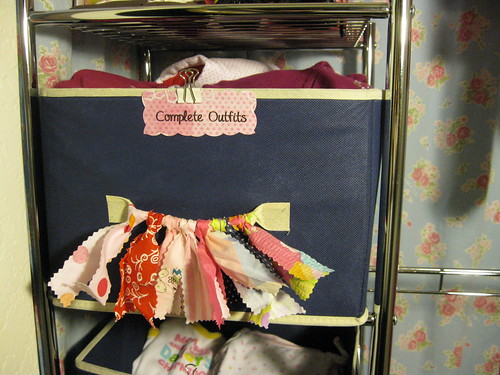
The labels are scrapbook paper with a bit of clear contact paper. Easy enough to change as Baby Girl's wardrobe progresses from mostly onesies to more variety.
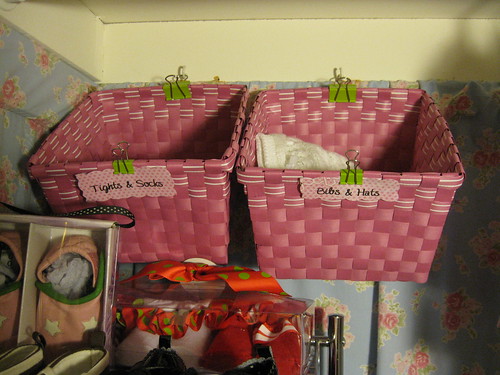
Also from 99 Cents Only were these two pink baskets. I hung them with cup hooks and clips so that they would be angled down slightly. I really do love binder clips!
Another simple project was to make closet dividers out of old CD's. This worked well for me because the closet rod was so tight to the shelf. As soon as we get more clothes, I will be able to add them in an organized way right from the start.
Looking at the picture above became a total "If You Give a Mouse a Cookie" situation. My other improvements made the scuffed up clothes bar look dingy and worn. So I had to paint it. I had to paint it pink.

Much sweeter!
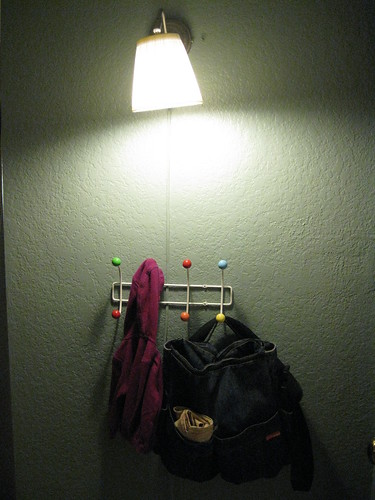
Since this is a temporary living arrangement, I really wanted to "shop" our apartment as much as possible. I had this little lamp from the old apartment and it's perfect in this area. I painted the cord to match our walls. I really like that it is a low watt light. This area is bright enough without being too harsh.
I also dug up this Eames knock off coat rack that I made several years ago. I love those cheery little knobs!
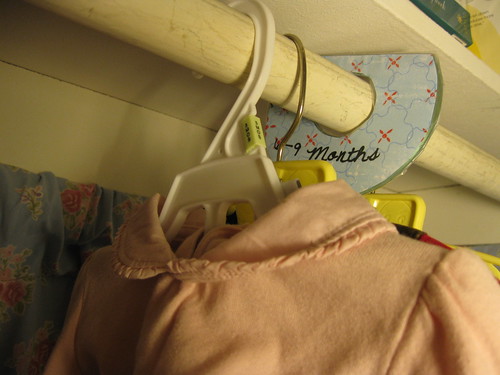
I wanted to have room to grow in this little closet, so I bought a great little closet bar doubler. For under $10 I think it is a great product. In this set up, the bar rests nicely on the metal shelf unit, but in another closet I can hang both sides to double the hanging space. It's perfect because baby clothes are so little.
By shopping my home and getting lucky with a few dollar store baskets I was able to create a sweet little closet for our wee one for about $15! That's pretty frugal by nursery standards!
Thank you CSI ladies for inspiring me to finish this task! I am also linking up with another favorite "Frugal Friday" at the Shabby Nest.


Recently, this donation of newborn clothing from one of my former colleagues forced me to take baby storage seriously. Holy onesies Bat Girl! Just in time, the CSI girls announced their closet makeover challenge and that motivated me to put some fun in functional.
Before....
After!
We have decided to have our wee one sleep in our room for the first 6 months or more. We have a lot of out of town family coming to help us. So, maintaining the guest room for their visits seemed wise. Fortunately for us, we have a large master bedroom/bath with a big nook in the front of the room. It even has it's own little closet!
After I removed the ill fitting mirrored doors, I cleaned out the whole closet. My wedding dress preserved in that big box will go under the bed my dad made. My good dresses have been stashed in Cliff's closet for now. Most of those shoes and purses will get donated. Sadly, my feet are growing and the boots barely fit. Sigh. At the end of the day, it wasn't too hard to give up this closet for a while.
Here you can see the closet empty. There are a few issues. First off, it's directly behind our bedroom door and not three feet to the other side is a wall. It's an awkward spot. To get into the closet you have to close the bedroom door completely. Also, it's a very dark spot as you can see in these pictures.
I briefly considered a curtain door, but decided to leave the whole closet open for ease of use. Also, I want to look at all those beautiful baby things. They are so sweet and so many were gifts from friends who share in our joy. Actually, there is nothing about this time that I want to hide behind a curtain. I want to savor it all. Since it would be visible, I wanted to make it cheery. To make temporary "wallpaper" I hung a favorite sheet that I had been saving for just the right project.
The metal shelf was a hard worker in our pantry at the old apartment. After we moved it became semi-retired in Cliff's closet holding a baseball cap, a gym bag, and a pair of shoes. I knew I could do better, so I recommissioned the shelf here. Lucky for me, the 99 Cents Only store had these nice collapsible fabric bins. I had seen similar bins at Target and K-Mart for nearly $8! Score!
The thing about dollar store purchases is limited selection. In the size I wanted, navy blue was the take-or-leave-it color. While navy probably wouldn't have been my first choice, I do like navy and pink together. I simply looped fabric scraps to make these girly pulls.
I really like the effect.
The labels are scrapbook paper with a bit of clear contact paper. Easy enough to change as Baby Girl's wardrobe progresses from mostly onesies to more variety.
Also from 99 Cents Only were these two pink baskets. I hung them with cup hooks and clips so that they would be angled down slightly. I really do love binder clips!
Another simple project was to make closet dividers out of old CD's. This worked well for me because the closet rod was so tight to the shelf. As soon as we get more clothes, I will be able to add them in an organized way right from the start.
Looking at the picture above became a total "If You Give a Mouse a Cookie" situation. My other improvements made the scuffed up clothes bar look dingy and worn. So I had to paint it. I had to paint it pink.
Much sweeter!
Since this is a temporary living arrangement, I really wanted to "shop" our apartment as much as possible. I had this little lamp from the old apartment and it's perfect in this area. I painted the cord to match our walls. I really like that it is a low watt light. This area is bright enough without being too harsh.
I also dug up this Eames knock off coat rack that I made several years ago. I love those cheery little knobs!
I wanted to have room to grow in this little closet, so I bought a great little closet bar doubler. For under $10 I think it is a great product. In this set up, the bar rests nicely on the metal shelf unit, but in another closet I can hang both sides to double the hanging space. It's perfect because baby clothes are so little.
By shopping my home and getting lucky with a few dollar store baskets I was able to create a sweet little closet for our wee one for about $15! That's pretty frugal by nursery standards!
Thank you CSI ladies for inspiring me to finish this task! I am also linking up with another favorite "Frugal Friday" at the Shabby Nest.
And, last but not least...