Showing posts with label Stash Buster. Show all posts

Friday, April 16, 2010

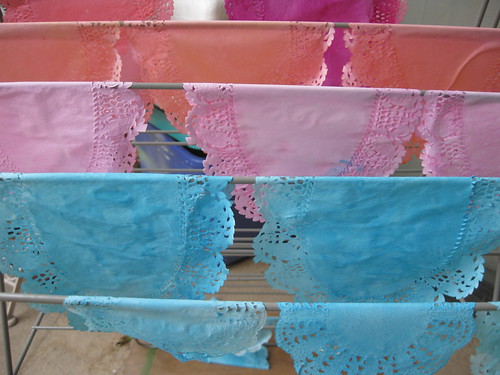
WIP: Doily Garland

Dying Doiles

Updated:
Tried dying with food color...messy! Switched to painting with kids water color set. Ah! Much better.

Wednesday, April 14, 2010

WIP: Road Trip Bag- Help Me Out Ladies!

Last Christmas I got the book Stitched In Time by Alicia Paulson.  I *love* this book. Really and truly. I could move into this book. It's so sweet, and cozy and sentimental.
IMG_2517
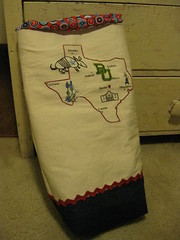
The Road Trip bag captured my imagination right away. I love how the floral lining peeks out. I love the simple leather straps. I love it all. My mom and my aunt make an annual pilgrimage to the famed Round Top Antiques and Flea Market in Texas and I just knew my aunt would love a Texas road trip bag. I mean what Texan doesn't love to flaunt their state?

To add my own flair, I lovingly created a tablecloth inspired map of Texas and embroidered it. Then I sewed it into the dimensions of the bag as directed by the pattern. My pathetic spacial skills did not alert me along the way, so I was quite surprised to discover what a narrow little bag this is.
Road Trip Bag take one

Oh, sure the book completely tells the finished dimensions of 10 1/2" X 15 3/4".
The picture shows the magazine sticking out with just a bit of space on the side.
And really, how big can a bag with such sweet leather straps really be?

But, all those clues meant nothing to me until I went to sew the lining in and felt how narrow it was. I imagined trying to dig out sunglasses or a ringing cell phone at the bottom when it's such a tight fit. It's certainly not a rummage through bag.

I'm so sad to say it feels wrong to me. I know bags are such a personal thing. I guess I just tend to like a roomier bag being a pack rat and all. So, I am back to the drawing board.

I have thought of two remedies...let me know what you think.

Choice A: Take out the side seam on the canvas part and add side gusset. This would make the top roomier without having to redo the whole thing.

Choice B:  Cut out the Texas and make it into a patch on another bag altogether. I don't have enough canvas to remake the bag as is. I could fringe the edges of the patch. It could be cute.


In the meantime, here is an awesome take on the road trip bag (also modified to another size) on flickr.

Sunday, April 11, 2010

Martha's Sewing Encyclopedia: Bib Pattern & Book Report

My mother-in-law used to give handmade baby bibs as a new baby gift. She bought them at a certain craft fair for years, but now this particular seller is no longer there. For a while now, she has been trying to persuade me to make and sell bibs.
 Cupcake Bib
I have no interest in making anything to sell, really. For one thing, my full time job keeps me plenty busy. Also, I have rights at work that sometimes I ignore all together at home. For example, I get a state mandated 20 minute break everyday. Whilst crafting, I often work for hours without a break!
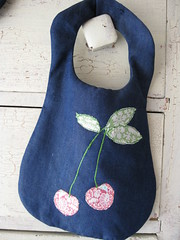
Cherries Bib
Anyway, my mother-in-law is incredibly good to me, so I decided to surprise her with a trio of bibs that she can gift at any of the dozens of showers she goes to.
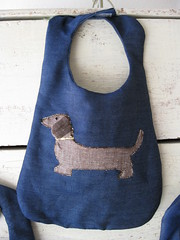
Dog  Bib
It was my first project from my new Martha Stewart Encyclopedia of  Sewing and Fabric Crafts.


This bib is from the Oilcloth Bib pattern in the book. It has an additional crumb catcher pocket- which would be awesome if I had oilcloth. I printed out the pattern from the enclosed CD. (The shape of the bib is the same as this pattern from her website.) I used lightweight denim and quilt batting from my stash. The bibs my mother-in-law used to buy were gingham, but I am a denim gal and I am also Stash Busting this month. It's not as sweet as pastel gingham, but maybe it's more forgiving of stains?

The pattern calls for snaps, but I have only Velcro in my stash, so Velcro it was! I used an Ellison Press cutout from school as the pattern for the cupcake, a Google image for the dog, and I free handed the cherries.

Over all, a very easy pattern to make. The first bib took about a bit longer but the rest took maybe 20 minutes or one episode of  Modern Family on Hulu.
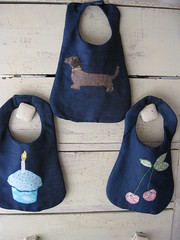
Trio of Bibs
Now for the book report...
I read the Martha Encyclopedia of  Sewing Crafts. It is a really great book...with some limitations.

The Pros:
Photography- This book is detailed and gorgeous. Lots of pictures illustrate the tiny details of sewing. I hope to study the pictures to help my own photography skills.
Tutorials- Martha is the master! There are very detailed and well written insturctions.
Background info- This is truly a sewing encyclopedia with glossaries and resource pages galore.
The enclosed CD makes printing out patters very easy. The enlargement is done for you! The patterns on the website require you to enlarge them. Not a big deal, just more time consuming.
Inspirational- there are some techniques covered that I would like to try-such as dying fabric.

Cons:
-Most of the projects (or something very similar) are on her website already. 
-Many more projects are inspired by bloggers who I have been reading for years. For example, stuffed animals from felted sweaters- hello Betz White!
- Martha is a business woman- this book is not about using what you have! I have a list of craft supplies as long as my arm that this book makes me want to buy!

This would be the perfect book for a beginning sewer because it really will "grow" with you.  I like the informational sections more than the patterns and tutorials. Tutorials are available on the web a plenty. What Martha does is give detailed instructions on the "right way" to do something. She really does educate the reader about fabric choices, tools, stitches etc. This really is a full text of everything from curtains, to blankets, gifts and quilts. I would never want to choose only one craft book, but you could have just this book and sew for the rest of your life. It is very complete. Makes me want to get the other Crafts encyclopedia too.
Monday, April 5, 2010

Juice Glass Mini Cloche


Juice Glass Cloche
I can't remember where I saw the first homemade cloche, but it went to the top of my "to do" list. I scoured thrift stores for a cheese plate I could use. Nothing. I looked at every bowl and vase for the right proportions. I wanted a rounded shape with a little bottom-to-be-top. Finally, about a year later, at the 99 Cents Only store,  I spotted an adorable rounded juice glass with a tiny bottom. A mini cloche it would be.

Napkin Ring Nest
To give you an idea of the scale, the base is an old coaster.

It took me a while to decide what to put inside the cloche. Then I remembered the grape vine wreath napkin rings my mom sent me when she was de-cluttering her own stash. The knob is from my mom's friend who de-cluttered her house by sending me a bag of those knobs. (Ahh! I love being the recipient of all this cool stuff.) I spray painted and Gorilla glued the knob to the bottom of the juice glass. Easy peasy!

 Anyway, I added some shredded textbook, moss and a few clay eggs. The tag uses this terrific image from the Graphics Fairy. I couldn't believe how nice this image printed out even at a fraction of the original size.

I think it came out swell and I am jonesing to go back to the 99 Cents Only store and get a few more glasses! I won't - I promise! Nevertheless, I have more wreath napkin rings, knobs, paint, glue, moss and ribbon. And with friends and family like mine, it's gonna be a while before this stash is busted! May 1st- those juice glasses are mine!

I am linking this to Brag Monday at the Graphics Fairy.

and


DIY Day @ ASPTL

 DIY Day.

Hope you are having a great week!