Tuesday, January 31, 2012

For the Love of a Mobile

Marilee is at the stage where she will look at a mobile for a good 10 to 15 minutes. In my world that is a lifetime! Naturally we want to have mobiles all over the house. We were gifted a crib mobile with a music box, so we moved this mobile to over her changing area.

IMG_3557
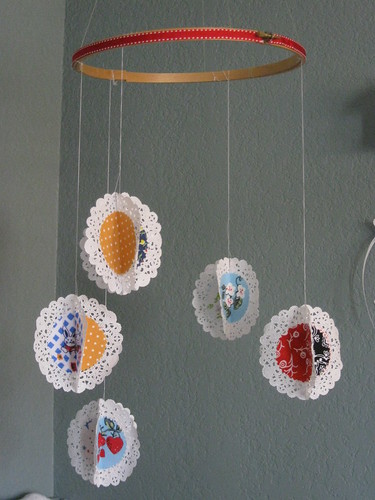
I saw this idea first on Pinterest and wrote about making one here. It's terrific because the breeze from our heater makes it move and twirl quite a bit.

Recently we set up a pack and play in the office and I wanted to add a mobile in there as well.
Mobile Supplies
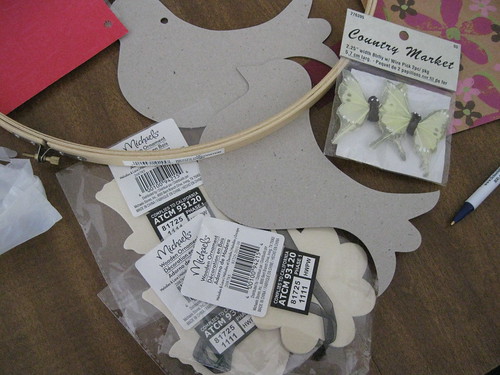
The Michaels dollar aisle yeilded some cardboard birds and some assorted wooden shapes. Then this Sunday we were given a present with such beautiful wrapping paper I was completely inspired.Mobile 3
Mobile 2
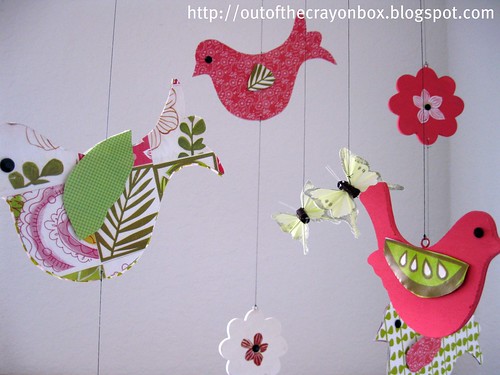
A little Modge Podge, paint and wrapping paper and we were in business. I do plan on adding some ribbon to the embroidery hoop as in the mobile above, but otherwise I am quite pleased. Most of this was done while nursing so that alone is an accomplishment!

I go back to work tomorrow and I am feeling pretty good about it. Cliff is going to be the modern stay at home dad and I think he is looking forward to that new job too.  Mostly, I feel incredibly blessed to have a good job in this economy and a sweet family to come home to.

Saturday, January 28, 2012

Here is the last of my Picnik projects.  Remember they are closing down the site on April 19.
This is a repost from February 2010.

Google Eye Valentines from Family Fun
Family Fun Magazine has the best ideas! This month two ideas for Valentines grabbed my attention. The Google Eye Valentines and the scratch off Valentines.

Valentines for My Students

Since both ideas were stellar, I decided to combine them and do both.

I took a close up picture and edited it in Picnik. In Picnik I added a Valentines boarder and "sticker" with text. The text on the heart has pun filled messages such as "Eye think your great!" Puns are so great for my English language learners.  Then I had the photos printed at Walgreens. Next, I covered the heart "sticker" with clear contact paper and silver metalic craft paint mixed with a dab of soap. The easiest part was adding the google eyes. I got these great stick on google eyes at Michaels. They came in assorted sizes which just makes everything even sillier.

"Eye" think they will be a hit with my pupils.

Update: Yes, they were a hit. In fact some of the students kept them in their pencil boxes. I think as teachers we sometimes forget to be silly with our students. They really do love it.


Friday, January 27, 2012

Favorite Picnik Projects Before They Close


This week I am going to repost some of my favorite projects using Picnik. I believe their last day is April 19. There is time to make any number of projects if you don't delay.

Anyway, this post actually comes from my old school blog, My Many Colored Crayons. This was one of my favorite projects ever. Enjoy!

Sky Blue's PortraitRed Ribbon Week Door Contest
Portrait of a Drug Free Future!
It's Red Ribbon Week at OFS and this year we are celebrating with a door decorating contest. I have a slight problem with bragging about the Crayons and today is no exception. Check out this door!! See our Red Ribbon bracelets? The little "red ribbons" contain student writing on why they pledge to be drug free. I think it has a good chance at winning!

And, I really want to win which is silly since the prize hasn't even been announced.

I was inspired by a portrait project in this month's Family Fun magazine which unfortunately is not linked yet. However, their project had multiple
steps and involved acrylic paint. It just seemed a bit complicated when multiplied by 25 students. Last week was the Hispanic Heritage Month Dance. This week is the book fair and OCR testing, so teaching them how to draw a self portrait was out of the question.
Goldenrod's PortraitRose's PortraitSpruce Green's Portrait

My version of Cheater Self Portraits used few supplies and worked out well for fourth graders with little experience with water colors.

Here's our tutorial for Watercolor (Cheater) Self Portraits:


Supplies:
drawing paper cut to 8.5" X 11"
water colors
a digital picture
a computer with internet access

1. Take a picture with your digital camera. I think a close up or a relatively simple scene would work best.
(This picture is not of a student but, from an ad.)

2. Go to Picnik and upload the photo(s) for free! Choose their
"create" menu and then scroll down the special effects until you find the one that is called "Pencil Sketch." Apply that effect to your picture.

3. Print the picture out on the drawing paper. At work I have access to a laser printer. At home I used an inkjet and I found worked well even with water colors.

4. Paint the picture with water colors. Less is more. It's nice to let a little of the print come through. It makes the details like a nose, much easier.
I gave my students two copies so that they could practice controlling the paint and mixing colors. I am pleased with the outcome. It took two hour long sessions to complete.

Update: That was the post from way back in 2009. Naturally, we did win the door contest and the prize was a new Connect Four game. Sweet! Later I went on to make another watercolor of my colleague's daughter. I thought it came out super cute.

Water Color Girl

I had always planned on making several others as Christmas gifts for various people. And, of course, now I want one of my own kiddo. I wonder how many I can get done between now and April 19?

Thursday, January 26, 2012

Custom Kleenex Boxes

tissue box design
I may have the most photographed baby in the world. At least up until 2 1/2 months that is. Once I return to work next week, I doubt I will be playing photo studio quite so much.

Anyway, last year I signed up for some special promotion whereby Kleenex would sending free tissues to a friend.  I like mail and I thought that would be a sweet surprise for a friend so I joined in. Since then, I get Kleenex promotional emails. Most I delete without a glance. However, I happened to open an email telling about making custom tissue boxes. Goodness what a sucker I am!

$5.99 for the custom tissue box and another $5 for shipping. Friends, I just spent $20 on Kleenex! These special tissue boxes will be delivered to the Grandparents. Hopefully in time for Valentines Day. Come to think of it, I didn't even look at how long they took to make and ship! Watch, it's six weeks or something! Oh well. Both our parents waited a long time to become grandparents. I guess their noses deserve some special treatment.

Since my husband and I both love a good pun, the pink heart reads, "I 'tissue' were here!"

Speaking of Kleenex, (and who knew there was so much to say?) have you tried the new cooling Kleenex?
I saw a supermarket display of these with a free sample. My friends they are actually cold. The tissue has menthol or something in it which makes them cold. They feel really good on a sore nose. Expensive compared to the store brand I normally buy, but quite the treat.

By the way, Kleenex did not pay me or reward me for this post, although the should because I just spent $20 and well over 100 words on tissues! Oy vey!

Wednesday, January 25, 2012

Last Chance for Picnik- Pictures into Embroidery Transfer

Did you hear? Picnik, the free photo editing site associated with Flickr, is shutting down on April 19, 2012.Boo hoo! I love that site and use it a lot. Of course, I never did pay the $28 for the premium membership. So, I guess I am part of the problem. Sigh. Anyway, until April 19 all their premium features are now available for free! This week I decided to feature some of my old projects using Picnik.

Here is a post from May 2010.

I really love the Sublime Stitching patterns by Jenny Hart. Her motto is "Not your grandmother's embroidery!" There are so many fun patterns. The flickr group is loaded with eye candy. This Etsy store, Sew Lovely Embroidery, also has wonderful modern designs.

However the other night I had the itch to stitch right then and there. You know how it is when an idea strikes! So, I came up with my own way to convert a picture into an embroidery pattern that was simple enough for me to do.

This pin up cowgirl was my starting photo. I found the picture on Google and uploaded it into Picnik. Then under the "Create" tab I clicked on "effects." Next I chose "pencil sketch." And the result was the photo below.

From there, I clicked on the "Edit" tab and chose "Exposure." I moved both the "Exposure" and "Contrast" settings as far as I could so that it would look like an even simpler drawing.


The result was this. Notice how most of the background is gone now and the details are sharper? This was good, but I knew I wanted it even simpler. So, still in Picnik, I chose the "Create" tab and went to stickers. I used the rectangle under "Geometric"  (and slid the color to white) to cover up the fire and the photographer's name. Then I went to text and added the "Dinner!" Finally, I downloaded it to my computer and printed it out. I was very careful to print it in "mirror image" so that I could use Citra-Solv to transfer my pattern to the fabric.


To do the Citra-Solv transfer I photocopied my print out and taped the photocopy print side down to my fabric. I used regular old scotch tape. Be sure not to cover any of the design with tape. Then I took a paper towel with a bit of Citra-Solv on it and rubbed it all over the design. Lastly, I burnished the paper by rubbing the entire design really hard with the edge of a spoon.
Voila!

Embroidered Cowgirl
I had a lot of fun changing up the colors for this design. Here is the finished project:
Embroidered Dishtowel

Update: Since this process worked so well, I went on to create this Texas tote.
Texas Tote
You can see that full post here.


Monday, January 2, 2012

Packing Away the Pink Christmas

IMG_3985
IMG_3983

Farewell pink and white Christmas tree. You were splendid. Normally I am a bit melancholy while packing away Christmas decorations. This year, the new year holds so much promise and excitement. Hello 2012!