This post is for Chirsty and her large zucchini harvest. Many years ago I worked at a sweet little school in Wyckoff, NJ and this was a favorite at our school breakfast pot lucks. Since then this has been one of my "go to" brunch recipes. I must warn you though, some men become very disappointed by the name "pie" so you may just want to call this "Zucchini Bake" and spare yourself some grief.
Zucchini Pie/Bake
3 cups diced unpeeled zucchini
1 medium onion chopped
1/2 cup grated parmesan cheese
1/2 cup grated cheddar cheese
1/2 cup vegetable oil
1 cup Bisquick mx
4 eggs slightly beaten
3 or 4 T miced parsely
1 tsp. salt
1/2 tsp. pepper
Preheat oven to 350 degrees. Combine all ingredients and bake in either a greased 9X9 baking dish or a 9" pie plate. Bake for 35-40 minutes.
Have a great day!
Tuesday, June 29, 2010
Wednesday, June 23, 2010
Minimalist Class Party
"Do not think that love, in order to be genuine, has to be extraordinary. What we need is to love without getting tired." -- Mother Theresa
The words of Mother Theresa have been so comforting to me this year.
Without a PTA class parties at OFS fall on the teacher. I would say the school wide tradition is that the kids bring in a bunch of junk food. It makes me feel like a stewardess with 30 first class passengers. The kids like it.
This year I decided to change this game. Using the economic decline as my excuse. I told my students at Christmas time that we were going to limit our class party to one simple treat that I would provide. Oh sure, they fussed a bit, but I was able to convince them that the money their parents saved not buying treats for a class party would be spent on their own family celebrations. I made these disastrous reindeer brownie things that they actually loved.
It was a great party. Simple. No pig out. No mess to clean up.
So I used the economy again to push the idea of a very limited end of the year party. This time there was hardly any fuss. I told them that I would make a special treat and they trusted me.
Last year, I spent hours on the last day of school eve frosting tiny bear bikinis.
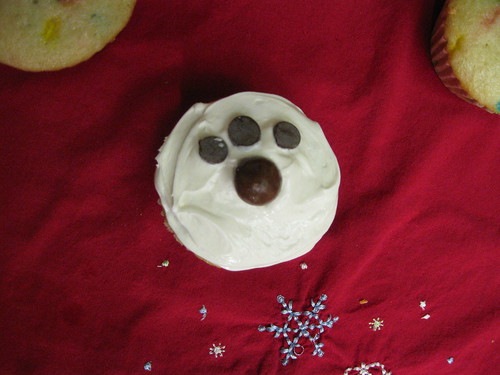
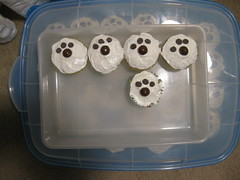
This year I was very tired. I decided on something really simple. Dog paw cupcakes. They are made from a mix, a can and one Junior Mint and 3 chocolate chips. Again the kids loved them.
The biggest hit was the superlative awards I gave them. I made a very simple photocopied award and gave each child a silly award. "Most Likely to Be In the Bathroom" went to Magenta. The "Michael Jackson Style Award" went to Lime. "Most Likely to Be A World Cup Goalie" and "Kickball King" went to two sporties. While the biggest talker got "The Young Oprah Award." My aide and I collaborated for about 10 minutes on these and they were a HUGE hit.
I guess my takeaway from the recession has been just what Mother Theresa says, special gestures do not have to be extraordinary to be genuine. This lesson has been kid tested and is teacher approved.

The words of Mother Theresa have been so comforting to me this year.
Without a PTA class parties at OFS fall on the teacher. I would say the school wide tradition is that the kids bring in a bunch of junk food. It makes me feel like a stewardess with 30 first class passengers. The kids like it.
This year I decided to change this game. Using the economic decline as my excuse. I told my students at Christmas time that we were going to limit our class party to one simple treat that I would provide. Oh sure, they fussed a bit, but I was able to convince them that the money their parents saved not buying treats for a class party would be spent on their own family celebrations. I made these disastrous reindeer brownie things that they actually loved.
It was a great party. Simple. No pig out. No mess to clean up.
So I used the economy again to push the idea of a very limited end of the year party. This time there was hardly any fuss. I told them that I would make a special treat and they trusted me.
Last year, I spent hours on the last day of school eve frosting tiny bear bikinis.
This year I was very tired. I decided on something really simple. Dog paw cupcakes. They are made from a mix, a can and one Junior Mint and 3 chocolate chips. Again the kids loved them.
The biggest hit was the superlative awards I gave them. I made a very simple photocopied award and gave each child a silly award. "Most Likely to Be In the Bathroom" went to Magenta. The "Michael Jackson Style Award" went to Lime. "Most Likely to Be A World Cup Goalie" and "Kickball King" went to two sporties. While the biggest talker got "The Young Oprah Award." My aide and I collaborated for about 10 minutes on these and they were a HUGE hit.
I guess my takeaway from the recession has been just what Mother Theresa says, special gestures do not have to be extraordinary to be genuine. This lesson has been kid tested and is teacher approved.
Tuesday, June 22, 2010
CSI Project: Dollar Store Wall Art
Hello there!

I am finally on vacation! Let the crafting begin...
This is actually my CSI challenge for last week's Dollar Store Challenge that I missed. Luckily for me, it is "Wall Art" week!
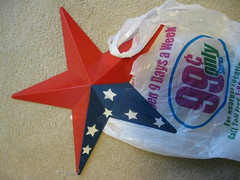
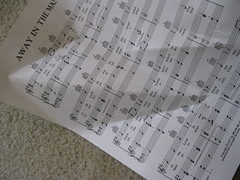
This pretty star started as a cheap dollar store 4th of July star. I covered it with Christmas sheet music.
Yup, I am working on Christmas! Sometime last year I thrifted a book of Christmas music with a project very much like this in mind. Now that I don't really have a "white Christmas" I find myself craving white Christmas decorations. I could see this being a summer decoration with a few shell embellishments and some non Christmas music.
This project came together so easily I may have to go back to 99 Cents Only and get another star.
Here's how I made this Christmas Star wall art:
First off, the goods. Here is the before shot.
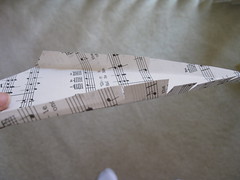
I primed the whole thing with gray spray primer. Then I fit the paper to the star by pressing the paper against a star point and creasing it along the edges with my finger.
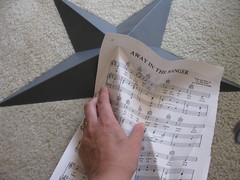
You should be able to see the crease marks really well.
I cut around the crease mark leaving an edge at the bottom of the point. However, I cut exactly on the crease mark at the top of the point- the part that would be in the middle of the star.
I hope that makes sense. I put some notes about this over on the flickr photo.
Next, I held the paper in place along the point of the star an
d folded the extra under the edge of the star. I then cut little flaps to tuck and glue under the star.
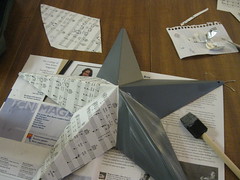
I put Modge Podge on both the paper and the plastic. I fit one point at a time smoothing and adjusting as I went along. The top point has a hole for hanging. I wish I had paid closer attention to that point. As it is, the text is upside down. It's in a small enough scale that I don't think it detracts from the look. It's just I wish I had caught that. Oh well. I also added another coat of Modge Podge on top and dusted the whole thing with some clear glitter.
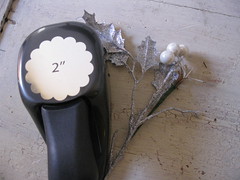
For the embellishment I took my 2" scallop punch and punched out 9 circles from the leftover music scraps. I folded eight of the scallops into quarters and then hot glued them onto the leftover scallop in a flower pattern. I used some leftover silver holly floral picks from last Christmas to finish it off.
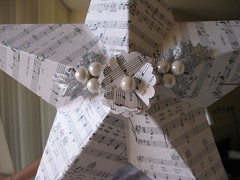
Lastly, some ice blue velvet ribbon to hang.
There you go, not exactly Christmas in July, but close! Be sure to check out the other CSI Wall Art challenge projects.


Updated: I hope this solves the flickr problem. I reloaded them all.
Sorry about that.

I am finally on vacation! Let the crafting begin...
This is actually my CSI challenge for last week's Dollar Store Challenge that I missed. Luckily for me, it is "Wall Art" week!
This pretty star started as a cheap dollar store 4th of July star. I covered it with Christmas sheet music.
Yup, I am working on Christmas! Sometime last year I thrifted a book of Christmas music with a project very much like this in mind. Now that I don't really have a "white Christmas" I find myself craving white Christmas decorations. I could see this being a summer decoration with a few shell embellishments and some non Christmas music.
This project came together so easily I may have to go back to 99 Cents Only and get another star.
Here's how I made this Christmas Star wall art:
First off, the goods. Here is the before shot.
I primed the whole thing with gray spray primer. Then I fit the paper to the star by pressing the paper against a star point and creasing it along the edges with my finger.
You should be able to see the crease marks really well.
I cut around the crease mark leaving an edge at the bottom of the point. However, I cut exactly on the crease mark at the top of the point- the part that would be in the middle of the star.
I hope that makes sense. I put some notes about this over on the flickr photo.
Next, I held the paper in place along the point of the star an
d folded the extra under the edge of the star. I then cut little flaps to tuck and glue under the star.
I put Modge Podge on both the paper and the plastic. I fit one point at a time smoothing and adjusting as I went along. The top point has a hole for hanging. I wish I had paid closer attention to that point. As it is, the text is upside down. It's in a small enough scale that I don't think it detracts from the look. It's just I wish I had caught that. Oh well. I also added another coat of Modge Podge on top and dusted the whole thing with some clear glitter.
For the embellishment I took my 2" scallop punch and punched out 9 circles from the leftover music scraps. I folded eight of the scallops into quarters and then hot glued them onto the leftover scallop in a flower pattern. I used some leftover silver holly floral picks from last Christmas to finish it off.
Lastly, some ice blue velvet ribbon to hang.
There you go, not exactly Christmas in July, but close! Be sure to check out the other CSI Wall Art challenge projects.

Updated: I hope this solves the flickr problem. I reloaded them all.
Sorry about that.
Craft Club -Owls
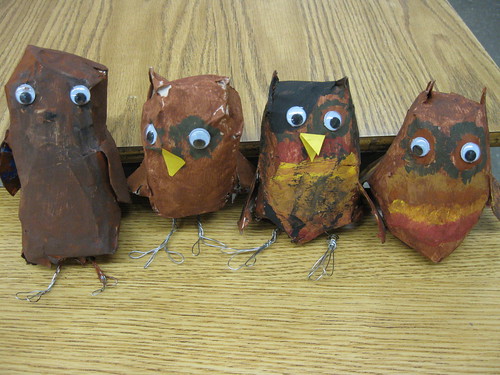
Love these. They are loosely based on a paper machae birds tutorial from Art for Little Hands.
Craft Club was a huge success. Sometimes I had 15 students and other times I had about 5. Either way it always just worked out. I really enjoyed the laid back discussions we could have. I really believe more than anything else children want to have time to talk with the adults in their lives. When the craft project had a "just right" level of difficulty the children were engaged and also could make conversation. Those were the best days. I learned so much about their lives and minds.
While I relish having the summer off, I really do look forward to going back -refreshed- and ready for another year of fourth grade. Fourth graders are the best.
Monday, June 21, 2010
Tatertots and Jello: It's Time!!! Huge Giveaway {worth over $300}
Have you seen this? What a great giveaway. I never got into the Cricut because of the cartridge thing. This machine just hooks up to your computer. Super cool.
Tatertots and Jello: It's Time!!! Huge Giveaway {worth over $300}
Tatertots and Jello: It's Time!!! Huge Giveaway {worth over $300}
Thursday, June 17, 2010
the CSI project: Dollar Store Challenge
I really do try to come up with new things for these project challenges. For me that is the fun. I did try to get a new project done for this week's dollar store challenge over at the CSI project, but alas the last week of school is pushing me to the limits and I'd rather do a really good job than rush. So this week I am going to submit an oldie, but goodie.
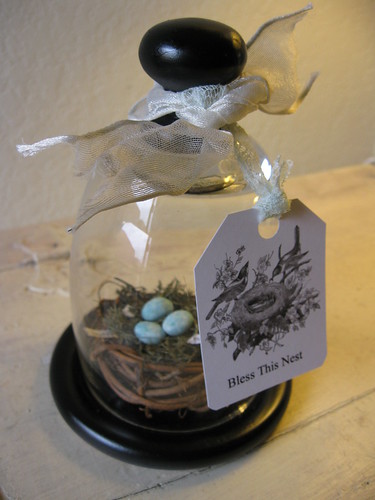
It's a mini cloche made out of a juice glass from the 99 Cents Only Store. The base is a wooden coaster I had on hand. The nest is a wreath napkin ring. The eggs are made from a little Crayola Model Magic clay that I also got at the 99 Cent's Only Store. Sometimes they have really good Crayola products and when they do I stock up. The top is a wooden knob attached with the famous Gorilla Glue. The key to this project was finding a glass with a little rounded bottom.
Recently, I found a bunch of mini glass dome shapes at a garage sale. I think they may have been part of some sort of wrought iron candle holder. Anyway, they are destined to become mini cloches this summer too. It's one of those things, when I was looking for larger cloche glasses, there were none to be found. Now that I settled for the mini cloche, I have a whole stock pile.
Oh, and here is a sneak peek of the project I had hoped to enter...

This is a plastic Texas Star. (I used to call them "barn stars" or "folk art stars" but, after my trip to Houston, I stand corrected.) It looks OK in this picture, but it is not as nice looking in person the color is a little uneven. Anyway, I have it primed and plan to decorate it with scrapbook paper. Stay tuned!
Tuesday, June 15, 2010
Another Challenge to Try: Iron Crafter
I just recently discovered another crafty challenge-

Last month the secret ingredient was cans. I was so sorry I didn't find the challenge in time to enter. You can click over there to find out this months secret ingredient. Or just look at all these projects I have made in the past using at least some of the secret ingredient.
Can you guess what this month's secret ingredient is? I have a couple of ideas for a new to me project using the secret ingredient. Stay tuned. Just three more days of school!
Monday, June 14, 2010
Noodlehead's Gathered Clutch & The Polk Dollar
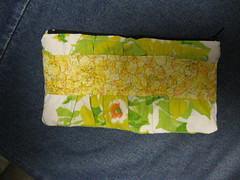
I am sure you have seen Noodlehead's Gathered Clutch tutorial? Well, it's pretty awesome!
I love zippered pouches as an alternative to gift wrap. Since I have to mail practically every gift, paper wrappings can be tricky. Plus storing wrapping paper in an apartment seems like a poor use of space.
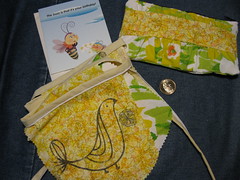
A yellow themed birthday package.
Love me a zippered pouch, but hand sewing the lining into a zippered pouch drove me crazy! I really am not a good hand sewer. Anyway, Noodlehead's tutorial shows how to do the zippered pouch without hand sewing the lining!
I still need a bit more practice with this. The first try was a bit bunchy. And, I wish I had another color zipper. This was a saw it-wanted to make it-stores closed-use what you have project. I realize I should have ironed my seams flat before sewing.

Still, I felt accomplished. It took me about an hour and a half to do everything.
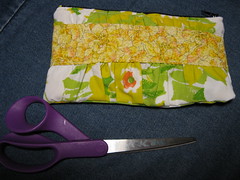
The size is about 8" across and 5" wide. Mine is a little lopsided. Nothing that a little practice can't fix.
In other news have you seen the Polk Dollar? How is that for a non sequitur?
A few months ago Cliff and I went hiking at one of our state parks. The admission was $12 and Cliff only had a $20. The attendant pointed us to a pay machine. Well, we got $8 in golden Polk Dollars for change. We have all of the 50 states quarters in both PA and CO mints. Yes, we geeked out on this collection. (Watch this is the one random post a month that my brother reads. I'll never hear the end of how nerdy I am.) Must admit though, we were pretty excited with this new stash.
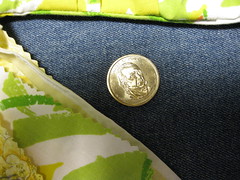
So we have been tucking these into all our gifts as of late. Just a bit of random for the recipient. Turns out the mint is doing a presidents series similar to the State Quarters. I mention this because I think they are cool and many of you may or may not personally know the tooth fairy. OK, maybe kids don't care about Polk. Lincoln comes out this year. In any case, it's a golden dollar! I'd love to get the Andrew Jackson dollar when it comes out and sneak it under Cliff's pillow. Do you have a favorite president?
I wonder if banks carry these? Maybe you know of other machines that give these as change? I am going to try at the subway...maybe coffee machines?
Ok, so enough of this chatter. Gotta get my rest. Just 4 more days in the Crayon Box!
Sunday, June 13, 2010
Craft Club- Texture Street Scene
Inspired by our Lost and Found box.
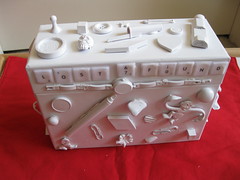
The art club made their own texture studies.
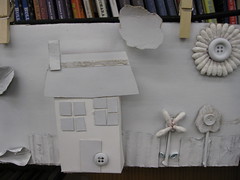


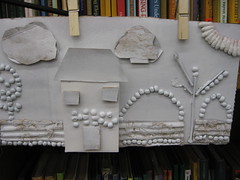
This was a last minute idea of mine. I cut the flaps off of boxes from the recycling pile.

I gave the kids some stuff to work with. It was mostly junk. I showed them how to peel back the layers on cardboard to reveal the texture. I also showed them how to make tabs so things would stick out. They came up with their own ideas and at times I helped by hot gluing things down.
Then I took everything home and gave it a coat of white primer spray paint.
I think this might have been their favorite project yet.
The art club made their own texture studies.
This was a last minute idea of mine. I cut the flaps off of boxes from the recycling pile.
I gave the kids some stuff to work with. It was mostly junk. I showed them how to peel back the layers on cardboard to reveal the texture. I also showed them how to make tabs so things would stick out. They came up with their own ideas and at times I helped by hot gluing things down.
Then I took everything home and gave it a coat of white primer spray paint.
I think this might have been their favorite project yet.
Tuesday, June 8, 2010
CSI Project- Martha Inspiration- Embelished Tote
OK, so I did come up with something new for the CSI Martha challenge after all. Remember this tote bag fail?
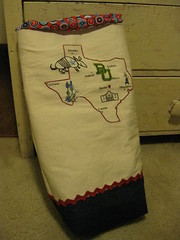
From Fail to Fixed!
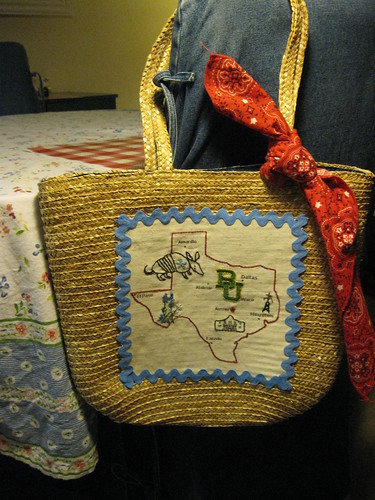
While browsing my Encyclopedia I thinking, "What can I do that is new?" I actually found a solution for my old tote bag problem.

The book has many suggestions for embellishing existing tote bags. Voila! Target dollar spot has $2 straw bags! Problem solved! I cut out the embroidered vintage style Texas map that I made and used super strong Wonder Under
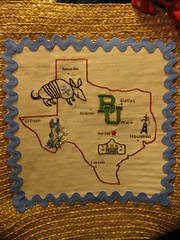
My Aunt Jean was such a wonderful hostess during our stay in Texas. In addition to throwing a beautiful wedding for her daughter, she hosted the whole family for meal after meal in her home. I was disappointed that I didn't have the bag done to give her as a hostess gift. Now I like the new version much better anyway and it will now become a thank you gift.

You can read about how I used Citra-Solv to make this embroidery pattern here.
CSI Project Challenge: Martha Inspired DIY Printer Fabric Pillows
Without further ado- my favorite Martha Inspired Projects-
Print on Fabric Pillows

I still remember where I was in May of 2008 when Martha aired a rerun of this Growth Chart Project. I had long admired projects using printer fabric, but the price of those sheets made it a bit spendy for me. I believe that was also the spring of threatened $5 gas and I was trying my best to limit my trips to Joannes. All in all, I was in a use what you have mode.
Like an angel of crafting mercy Martha showed how to make your own printer paper out of muslin and fusible web. I had both of those at home! My sister-friend, Piper, had a birthday just around the corner. Inspiration hit like lightning and I created this Chic- Flick quote pillow. Using favorite scraps of vintage sheets and other light blue fabrics I pieced together a collection of quotes from all her favorite movies.
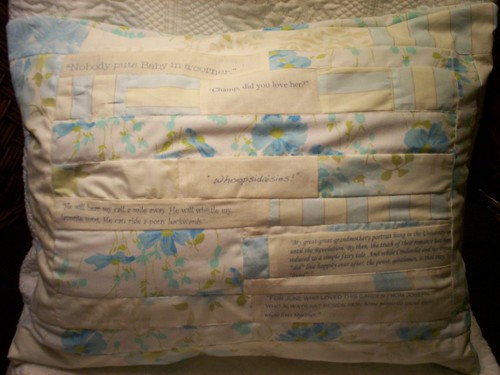 This pillow was my first quilting project and it was far from perfect, however it was a truly personal and unique gift. I burned the midnight oil to get it done-thus the dark pictures. In spite of some flaws, I love this pillow and all the memories of our girls movie nights.
 That same summer, my other roommate and sister friend, Kate came to visit me. We spent a long, hot, yet lovely day at the UCLA / LA Times Book Fair. We reminisced about some of our favorite books and Kate told me that as a child she read all the books Garth Williams illustrated.
I had only just dropped her off at LAX when I sewed up this printer fabric pillow for her birthday the following month.
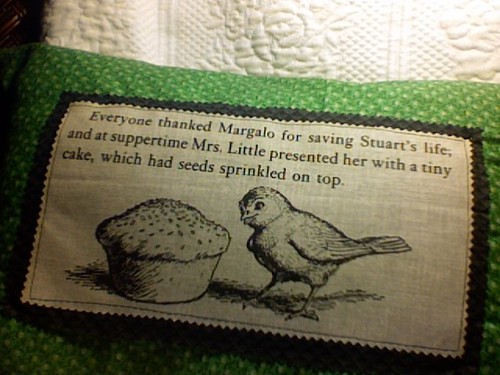
Garth Williams, a bird and a cupcake... perfect!

Then, later in December, I made this little door pillow for my brother and sister-in-law to be. They were planning a Paris honeymoon and this was a bit of inspiration to keep them going through the wedding planning.
Martha was definitely the first person I saw integrate computers into crafting and now I can not imagine making half my crafts without a computer, the internet and a printer!
Monday, June 7, 2010
Bunch Of Random Stuff
.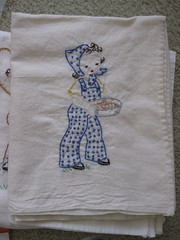
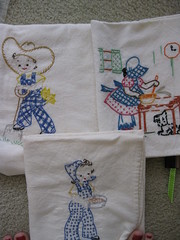
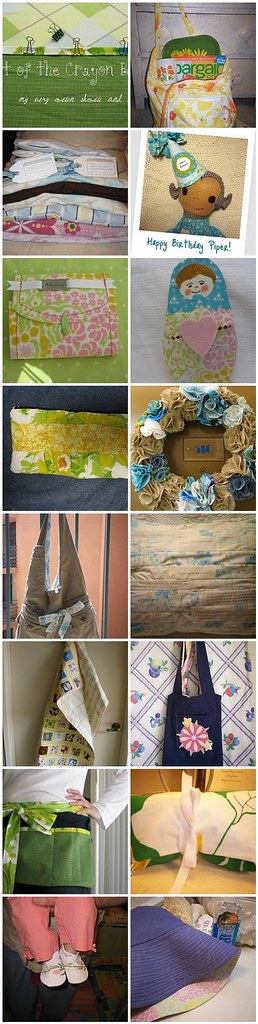
1. This dishtowel just kills me. I love that little pant suit girl so much! It was just one of the many wonderful things I received in the Sweet Goodness Swaps Cowgirl Swap.
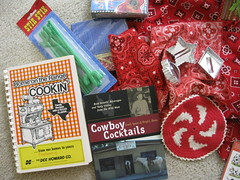
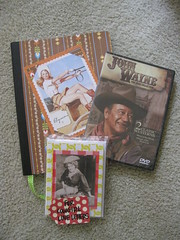
My partner, Raesha, really outdid herself with this one! There is just one good thing after another. Thank you so much Raesha!

2. Speaking of "good things" - Martha's people at The Crafts Department are going to be judging the CSI Project this week. Get ready for a slew of posts because I plan to represent.
3. Next week is the last week of school. This has been my most favorite class since ... my last most favorite class. Which was last year probably, I have had a few good years in a row. Nonetheless, I am starting to feel a little sentimental about letting them gobecause the third grade coming up scares me because we have had a really nice year together. So, I am thinking of treating them to a Tiny Party.
It would be two kinds of fun-one I know they would like all that little stuff. And, being language learners they will assume I mean "tiny" as in hardly a party at all. Since I got them to buy into a "Cleaning Party" at Christmas where they literally scrubbed my classroom from top to bottom- and thought it was "fun." I think they will be especially surprised that this party includes treats and no hard physical labor. Added bonus, making things small would stretch each recipe too!
4. Also on the A-Jane-da for this week is our school spring festival. I was inspired by this post to do a bubble booth. I bought the pool at Target today and plan to test it out tomorrow. Fingers crossed! I hope this works!
1. This dishtowel just kills me. I love that little pant suit girl so much! It was just one of the many wonderful things I received in the Sweet Goodness Swaps Cowgirl Swap.
My partner, Raesha, really outdid herself with this one! There is just one good thing after another. Thank you so much Raesha!
2. Speaking of "good things" - Martha's people at The Crafts Department are going to be judging the CSI Project this week. Get ready for a slew of posts because I plan to represent.
3. Next week is the last week of school. This has been my most favorite class since ... my last most favorite class. Which was last year probably, I have had a few good years in a row. Nonetheless, I am starting to feel a little sentimental about letting them go
It would be two kinds of fun-one I know they would like all that little stuff. And, being language learners they will assume I mean "tiny" as in hardly a party at all. Since I got them to buy into a "Cleaning Party" at Christmas where they literally scrubbed my classroom from top to bottom- and thought it was "fun." I think they will be especially surprised that this party includes treats and no hard physical labor. Added bonus, making things small would stretch each recipe too!
4. Also on the A-Jane-da for this week is our school spring festival. I was inspired by this post to do a bubble booth. I bought the pool at Target today and plan to test it out tomorrow. Fingers crossed! I hope this works!
Wednesday, June 2, 2010
CSI Challenge: PB Wall Vase Knock Off
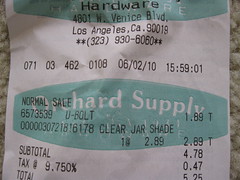
Here's another challenge I could not resist. I had to stop at OSH today on the way home from school and hunt down something to make anything for this Hardware Store Challenge! I should be saving money right now so I set a $5 limit for this challenge.
"I think I can...I think I can... I think I can..."
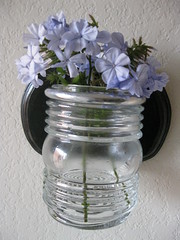
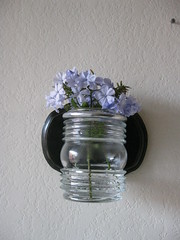
I let my mind wander as I perused the aisles. Low and behold, I found just what I needed for a project that I have long admired. It's a PB inspired wall vase!

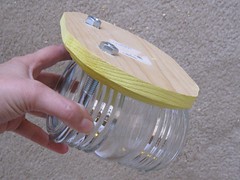
Made from a wood plaque I already had, a "u-bolt," and a "clear jar shade."
The inspiration piece: a PB wall vase from a few seasons ago.I believe it was called the Somerset Wall Vase.

PB Inspired Wall Vase Tutorial
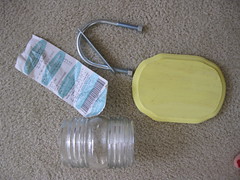
Supplies:
1 wooden plaque or other wood for base cut to your preferred size.
1 clear jar shade- I found it in the lighting section and took it over to the U-bolt area to find just the right size.
1 U bolt
Paint of your choosing
1 hanger and screws
power drill with a large bit- (hopefully sized to fit your U-bolt- but mine wasn't)
screwdriver
pliers
Throughout this tutorial you can click on photos to make them larger.

Step 1- Mark where you want to drill your holes. I did this by pressing the U-bolt into the wood to make indentations. Then I drilled where the indentations were. Easy!
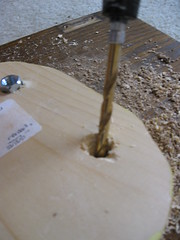
Step 2- Drill those holes! Now, I shoulda just bought a bigger bit, because a bigger bit woulda been better!
But, I didn't so I had to make do! To make my holes significantly bigger than my bit, I swiveled the drill around in circles pressing into the edges of the hole. I did this on top of a rather thick piece of scrap wood.
My holes weren't pretty and it took a few times of hammering the U-bolt into the holes to get them big enough. But with persistence it worked out. Finally, I was able to do a dry fitting.
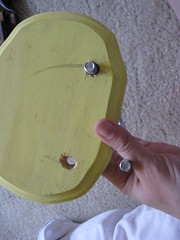
Step 3- Put it together. After using pliers to really tighten those bolts I could see that the jar was super secure and that the bolts didn't stick out too far.
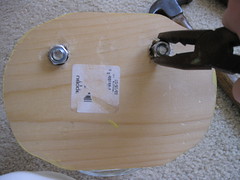
At this point, I added a simple picture hanger to the back. I bent it just a bit to accommodate the bolts.
Step 4- Take it apart! Paint the wood and wait for it to dry.
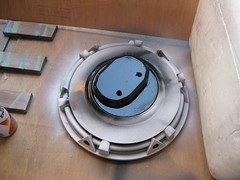
I used some black spray paint. Once it was dry I sanded some edges and cheater that I am, I used brown sharpie to "stain" those edges. Easy!
Step 5: Reassemble and hang!
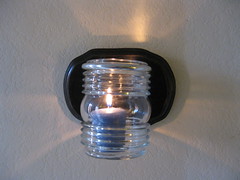
First I tried it as a candle holder! Wish I had some pretty beach sand and a few shells to add!
Next, I went outside and trimmed a bit off of a neighborhood tree.
Love it! It would also look lovely (and more like the inspiration piece) with some oil rubbed bronze paint. But, for my home, the silver works great.
Oh, look at this- unlike the inspiration piece with it's pointy glass, this vase stands easily while you fill it.

I set a $5 limit for myself and I very nearly made it. With tax the total came to $5.25!
Now I am headed on over to see the other CSI Project challenges. Who knows, I might have to run back to OSH tomorrow!
Subscribe to:
Posts (Atom)