If you are interested in the no tool transformation, you will do considerably less demolition. I will have a separate post below this one for you. It's too confusing to try to mix tutorials. However, I do recommend reading both because a hybrid of the two ways may be best for you.
Demo & Cleaning
First up, take out the drawers and set them aside.If you have doors remove those and set them aside as well. It is just easier to build the shelves when you have it all open for an easy in and out.
This is the view from the front with the drawers removed.
This is the back and this is where we will start with the "demolition."
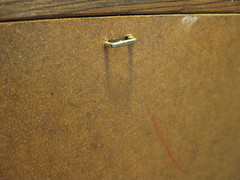
I believe that this soft particle board type wood is called hardboard or sometimes fiberboard. It's very smooth on one side and has a rough texture on the other. Time and neglect can make this board crumble, so removing the staples or the finish nails carefully is important. Loose staples are good, just slip a screw driver in there and pry them out. We want to save this board to reuse at the end.
Tight staples are much harder. You may have to use your screwdriver to pry the actual wood away. This makes holes. We can fill those later, but it's nice not to have to.

As you can see, I had a hard time removing my board. I actually wonder if it had either was glued, painted or rotted on. Large chunks broke off. Fortunately, this is the back. Wood filler, primer, paint and eventually a wall will all cover this up.

I keep a small bowl handy to collect the staples as I remove them. These things are dangerous.
Next up, cleaning! Now is the time to vacuum and scrub your cabinet. During this project you will learn a great deal about how these kinds of cabinets are made. You will also learn about people's gum disposal habits, the critters that live in neglected and unloved furniture, and often popular stickers of the early '80's. Also, if you have any loose parts in need of some Gorilla Glue as I did, now is the time to shore things up.
Next up, shelf talk.
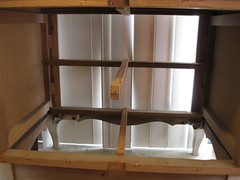
In the above picture you can see a vertical piece in the middle of the back. I took that out. It was cracked and crumbly and of no need.
This view is looking forward from the back. There are two supports going across the middle that used to hold the drawers. The top one is in my way, so I yanked on it, twisting slightly to loosen it. Then I pryed it off with my screwdriver. This piece was higher than the front horizontal bar which will hold the shelve and the oven door. It would have kept my shelf from laying flat.
The Shelves
OK, so now it's time to talk about measuring for the plywood, particle board, (or even cardboard shelves*) you will buy and get cut at your local hardware store. Both Lowes and HD will cut the boards to measure if you buy them at their stores. Here I am measuring from front to back along the side.I will also measure the opening across the back.
There is another consideration here. Many cabinets I have used have this similar framing. They use 2"X1" boards to create a frame and then cover the frame with thin board.

This is the gap that comes from the way the cabinet is framed. If you do not mind the gap, measure your length and width and get boards cut for that. I have always felt that ovens should be airtight. I know that's picky for a kiddy oven, but the gap bugs me. I assure you no child would care!

But if you are like me, you can have a bit of 2"X 1" cut to fit in there too. So if you need to, measure for that. This takes care of the gap!
I had two shelves cut and I will bought a scrap of 1" x 2" board like this to fill that gap and possibly provide extra support elsewhere if needed. I got just enough for $0.50 at the HD scrap section. I didn't even know there was such a thing until I was waiting for the guy to cut my boards. People were coming up to him with random wood and saying, "Fifty cents?" He would then spray a dash of green spray paint on their board to alert the clerks. Needless to say, I was all over that! I got some great scrap wood for all sorts of projects.
I will also need some "L" brackets because I have no supports in the back to hold the back of the top shelf up. I can pick those up at the hardware store easily.
Installing the shelves is not that hard, but I usually hold off and paint them first. That way I don't have to contort myself as much getting down into the bottom half and such. I will discuss that next week when we do a rough build to make sure everything fits before painting.
* If you are really on a tight budget, I see no reason why you couldn't get some large cardboard boxes and glue two layers of cardboard together. I would use a generous amount of regular white glue. You could trim the edge with clear packing tape or duct tape to make it smooth and then spray paint it all the color you want. I think it would be strong enough for play. Just a thought.
Updated: Tara asks a question in the comments about using the wood from the bottom of the drawer for the shelf. I am all for reusing the original wood and saving $! In the past, I have not been able to use the drawer bottom because it has been too difficult to neatly remove it from the drawer sides. Often it is glued in there. Or it has been a smidge too small to fit. By all means, if you can get it out neatly and it covers enough to be a shelf-use it!
The Oven Door
A Couple of Options

1. I almost always use one of the drawer fronts for my oven door. It's very economical and it's already sized to fit. Sometimes I have had to saw the front off and then yank out the bits of wood left over. But, most of the time, I can use my hamer to bang on the sides until they become loose and I can pry it all apart.
This drawer practically fell apart on me.
I removed the fancy handle and will replace it with a more oven friendly handle.

I taped the holes on the back and used Elmers wood filler to fill in the holes from the front.
What if you don't like the drawer style?
This kitchen was built in a different manor, however, I used one bottom door to make the oven door. I didn't like the formal carving, so I had Lowes cut a thin board to cover it up and I glued that on top of the door.
The other option is to have some plywood cut. This can be done when you buy the shelves. I did this for the blue kitchen since I wanted to save the drawer fronts for another project. Or maybe they were too hard to remove, I can't remember now.

Since I was having wood cut anyway, I went ahead and had two pieces cut. I then used my drill and saw to cut a window in both pieces. (It's very homespun.)I sandwiched a bit of old plastic from a poster frame in between the layers.I also added a length of 1" X 2" board to create depth for the hinges to attach. Then I used a dollar store picture frame to trim it out. At the time, I did not have a miter saw. So I cut the dollar store frame in the middles so that it would be to size. I glued it on and sanded the uneven parts down. Again, it's very homespun looking on the inside, but the outside looks good.

And, now that I think of it, you could always make the oven door out of cardboard. A few layers thick should do really well and would be especially light weight for kids. Options people! I am all about options!
The Sink Hole

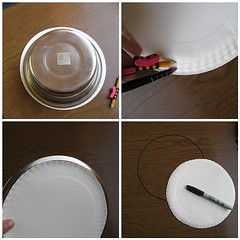
First up, you need a bowl with a good lip all around the edge.
I have measured these bowls in so many ways, but this way worked great and it's what I did this week.
First I traced the top of the bowl onto a paper plate. (It was handy, any paper would do.)
Then I used my compass to mark an even 1/2" trim and cut out the smaller circle. Next, I checked to make sure it fit well into the inside of the bowl. Then I traced it right onto the "counter top" with a sharpie.
Cutting the Sink Hole

Before I had a jigsaw, I made two play kitchens using a drill to make smaller and smaller holes around the circle I marked. Then I used my hammer and a flat screw driver to tap the in between parts like a beaver until the circle of wood came out. It works. I did it twice. The chewed up edges are safely covered by the rim of the bowl. Still, I am not sure why I didn't just ask our building maintenance guy to give me a hand? I am sure he has a jigsaw. Guess I'm just a do it yourself-er and I made do. And so can you if need be.
Then when I realized I was in the "business" of making play kitchens, I invested in a jig saw. I have used it to make many things since then and I am glad I have it. To get the blade into the circle you have to cut a pilot hole. I used my drill to make a few holes next to each other so the blade would fit.
This year, my drill bits were breaking and in need of replacement. When I went to the store I found this type of drill bit that makes a big hole. I bought it and it's made a big difference in how quickly I can get the job done. This is important to me and my neighbors who are just feet away from all the noise.

From the pilot hole, I cut lines that make "pie slices" for a lack of a better word. Eventually, I can curve the blade around (well within the circle- you can always cut more, hard (but not impossible) to put back.


I try to really take my time and go slow here, and before long- the bowl is in!
The Backsplash- Two Ways
1. For the green kitchen, I had leftover plywood from the shelves. I actually took the board and held it under the curve of the counter top and traced the fancy counter top. Then I cut along that curve and later screwed the board to the back of the kitchen for a backsplash.
2, For the blue and black kitchens, I used a 1"X 2" board that was the same length of the counter to make a low backsplash.
For this kitchen, I found a great scrap at the HD scrap pile and I am going to do a mid height, rectangle with just rounded corners for the backsplash.
OK, so that was a lot! As always, the photos can be enlarged by clicking on them. There are additional photos and notes on flickr. Leave any questions you have in the comments and I will address them for everyone to learn from.
Tool Free Options Here
Lesson 1 -Supplies
Why I make the play kichens -here


9 comments:
Love this! I have refurbished a really old handmade kitchen and thought of making one, but without a jigsaw wasn't sure how I could do it. Now, I know!!!
And thank you for all the tips. Who knew HD (or was it Lowe's) had marked down wood???
You are too good! I am really enjoying reading these tutorials! Also, I saw they were featured on One Pretty Thing's Daily DIY yesterday! Congrats and best of luck to continue to spread your generous spirit. :)
I just came across your blog today via One Pretty Thing. You're amazing! Thanks for sharing. I can't wait to make my daughter a kitchen soon.
Am in the midst of doing one for my daughter for Christmas! I will look forward to your tips!
Great tutorial! I love your projects. ;)
Roeshel
It is amazing. Your creativity and hard work, your generous spirit. You are blessing so many. I love the creativity you put into these little kitchens. Any little girl who gets one is getting a treasure.
Ruth
This is amazing! If my daughter wasn't 15, I would be making this tommorrow. Excellent job!
I LOVE these ideas!!!!! Thank you sooooooo much. I have a son, but will inform everyone with girls about these awesome ideas. Thanks <3
Okay, I think I am with you on all this so far, but why can't you just use the drawer bottom for the shelf instead of buying plywood? I bought my $5 dresser today and haven't looked at it yet and maybe its a mess. But is it possible to use the drawer bottom? tibariba@yahoo.com THANKS!
Post a Comment