Lesson 1 is all about the supplies! This week you will need to gather your supplies.
First Up- A Supply List PDF
I recommend printing this list out and reading it along with the post. You can then highlight the items you would choose as I discuss them below. There are many substitutions and I hope that you are inspired by the options presented to expand on these ideas. If you come up with something new, please share it!
This is a long and detailed post. Bear with me! Gathering the supplies is the most time consuming part of the whole process. Although, you probably have a lot of these things at home.
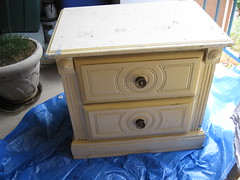
The Base Cabinet
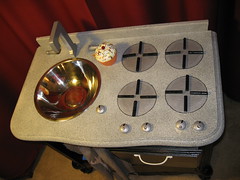
The base of the play kitchen is a nightstand, small cabinet. or chest of drawers. For these directions, I will be working with a two drawer chest. The top drawer will become the oven and the bottom drawer will be removed to make a storage area. With four kitchens under my belt, I can safely say this is the easiest, cheapest way to go. If you are going the "tool free" route, the top drawer is especially important. However I can assist you with any questions should you have a different styled cabinet.
In the past I have been really lucky to find cabinets on the curb or get donations through craigslist. This time however, I bought the cabinet I will be using. I saw it on craigslist for just $5 and went for it.
In LA we are very lucky to have a thriving resale market with a Goodwill or other thrift store on every corner, year round garage sales and a very active craigslist. However, in other places you might have a basement, attic or garage. (Concepts that are just a distant yet fond memory for me.) Shop your home. Call the in-laws. You never know what someone might be storing and willing to part with.
These are the nightstands I have used in the past.
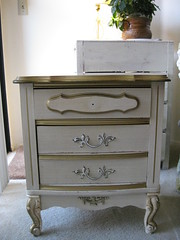
This awesome retro nightstand was (maybe still is?) just $35 on the Tucson Craigslist.

Updated- This very cabinet was snatched up by one of our build a long builders! I could not be happier that Amanda from All Things Creative got this cabinet for her kids' kitchen to be!

This one was (maybe still is?) just $10 on the Houston craigslist.
One last consideration for the cabinet is height. The counter top height on mine will be about 23". However, if you have a tall child, you may want to consider a higher cabinet in order to accommodate them for longer.
Paint
Paint- I always use primer, paint and a low odor sealant. A quart of paint will do you.
I buy a quart of primer and use it on multiple projects. I just consider it a balcony workshop staple. Many people swear by spray paint primer. I am thinking that one can of spray paint primer would probably work. You could always buy two cans and save the receipt just in case.
I get my paint from the "oops" shelf at Home Depot. Lowes and smaller paint retailers also offer these cans for cheap. If you have a certain color in mind, or if you want to save time, I highly recommend the Dutch Boy "Twist and Try" quart. I went to OSH hardware and they custom mixed a color for me in the satin finish for just $5.With the satin finish, you may be able to skip the sealant. On the other hand, if this is likely to be your first and last project for a while, spray paint might be the most affordable option with little left over to store or dispose of.
To seal and protect my efforts, I use Zar Ultra Max Satin Polyurethane. I chose it because it was low odor, fast drying and cleaned up with water. I load it on so it can be a little bit yellowing. I think I paid about $20 for it, but one quart was far too much, so I have lots left over. If you want to save time or money, a can of spray on sealant works great. You can get it at Michaels with a coupon and one can should be more than enough. Just beware, the fumes can be nasty. Be sure to work in a well ventilated area.
Craft paint- I use silver, gray, and black acrylic craft paint to paint the oven and the knobs and such.These little 2 oz. bottles are very inexpensive and often on sale at Michaels. I have also used silver spray paint. Craft paint is just as easy.
You will also need a paint brush and or foam roller, and a dropcloth of some sort.
For the counter top I have used regular paint.
I have also used Rust-Oleaum American Accents Stone Spray Paint.
The "Stone Pebble" looks just like granite. It runs about $8 a can and is also available for purchase with a coupon at Michaels. One can should be enough.
Other Supplies:
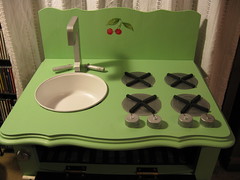
Knobs- For a while I was buying wooden wheels to use as the oven knobs and then I realized that plastic lids from soda bottles or milk cartons are just the right size. Diet Coke is my preference because they are already gray and scratches wont show on them. Diet Coke is also my beverage of choice while working on the kitchen. :) For the sink facuet handles have used the little wooden turnings that are shaped like people bought at Michaels or thick dowel cut into small lengths as knobs.
This picture shows the wooden wheels and wooden people used as knobs for the oven and faucet. You can click to see a bigger picture.
Faucet- I know lots of people buy or use real faucets so that is always an option. If you have an old faucet sitting around, by all means use it! I use a white 6" wooden letter "L" or "J." I have bought them both at Michaels and at Joannes. They cost about a dollar. However, I have recently noticed that they are harder to find and that the fonts for these wooden letters are changing. I use the block letter style because it is symmetrical as opposed to flat on one side. Thicker 8" paper machae letters might also work. Wooden letters are my faucet of choice because of the scale, ease of installation and price.
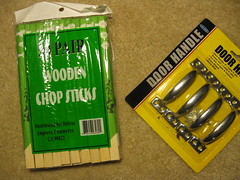
Burners- I like to cook with gas and I think budding gourmets everywhere would agree with me. So, I cut and paint and glue all those little bits of dowel to make the raised gas burners. A thin dowel is available for about $0.75-$1 at hardware stores. Recently, I got smart though and bought a pack of 50 pair of chopsticks for $1 at General Dollar. The chopsticks are soft enough that I figure I can use a craft knife to cut them. I think I will use about 8 pairs to make four burners, but I may need even less. Maybe you can get some free chopsticks the next time you eat out?
On the other hand, you could just as easily paint your burners on and that would save a few dollars and a few steps. Or, if you have old CD's you could use those as modern burners. Coasters might also work. There is lots of room to get creative!
Oven Handle- I now buy my handles in a four pack at the dollar store in their hardware section. That makes them about $0.25. Home Depot has nice simple handles for a dollar or so. Depending on your cabinet, you may be able to repurpose the drawer hardware.
Hinges- If you want an oven door that opens down, you will need some hinges. You can buy these for a buck or two at a hardware store. Or you can make leather hinges out of an old belt. If your cabinet has doors with hinges, you can recycle those! I got a pack of two hinges for a dollar at my Dollar General.
Corner braces- I often add small corner braces under the edge where the oven door sits just for extra strength.Sometimes I am able to get these at the dollar store and other times at Home Depot or Lowes.
Plywood- I use a $4-$8 piece of plywood that I get cut for me at Lowes or the Home Depot. If you are going the tool free route, you can either have a hardware store cut the wood for you, or you can glue several layers of cardboard together to create a firm and sturdy shelf. This is one thing you will need to hold off on buying until you have your cabinet and can measure for the size accurately.
Curtain Rod- I use a 3/4" dowel for the curtain rod. If you are going the tool free route, you may want to buy a small cafe curtain rod.
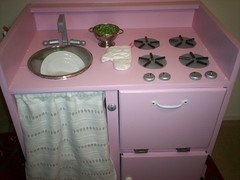
Fabric- You will want to measure the width of your cabinet and get a scrap about 1 1/2 the length of the cabinet. This will make your curtain gather nicely. I use a sewing machine to make my curtain, but you would not need to do that. You could hand sew it or even probably hot glue it!
Glue/ Putty- Your heavy duty glue of choice. I use Elmers Wood Glue and or Gorilla Glue. I also use Elmers Wood Filler if needed to patch up dents and fill in cracks or holes.
Extras- This is where it gets fun. I like to put a little hook for aprons and pot holders on the side. This is the hook I use because I think it looks less pointy and safe. I also like to add a magnetic chalkboard on the other side. I usually buy a wooden frame and cut out a cookie sheet, put it in the frame and make it into a chalkboard. It's cheap, but not easy. I recently learned about these magnetic boards and I think they are great!
Tools:
These tools are handy, but not necessary! It is easier with power tools so you might want to ask around to see if you can borrow some.
Power Drill
Power Screw Driver
Hand Saw
Jig Saw
Heavy duty scissors
Utility knife/ exacto knife
If you are going power tool free,
The only tools you really need are a screw driver, a hammer (or a big rock, seriously- it would do), and a thick nail.
Sink- You need a bowl with a rim. For the first three kitchens I scoured Goodwill for just the right bowls. Not any more. Time is too precious. Now, I go to a restaurant supply store and buy a nice bowl with a wide rim (important to allow bowl to hang/ balance in place.) Ironically, the restaurant supply place is cheaper than Goodwill! Dollar store cake pans work well too. If you are going tool free, I would suggest a cake pan because if it's low profile.
Misc:
screws
sponge/rags
degreasing cleanser
sand paper
Chalkboard paint to make a memo board on the side-optional
permanent marker
masking tape
Feeling Overwhelmed? I swear the gathering of materials is the hardest part. From here on out there will be lots of pictures and options! I think we will finish before six weeks, but just wanted to play it safe.
Play Kitchen Build Along Flickr Group I encourage you to share photos in our Flickr group. It's a great place to get ideas and encourage each other with comments.
OK, feel free to leave any questions in the comments. I will update this post with answers so that everyone can benefit from shared knowledge. Go forth and gather! We'll meet back here next Wednesday to get building!
Updated: Lesson 2 will be about measuring to buy the wood for the shelves and how to create an oven.
Updated: Stephanie asked a good question about the cabinets all being made of wood. Many do have some laminate. My last two had quite a bit of laminate on the tops and this current one is particle board on the sides. No worries! It will work! There is almost no sanding and with priming your paint will stick just fine.
Updated: About a minimum size- I sold both the blue and green kitchens without keeping any notes on the size. I did go out and measure the drawer from the green kitchen (the smallest I have made) and the drawer is 15" across. The counter extended about an inch beyond the drawer and there was about a two inch frame on either side of the drawer. I am guessing that the width was about 20"-21." I think it fit the sink and four burners just fine. Most kids dishes are small fry pans or sauce pans.
Lesson 2
Lesson 2 Tool Free
My Play Kitchen Inspiration
* If you make a play kitchen from this free tutorial, I'd really appreciate if you would add a picture to my Play Kitchen Build Along flickr group and link to this tutorial on your blog! Thanks!
19 comments:
So, where do I measure on my nightstand to get the plywood cut? Will I need to make myself a new oven door, or will I be able to use the current cabinet doors? I'm sort of thinking my kitchen will turn out similar to your black kitchen since my starting nightstand had the cabinet doors and the drawer on top. Are there any extras I would need to get for that? Thank you again for doing this! I got my nightstand today and I'm so excited to get started!
Lesson 2 will be all about measuring your cabinet for the wood to make the shelves and the doors. I think if I were you, I would leave my doors as is and put shelves in there (or are there already shelves in there?) Treat one door like a fridge door by using magnetic paint or some metal flashing to make it magnetic. Then I would use the top as the oven. It will be a pizza style oven, but the bottom part that holds the drawer can be the shelve. In the past, I have actually cut the front off the drawer and used that as the oven door. OR you could measure the space and have HD or Lowes cut some new wood for you. Just a few thoughts.
Actually, now that I look at it, I would make one door front the oven door. And make one the fridge. Maybe remove the top drawer and have that as open shelving. You might be able to turn the door backwards so that it's flat like an oven door and move the hinges to the bottom of the door to make it open like an oven.
Can you take a picture of the inside and post it to the flickr group. Then I can show/tell how to make a divider wall if necessary.
Oh my goodness, those are way too adorable! Now I'm wishing I didn't already have a play kitchen for my girls (not that I NEED another project)! I'm so impressed.
Thanks for dropping this week and for the "following" love! (I've returned the favor.) :)
Thank you for doing such a thorough job of teaching others how to do this. When I first saw a link to your play kitchen (I'm sorry I don't know where it was!) I knew I needed to make it for my daughter for Christmas. I've had my eyes out for a good cabinet and have scouted out a few options so far. I plan to take pictures and post progress on my blog (giving all the due credit to you and your site, of course).
I'm also going to be trying to use the concepts from this project to make a toolbench for my little guy, and will post pictures of that progress as well. Thank you again for this! Your creativity is inspiring! :)
I don't have a flickr account but I'll surely post everything in my blog :)
Sis B- I would love to see what you come up with for a tool bench!
How cute is your blog?! So cute! Love your projects - very nice! I'll be sure to be back! Following you!
Its so nice of you to give such great instructions for your kitchens! I'm going to bookmark them and save them for the time when I have kids (hopefully!).
Thank you! I am so excited to get started. I just picked up my little dresser yesterday on Craigslist for $5. I think it will be similar to your bluegray kitchen.
So excited!!!!!!!!!
This so helpful!! Thank you for taking the time to share all your expertise! I just posted my "before" picture to your flickr group. I hope it's not cheating because it's not exactly the same kind of cabinet, but it's what we have available. Also, we'll be a month or so behind since we're getting ready to move, but I've been planning to do a play kitchen for a while, so I'm EXCITED!! Polly @ http://helpinglittlehands.blogspot.com/
I am trying despirately to find a nightstand, etc. for this cheaply! I can't find any in our area! We live in a small town with an ok craigslist! (All of them on there are $80 plus!!) I want so badly to make one for my daughter for Christmas! Looking forward to seeing results soon!
WOW...I LOVE this. I wanted to get my daughter a kitchen last year and they were just SO expensive. This is so fun!!!!!! I can hardly get over it. YAY!
Anne
I really love your play kitchens and have been searching the good will weekly for the perfect cabinet. I have seen a couple but I was wondering if all of your base cabinets are real wood? I have seen a ton that are pressed board/laminate, but they won't work with all the sanding right?!
Stephanie- I sure hope you check back here. No, not all my play kitchens are solid wood. They all have wood in them, but you would be surprised how furniture that looks good on the outside is really a wood frame with particle board, laminate or sometimes plastic stuck to it. Also, I do not do a lot of sanding. Actually very little. If you find a laminate cabinet, it will work!
I'm joining in here a little late, but have my nightstand that I scored at Goodwill for 5 dollah!! The angels sang!!
Am making this for my daughter for Christmas...she's 3 and is just getting into her imaginary play!
xoxo ~Lisa
I think I might try to do this as well. I'm just beginning my search for a nightstand (my in-laws might have something) But I was wondering what a recommended width might be. 20" (what I'm finding for nightstands) seems so narrow to get a sink and stove on it.
Thanks! My husband and I just finished one. I didnt find this post until we were done, but I DID see your photostream previously and that helped a LOT! I just wrote a post tonight about how to make one, and I linked my readers to this page!! Stop by and check it out! Thanks again!
Thanks so much for the tips and inspiration! We have now made an oven and seperate sink out of reclaimed nightstands and my daughter loves them! She has requested a fridge.....so off to find another piece!
Post a Comment