
This was my easiest kitchen yet! Yes, with three down, I have learned a few tricks, and I did have a lot of supplies on hand. However, the drawer format was especially easy. Not counting the two saws I bought, this kitchen went together pretty cheap too. Consumable supplies were about $26, I didn't count the sealant because I have nearly a whole can left. I hope to sell if for $100 for the homeless program at my church.
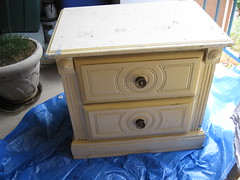
Step 1- Start off with an unloved dresser. Take out the drawers. In this chest there was just cardboard separating the two levels between the drawers. I used that as a template for the plywood shelf. Remove drawer slides and any staples or other bits in there.
Step 2 - Shop for supplies
Home Depot:
plywood sheet $5 (they cut it to size for the shelf and two pieces for the oven door)
handle for oven door $0.99
round insert cups (for the bottom of chair legs) for oven knobs $2.99

paint for cabinet part- Home Depot mis-tint shelf!! $1
Giant Dollar (I am always surprised and thrilled by the hardware aisle at dollar stores.)
hinges $1
foam paint rollers $1
extra screws $1
extra small screwdriver $1
two 8 1/2"X 12" wooden picture frame $1 each
small L brackets $1
Michaels
wooden letter "L" for faucet $1
small turnings for faucet handles $1
Osh
Stone spray paint $3.00 ( I got that great deal, this is usually about $8 and I usually buy it at Michaels with a coupon.)
Silver spray paint on sale $3.00
Handi Saw
Jig Saw
Local paint store
Zar Ultra Max Waterborne Oil Modified Polyurethane $18.99
I have used spray sealer in the past and love the ease, coverage and price, but it has a lot of fumes and so I decided to invest in a can of low VOC sealant. This had very little odor at all. I have tons left for future projects
Additional Stuff
baking sheet - free from the same craigslist curb alert as the cabinet
primer- from my stash
chalkboard paint-from my stash
white spray paint-from my stash
1 1/2" dowel -from my stash
thin dowel -from my stash
pan $2 from Goodwill
fabric for curtain from stash
bit of scrap 1"X2"
bit of plastic from old poster frame
Step 3. Trace "sink" and cut hole. I didn't always have a saw, here's how I "cut" the hole in the past.
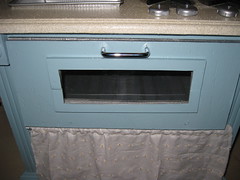
Step 4. Draw and cut hole for oven window in both oven door pieces . Use first one to make template for the second board. Then measure the length of the oven door and cut the same length from 1"X 2". Use this to hold the hinges for the oven door. Cut a piece of plastic to fit and tape it on an inside door. Then screw everything together. The plastic is sandwiched between the two door pieces creating a window.
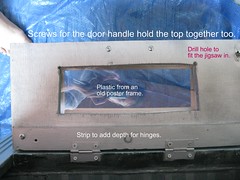
I then cut a wooden picture frame to trim out the windows rough edges. I glued this in place and clamped it until dry.
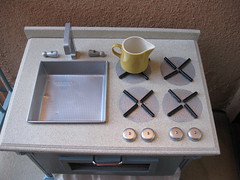
Step 4- Drill holes in wood turnings and the letter "L" for the faucets. Drill corresponding holes in the counter top. Drill holes in dowel for curtain rod.
Step 5- Do a dry assembly. There were places I braced for extra durability with mini L brackets or scrap wood.
Step 6- Take it apart to paint. It is much easier to paint the shelf to look like an oven when it is out in the open. You really must prime these. The stone spray must have a base color- I used white primer and it shows through. Wrap the base cabinet before you spray the stone counter top. I used saran wrap.
Step 7- Cut and paint dowels to make burners. Glue them on with wood glue.
Step 8-Seal everything well with sealant. The stone finish must be sealed with several coats or else it is a bit rough and flakey. With several coats it's nice and shiny like real stone counter tops.
Step 9- I decided to make a magnetic chalkboard. I cut a old baking sheet with my Handi saw just to get through the rim, then I used my Pampered Chef scissors to cut the rest! Yup! Love those scissors. I primed it and painted it with chalkboard paint and then put it in a wooden frame with a piece of plywood scrap to back it. I glued the whole thing on with the cabinet sitting on it's side until it dried.
Step 10- Reassemble- Make curtain by measuring opening and adding a bit for the pocket and so that it gathers.- Play!
I hope that you are inspired to make one for a child in your life or perhaps to donate to charity.
If you do, please send me pictures! I would *love* to see what you make!
I am submitting this for the Metamorphose Monday at Between Naps on the Porch! Head on over and check out the amazing transformations over there!
17 comments:
I LOVE this its so beautiful. I want one for my daughter now. Maybe I will try it. You are so creative! Well done.
How freakin' adorable! You did a fabulous job! I would have never imagined that up! GREAT JOB!!!!
This is the cutest idea ever! I so need to do this I am going on Craiglist now to see if I can find a free little dresser. You sure are creative!
one word -
AMAZING!!! very clever and crafty. I'm on the hunt for an old dresser or such in need of a makeover... thanks for the inspiration.
Wow. I dont know what else to say. You are amazingly talented.
Absolutely precious- you are amazing!! By far the best metamorphosis out there this Monday! :-)
This is excellent! Love you project and how you are raising money for a fantastic cause.
Amazing....My daughter is turning one on Friday and I was thinking of getting her a plastic Kitchen...Was thrilled to find this site - looks like I will be starting a play kitchen project this fall.Great ideas and wonderful blog:)
I am in shock. One of the most stunning rehabs I've ever seen. You are a genius...and so generous to donate your time and talent to a great cause.
You are one clever and TALENTED gal! Wow, truly amazing... I'm in awe, and inspired!
Thanks for sharing!
~Amy
oh my gosh, this is the cutest thing ever!! Wow, you are so creative to have thought to do this :)
Cute, cute, cute!!! Wow, you are so creative. Great transformation!
Amazing, Again! I absolutely LOVE IT! I'm so impressed. :)
PS--I don't know if it's just me, but Bloglines has quit updating your blog for me. It's been kaput all through July. Don't know why it's doing that, and hope no one else is having the same issues!
Ingenious!
This is amazing!! Thanks so much for the tutorial - I am inspired! :)
Very cute! I'll be linking at dabbled.org today @
http://dabbled.org/2010/03/good-links.html
(it will be up soon)
Wow! I wish I could be so creative and talented. My imagination never goes further than next toy store
Post a Comment