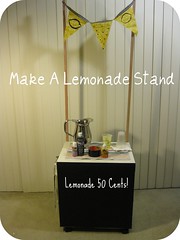
I am very excited to have finished my first of hopefully many DIY Club submissions. I squeezed this one in after school yesterday and met the deadline by the hair of my chinny-chin-chin
Other than shopping for a few supplies and letting paint dry this is a quick and easy project. In fact, this blog post is taking longer to write than most of the steps in making the lemonade stand!

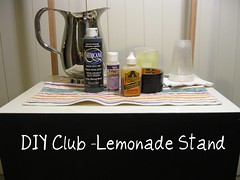
Supplies:
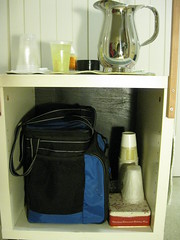
1- Printer cart/stand- I found mine on craigslist for $5. I notice these things pretty often at Goodwill too. You could also just build a box on wheels.
2- 4' redwood garden stakes - I got mine at HD for about $1.50 each
A piece of thin plywood that is the same size as the front of your cabinet. Many hardware stores will cut plywood for you. Don't forget to check for bargain off cuts in their scrap bin!
Gorilla Glue
Gorilla Tape
Chalkboard paint and foam roller
Deco Art Americana Fabric Medium
Deco Art Americana Acrylic in Ebony Black
Assorted screws and a screw driver
Hot glue or a sewing machine
Fabric scraps for banner
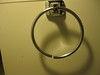
Towel ring- (optional) I got mine at Goodwill but it's similar to this
Cup hooks
sandpaper
pinking shears
Steps:
1. Sand the edges of your plywood smooth.
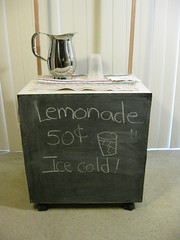
2. Paint the plywood with several coats of chalkboard paint. My roll on paint takes three days to cure, thus the text edited photos. I promise to update this post with a chalkboard action shot latter.
3. Pre-drill holes for the redwood garden stakes and screw them into the back of your cart. I used two screws each for extra stability as seen below.
4. Attach cup hooks to the top of each redwood garden stake. These hooks will hold your banner up.
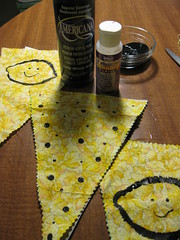
5. While paint is drying, make your banner! I used three triangles of scrap fabric and about a 15" of other fabric for the "string" part.
6. I want potential customers to see this stand from a mile away! So, I painted some friendly lemons on my banner with Ebony Deco Art Americana acrylic with some Deco Art Americana Fabric Medium mixed in. I just free handed them and used the end of a paintbrush and a pencil eraser to make the dots.
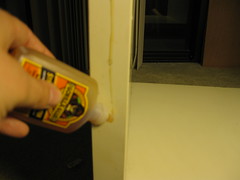
7. While the banner dries, affix the towel ring to the side of your cart. I used both screws and Gorilla Glue since I feared the cart walls might be quite thin. They look thick, but at certain points they are hollow.
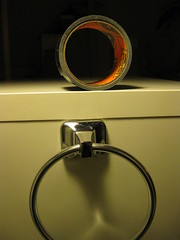
There was this weird little gap in the ring, so I taped over it with Gorilla Tape and shoved it into the holder. It's nearly invisible and now the ring is much stronger.
8. By now, the fabric banner should be dry, so make the "string" for the banner. I took a 20" scrap and sewed it in half. You could also just use ribbon. Then I trimmed the raw edges with pinking shears. I measured between my cuphooks for length and sewed a loop to each end like this:
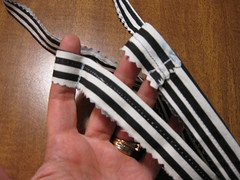
9. Sew or hot glue the triangles to the banner "string."
10. By now the chalkboard should be dry. So predrill and screw it onto the front of your cart. I used Gorilla Glue as well. Now the board is good and flush around all the edges.
The final step is to paint those screws to match the chalkboard.

Actually, for me the final step was to stage it for blog photos and lament greatly that I was out of real lemons and colorful cups. Sigh.
Updated: Three days later the chalkboard paint is cured. Let the fun begin!
As always, feel free to click on any photo for a better view or ask any questions in the comments.
Thanks to all these lovely ladies and the sponsors for hosting the DIY Club!Updated: I am a finalist!! You can vote for me here.
18 comments:
This is absolutely adorable. So creative. Great directions too. Thanks for linking to the DIY Club!
Holly
504 Main
My Goodness Jane - This is simply adorable! I wanna go sell lemonade on the corner now! Fabulous job! Thanks so much for joining The DIY Club this month! We greatly appreciate it! ~ Stephanie Lynn
if only my 8 yr old self had this i could have made a fortune!
This is adorable!
I love that! Such a cute project!!!
XOOX
Jen
Great ideas! My girls are always flagging down cards (poor neighbors) selling lemonade, flowers, cookies, etc. I have old TV cart that would work perfectly with this idea. Thanks for the inspiration!
what a cute idea. i love it! you come up with the most creative stuff!
That is too cute! What a great idea!
Hi Jane - Your project is one of the top ten finalists for The DIY CLUB. Be sure to check out the voting post on any of the four DIY CLUB blogs. Congratulations and thanks again for joining this month!
Very cute! I love that you used chalkboard paint on it. You could change it up for fall and sell hot chocolate too:)
I love this! What a clever idea you had! My kids would go bananas over a lemonade cart. Thanks so much for the how to!
Congratulations!! This is so super cute. What little kid wouldn't love to use this adorable stand for their lemonade stand. So fun.
Blessings!
-Sarah
Congratulations on winning the DIY Club's 1st challenge!
What a darling project. Congratulations on well-deserved win!
This is darling. Congrats on your win!
I made a lemonade stand for my daughters for christmas, it is so much fun to have around.
You can check mine out here (if you'd like)
http://snowybliss.blogspot.com/2010/01/theres-always-money-in-lemonade-stand.html
Have a fabulous weekend!
Congrats!!!
what a lovely lemonade stand? I found you via 504 Main DIY, I'm a new follower, please stop by to see me sometime.
I love this! My kids have a "pop stand" every year on the Fourth of July. I think this year's pop stand will be much fancier now that I've seen your great tutorial! Thanks for sharing, and congrats on your win!
Post a Comment