There are several steps to make these, but overall easy and fun. I am going to do these with my fourth and fifth grade craft club.
Tutorial:
Supplies:
plastic eggs that open
colored tissue paper
white paper towel
Elmers glue
quilling supplies
hot glue gun/ glue sticks
scissors
marker
Easter stickers or candy
Easter grass
small pebble
Step 1-
Take apart the plastic egg and tear up tissue paper into small bits.
Using glue with a little water to thin, apply the tissue paper right on top of both the top half and the bottom half of the egg. Be sure to overlap pieces so that the egg is completely covered. This will make the inside colorful. You can get creative by layering different colors or adding stripes of tissue, dots, etc.. Allow to dry for a bit. It will dry fairly quickly. It doesn't need to be fully dry.
This egg has the tissue layer and one layer of paper towel on it.
Step 2- Next, rip paper towel into bits and soak them with the glue and water mixture. Completely cover the first layer with paper towel. You want to add a few layers of paper towel. This will dry and give your egg a surprising amount of strength. Allow this to fully dry overnight.
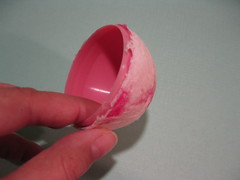
Step 3- Remove your paper egg from the plastic mold by gently running your finger nail under the edge. I also used a toothpick to get into the edge and separate the paper layer from the plastic.
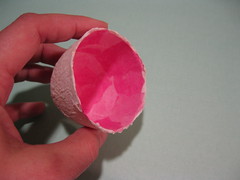
When you remove the paper egg from the plastic mold, you will have a smooth and colorful inside!
Step 4. Hold both halves together and draw a circle so that both halves of the circle line up. Use scissors to cut out each half circle.

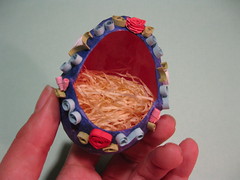
This is the egg hot glued back together. You can see the gap at this stage, but it won't show later.
Step 5- Hot glue the egg back together lining up the circles. There will be visible gaps, this is OK.

The outer tissue paper layer covers up the hot glue and the gap.
Step- 6- Cover the outside of the egg with another layer of colorful tissue paper and let it completely dry.
Step-7- Now decorate edges with quilled flowers or other embellishments.
I got all my quilling supplies from Quilled Creations and the flower patterns came from the book Paper Quilling for the First Time by Alli Barkowski. You could really decorate the edges with anything though. Puff paint would look very similar to the frosting used on sugar eggs. Glitter would be nice too. Get creative!
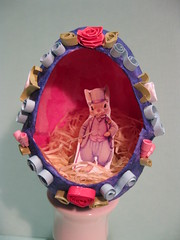
Step 8- Add grass and a small image or candy inside.
I used an image from an old Magic Cabin catalog because that is what I had on hand at the moment. I cut out the tiny image and glued it to a small pebble for a stand. However, I saw the perfect vintage Easter stickers at Michaels (similar to these images) and may have to go back and get them. To use stickers, stick to the pebble stand and add a little baby powder to the back to take away the rest of the exposed stickiness.

Reminder:
I am only one, but I am one. I cannot do everything, but I can do something. And I will not let what I cannot do interfere with what I can do. ~Edward Everett Hale
Have you checked out the Kind Words and Warm Feet Sock Drive for Comfort Socks?
Hope you have a wonderful week!
13 comments:
Well, these are adorable so I can't wait to see what you are sending for the swap! (I'm going to send some socks in your egg swap box.)
The 'Crayons' will love doing this project.
I've got something similar in mind, though I'll be making my egg shape using a balloon and some Paper Mache. I don't want my little daughter to have a pile of chocolate for Easter, so I thought I'd make an egg that she can open up and find a few little toys inside. I can pretend I'm back at school again whilst I'm making and decorating it.
WOW!!!! This is stunning! Thank you so much for the tutorial! Keep on posting :)
Neat way of shaping the molded egg - thanks for the tutorial! I bet the kids will love making them.
These eggs are so cute!!!
Very cute! I'm still working on my eggs. I'm just moving so slow lol. But I hope to have them in the mail by this weekend if my Mom will drop them off. LOL Still housebound in her care. Thank goodness you're never too old for Mom to take care of you?
Love it! Probably too difficult for a 5yo, but this 30yo might just give it a try. :)
Aww, I love this! So, so cute. Thanks so much for the how-to, I'll be linking.
What a cute idea!! I've always loved those eggs.
I love this project! It reminds me of eggs my grandmother made for church in the 1970's. I really want to try this. Thanks for sharing!
Those are so cute! Im still trying to get mine finished up!
wow- so stinkin cute! you are so crafty!
Many institutions limit access to their online information. Making this information available will be an asset to all.
Post a Comment