Here's another challenge I could not resist. I had to stop at OSH today on the way home from school and hunt down something to make anything for this Hardware Store Challenge! I should be saving money right now so I set a $5 limit for this challenge.
"I think I can...I think I can... I think I can..."
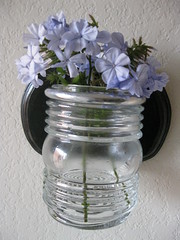
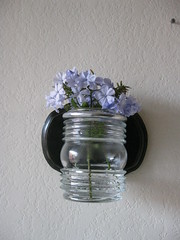
I let my mind wander as I perused the aisles. Low and behold, I found just what I needed for a project that I have long admired. It's a PB inspired wall vase!

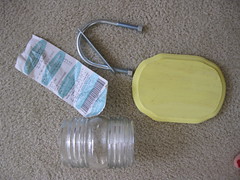
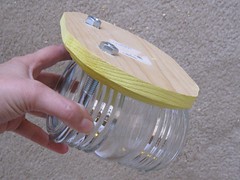
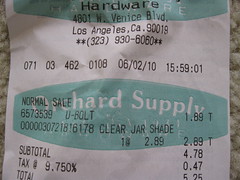
Made from a wood plaque I already had, a "u-bolt," and a "clear jar shade."
The inspiration piece: a PB wall vase from a few seasons ago.I believe it was called the Somerset Wall Vase.

PB Inspired Wall Vase Tutorial
Supplies:
1 wooden plaque or other wood for base cut to your preferred size.
1 clear jar shade- I found it in the lighting section and took it over to the U-bolt area to find just the right size.
1 U bolt
Paint of your choosing
1 hanger and screws
power drill with a large bit- (hopefully sized to fit your U-bolt- but mine wasn't)
screwdriver
pliers
Throughout this tutorial you can click on photos to make them larger.

Step 1- Mark where you want to drill your holes. I did this by pressing the U-bolt into the wood to make indentations. Then I drilled where the indentations were. Easy!
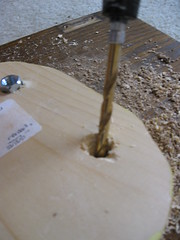
Step 2- Drill those holes! Now, I shoulda just bought a bigger bit, because a bigger bit woulda been better!
But, I didn't so I had to make do! To make my holes significantly bigger than my bit, I swiveled the drill around in circles pressing into the edges of the hole. I did this on top of a rather thick piece of scrap wood.
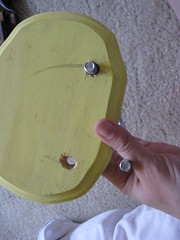
My holes weren't pretty and it took a few times of hammering the U-bolt into the holes to get them big enough. But with persistence it worked out. Finally, I was able to do a dry fitting.
Step 3- Put it together. After using pliers to really tighten those bolts I could see that the jar was super secure and that the bolts didn't stick out too far.
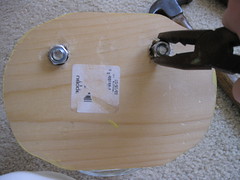
At this point, I added a simple picture hanger to the back. I bent it just a bit to accommodate the bolts.
Step 4- Take it apart! Paint the wood and wait for it to dry.
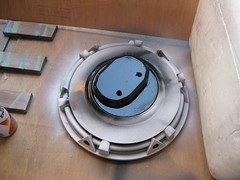
I used some black spray paint. Once it was dry I sanded some edges and cheater that I am, I used brown sharpie to "stain" those edges. Easy!
Step 5: Reassemble and hang!
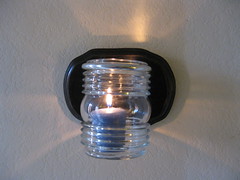
First I tried it as a candle holder! Wish I had some pretty beach sand and a few shells to add!
Next, I went outside and trimmed a bit off of a neighborhood tree.
Love it! It would also look lovely (and more like the inspiration piece) with some oil rubbed bronze paint. But, for my home, the silver works great.
Oh, look at this- unlike the inspiration piece with it's pointy glass, this vase stands easily while you fill it.

I set a $5 limit for myself and I very nearly made it. With tax the total came to $5.25!
Now I am headed on over to see the other CSI Project challenges. Who knows, I might have to run back to OSH tomorrow!
8 comments:
Very, very well done - I love the shape of the 'vase.'
Very cute project!It is amazing that an ugly plain light can become such an adorable vase!!
So cute! I kinda like yours better! Of course, I'm from the south, and we like mason jars with anything!
Also, love your blog background!
How cute!? I really like this. This is a good gift idea. I might try this someday. Thanks for sharing.
Saw this on The CSI Project
LOVE IT!!!!! I'm definitely going to have to make me some of these little lovelies!! I saw this on the CSI project, and you are just fabulous!!!
Super cute! You are so creative!
Wow - I love it. that dark color behind really makes it pop!
Thanks so much for linking up to The CSI Project's hardware Store Challenge! We hope you will come back next week for the Martha Stewart-inspired challenge -- The MS Craft Department are our guest judges!!!
XOXO
Jen
crafty, crafty. and you gotta love the very inexpensive aspect!
Post a Comment