Tuesday, November 10, 2009

Play Kitchen Build Along Tool Free Options

Kitchen Lesson Logo
So when I say "tool free" I mean power tool free. I hope that you have a screw driver, a big nail, a hammer and a paint brush.

First up, remove the drawers and doors.
Drawers Removed
Investigate the inner workings.

The oven
To make a truly tool free oven, Paint the insides of the top drawer to look like the insides of an oven! Paint the outside sides black or something that would also be ovenish. The drawer will open just as it always did, but you can make it look oveny by painting stripes to represent the rack on the bottom. Paint it gray or black. I would also use my screw driver to replace the fancy handle with a more oven looking handle. This idea came from Kelly and I thought it was genius! Kids have tremendous imagination and they will get that it is an oven. Plus, how easy for storage and clean up! I really love this idea. One thing to think about is the sink. If you have a shallow sink or a countertop bowl sink, no worries, but a deeper sink would keep the drawer from opening properly.

You could also follow the steps for shelves from Lesson 1 and have Lowes or HD cut you an oven door. Without tools, it would have to be a solid oven door. If you can break your drawer without tools, you may be able to do the drawer front oven door too.

Now, for tool free, I would not take off the back to put the bottom shelf in because of the way it's assembled with that vertical column piece. But, that's just my cabinet, your cabinet may be different.

If you can not take the back off without disturbing the drawer rigging for an oven drawer, then I would have Lowes or HD cut me two smaller pieces that together made the measurements for the bottom shelf. That way you can slip them in from the front and glue them in place. The bottom cross bar is a good place to glue. Again this varys from cabinet to cabinet.

The Sink
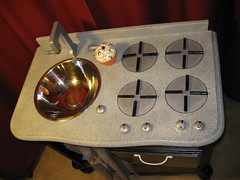
For tool free I would use a square baking pan similar to the one in the blue kitchen below. I would glue it right to the counter and voila! A trendy bowl sink! I think this could be super cute with a vintage type kitchen or an ultra modern kitchen.


Backsplash- Have Lowes or HD cut you a board that is the length of your kitchen. Your backsplash can be as high as you want or low like this one. Use your big nail to make premake holes for your screws and screw your backsplash to the back of your kitchen. I am sure you could use some really strong Gorilla Glue or Liquid Nails too if you prefered. Another option, a backsplash doesn't get a lot of wear and tear. I see no reason why this couldn't be made out of two layers of cardboard cut the way you want and glued on.
Stove Top

OK, if you are doing the tool free, drawer oven and bowl sink, you are basically done. All you have is to install the bottom shelf and paint it up cute. You will want to get a curtain rod to make a curtain for the bottom- or not. The cute burners, faucet and extras are coming up in two posts. Meet you there!

As always, ask questions!


Play Kitchen Build Along Introduction
Lesson 1
Lesson 2 With Tools
My Play Kitchen Inspiration


* If you make a play kitchen from this free tutorial, I'd really appreciate if you would add a picture to my Play Kitchen Build Along flickr group and link to this tutorial on your blog! Thanks!

Monday, November 9, 2009

Easy & Independant Cornucopia Craft for the Kiddies


Easy Cornucopia
Originally uploaded by Jane Little.


Here's a thanksgiving project for the kiddies to do. Meredeth posted at Like Merchant Ships about an easy cornucopia centerpiece using paper and a clay pot. I modified the craft by using a paper cup and tissue paper balls for fruits and vegetables. My third graders made them and they have had no problems being independent with this project.


Supplies:


Paper cup
lightweight brown paper (roll paper or a paper bag)
tissue paper, construction paper
glue


I eyeballed the measurements for the brown paper. It needs to wrap around the cup with some hanging off the end. Crumple the paper up good to make it more pliable. Then wrap it around the cup tucking some into the cup. Twist the leftover on the end to make the tail of the cornucopia. Roll up balls of tissue to make the fruits and vegetables. We added some construction paper leaves.


Check out Like Merchant Ships for more detailed photos on the wrapping part.


Sunday, November 8, 2009

Looking Forward to Christmas

A few things...

1. Chris at Just A Girl is having a linky party today with the theme, "I Can Make That!" Boy have I said that a bajillion times. Recently I set my mind to making new Christmas stockings. My search for "the stockings" lead me to about a dozen stockings that I love and want to make. So I am declaring this the Christmas of the Stockings! I actually think I will make some in lieu of gift bags. First up, a white stocking.

Cliff patiently looked through all the stockings saved to my favorites folder on flickr. He liked these the best. So, when I learned how to do Citra Solv transfers I thought, "I can make something like that!" I would attempt a simple white stocking. I transferred a photocopied "Noel" to some thin white muslin type fabric. I placed it face down onto the muslin and rubbed the image with a cotton ball dipped in CitraSolv. I burnished with the edge of my spoon and voila- "loeN!" Funny thing was I forgot to use the mirror image function when I printed, so the writing came out backwards! No worries- the fabric was thin and the transfer was dark, so I just flipped the fabric over and the back became the front. The lettering was corrected and no curses were spoken.
CitraSolv & Photo Copy Transfer on Stocking

 This stocking is really simple. Too simple. I want to add some pom-pom trim or bling or something!

White Stocking

Ahh! Much better! A dollar store ornament and some great wallpaper. Don't I wish I had that wallpaper!


Build A Better Background

 Just fooling around! That's a pillowcase taped to the wall. We had plans to go to a play, but when they got postponed, I decided to play around the apartment.

Anyway, the stocking is a gift for a friend.. I have a few small gifties to put inside and in the meantime, it can decorate my place until we meet up to exchange gifts.
Kitchen Lesson Logo

2. A few years ago I said, "I can make that" about a PB play kitchen. Now I am saying, "You can make it and I'll show you how!" The Play Kitchen Build Along has just started and there is still time to join in if you would like to build a play kitchen (on a budget) in time for Christmas!

3. The new Sweet Goodness Swap is posted and sign ups start today, Monday November 9. The theme is Sparkling White Winter. These swaps are always lots of fun, so I plan to sign up. You may want to check it out too!

4. Speaking of stockings and winter, I recently posted about my interest in the cause of homelessness. Theresa Tese founder of Comfort Socks wrote to me and shared her inspirational story of how she came to be involved in working with the homeless. I am very moved by Theresa's story because she was just one person who had an idea and made it happen. I think we are all capable of great things in God's name and this is just another example! If you are looking for an easy charity project for your school or scout organization this one is terrific. Theresa has Boy Scouts and sports teams collecting socks for all sorts of projects.

5. Did you see the great giveaways at the DIY Showoff? Click on this button and head on over!
The DIY Show Off


Now head on over to the linky party at Just A Girl.


Have a great week!

Thursday, November 5, 2009

Somebody's Baby

I moved out to Los Angeles to marry my best friend. There is no other reason I would have considered life on the "Left Coast." Many, many things have been shocking to me, but the one thing that really upset me in my first visits and first year here was the problem of homelessness. I'll be honest, one homeless man near my  apartment looks exactly like my childhood image of the Boogy Man. Although we never interacted he frightened me.

One day at lunch we were discussing the problem of homelessness in the city. I asked one my colleagues if her children were afraid of the homeless and how she talked to them about the problem.

She said, "I tell my kids that the homeless men and women we see were once somebody's baby."

 There by the grace of God go I.

It was a comment I needed to hear. One that changed my life. It softened me to see the person within the rough crust of street life.

One of the reasons we joined our church is that they have a tremendous acceptance of all people. Homeless people come to our church and participate fully in worship each week and we serve a small lunch each Sunday that is free for anyone. On Tuesdays we serve bag lunch to over 100 homeless persons each week. In addition to lunch, clothes (especially socks) and toiletries are made available. I think it's a powerful demonstration of God's love and it is an important ministry to my development as a Christian as well.

I love the creative challenge of making the play kitchens and it's been a great way for me to contribute to the homeless ministry. I like the fact that on both ends "somebody's baby" benefits.

I started the Play Kitchen Build Along to share my techniques. Free and easy-like so many of the wonderful craft tutorials on the internet. It's an amazing community this internet!

Along the way on this creative journey, I have made some great bloggy friends. And, one friend who has given me so much play kitchen love, shared the idea of setting up a way to donate to the homeless lunch program. I am so amazed by the heart of this creative community! Craft-ivism is one of the big reasons I love blogging! So many opportunities to use your creative passions for the greater good.
If you are enjoying the Play Kitchen Build Along and would like to contribute to the Homeless Lunch Program you can donate on paypal! You can read about the lunch program here. You can donate to the lunch program here. Be sure to put "Homeless Lunch Program" in the purpose box so your donation gets directed properly.

Thank you for considering this cause!

Play Kitchen Build Along Introduction
Lesson 1 Supplies
Lesson 2- Demo & Construction
Lesson 3- Assembly & Body Paint

I am linking this post to the DIY Showoff  Show & Tell party! If this is your first time visiting- Welcome!
The DIY Show Off

Wednesday, November 4, 2009

Pottery Barn Inspired Serving Piece- Gorilla Glue Style


I was inspired by this serving tray and for weeks I thought, "I know there is a way I could make that!"  So as I was out at garage sales, or in a hardware store, or a thrift shop, I just kept the image of this tray rolling around in my brain. 
Candle Sticks & Cookie Tins Before
Once I let go of the galvanized metal look it came to me quickly, cookie tins! I even had two of the three I would need at home! Another round at the thrift and I came home with a couple of wooden candle sticks. I had some thick dowel and the round ball thing already in my wood stash.

Pottery Barn Inspired Serving Trays
Man! I wish I had some fun Christmas goodies to put in it for the photo!
Use your imagination and picture these cookies in the bottom layer. Candies in the middle and nuts on top.
Peace, Love, Joy

Here's How I did it:

First I glued the lids to the bottoms of the tins. Not only did this give the bottoms extra strength, but it also makes the tin look deeper.
Gluing lids to bottom of tins
Then I weighed everything down and waited for the glue to dry.
Weight Helps the Glue Set Right
Next, I primed and painted each part. I could have painted it with the hammered metal spray paint and it would be more authentic to the PB version, however, I am going to give this as a Christmas housewarming present and I think the soft white is more Christmassy. Of course, if you found tins in a print that you liked, you wouldn't have to paint them at all. I didn't paint the insides because I want to use them for food.

At one point, I had to get tough with my Gorilla Glue!
Getting Tough With My Gorilla Glue

More gluing and a different set of weights.
Weight Helps the Glue Set Right

I used rocks to weigh down the top tin. I really think they are pretty in there!

Gluing the Top Layer

I am super excited with the results! Not only was it cheap! It would be easy to duplicate again in the future. I plan to fill it with nuts, candy and homemade cookies. Cliff thinks it would look good with some greens as a planter. I was also thinking bath soaps, trial sized shampoos and rolled up washcloths would be kind of spa like.

PB Version- $64
My Version $10

Tins: I had two and bought one for $0.99.
Candlesticks -$0.99 each
Thick dowel & wood ball- had in stash
Spray Primer- $3 (tons left over)
Spray Paint- Rustoleum "Shell" left over from another project -free!
Gorilla Glue (Regular- I guess)- $4 (tons left over)


Shanty 2 Chic

Tuesday, November 3, 2009

Build With Me: Lesson 1 Supplies

Kitchen Lesson Logo
Thank you for joining me for the Play Kitchen Build Along!


Lesson 1 is all about the supplies! This week you will need to gather your supplies.
First Up- A Supply List PDF

I recommend printing this list out and reading it along with the post. You can then highlight the items you would choose as I discuss them below. There are many substitutions and I hope that you are inspired by the options presented to expand on these ideas. If you come up with something new, please share it!

This is a long and detailed post. Bear with me! Gathering the supplies is the most time consuming part of the whole process. Although, you probably have a lot of these things at home.

The Base Cabinet
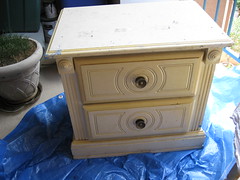
The base of the play kitchen is a nightstand, small cabinet. or chest of drawers. For these directions, I will be working with a two drawer chest. The top drawer will become the oven and the bottom drawer will be removed to make a storage area. With four kitchens under my belt, I can safely say this is the easiest, cheapest way to go. If you are going the "tool free" route, the top drawer is especially important. However I can assist you with any questions should you have a different styled cabinet.

In the past I have been really lucky to find cabinets on the curb or get donations through craigslist. This time however, I bought the cabinet I will be using. I saw it on craigslist for just $5 and went for it.

In LA we are very lucky to have a thriving resale market with a Goodwill or other thrift store on every corner, year round garage sales and a very active craigslist. However, in other places you might have a basement, attic or garage. (Concepts that are just a distant yet fond memory for me.) Shop your home. Call the in-laws. You never know what someone might be storing and willing to part with.

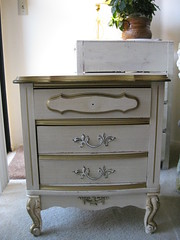
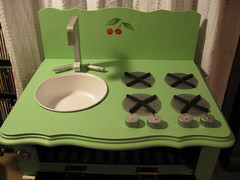
These are the nightstands I have used in the past.


This awesome retro nightstand was (maybe still is?) just $35 on the Tucson Craigslist.
Updated- This very cabinet was snatched up by one of our build a long builders! I could not be happier that Amanda from All Things Creative got this cabinet for her kids' kitchen to be!

This one was (maybe still is?) just $10 on the Houston craigslist.
One last consideration for the cabinet is height. The counter top height on mine will be about 23". However, if you have a tall child, you may want to consider a higher cabinet in order to accommodate them for longer.

Paint
Paint- I always use primer, paint and a low odor sealant. A quart of paint will do you.

I buy a quart of primer and use it on multiple projects. I just consider it a balcony workshop staple. Many people swear by spray paint primer. I am thinking that one can of spray paint primer would probably work. You could always buy two cans and save the receipt just in case.

I get my paint from the "oops" shelf at Home Depot. Lowes and smaller paint retailers also offer these cans for cheap. If you have a certain color in mind, or if you want to save time, I highly recommend the Dutch Boy "Twist and Try" quart. I went to OSH hardware and they custom mixed a color for me in the satin finish for just $5.With the satin finish, you may be able to skip the sealant. On the other hand, if this is likely to be your first and last project for a while, spray paint might be the most affordable option with little left over to store or dispose of.

To seal and protect my efforts, I use Zar Ultra Max Satin Polyurethane. I chose it because it was low odor, fast drying and cleaned up with water. I load it on so it can be a little bit yellowing. I think I paid about $20 for it, but one quart was far too much, so I have lots left over. If you want to save time or money, a can of spray on sealant works great. You can get it at Michaels with a coupon and one can should be more than enough. Just beware, the fumes can be nasty. Be sure to work in a well ventilated area.
 
Craft paint- I use silver, gray, and black acrylic craft paint to paint the oven and the knobs and such.These little 2 oz. bottles are very inexpensive and often on sale at Michaels. I have also used silver spray paint. Craft paint is just as easy.

You will also need a paint brush and or foam roller, and a dropcloth of some sort.

For the counter top I have used regular paint.


 I have also used Rust-Oleaum American Accents Stone Spray Paint.


The "Stone Pebble" looks just like granite. It runs about $8 a can and is also available for purchase with a coupon at Michaels. One can should be enough.

Other Supplies:
Knobs- For a while I was buying wooden wheels to use as the oven knobs and then I realized that plastic lids from soda bottles or milk cartons are just the right size. Diet Coke is my preference because they are already gray and scratches wont show on them. Diet Coke is also my beverage of choice while working on the kitchen. :) For the sink facuet handles have used the little wooden turnings that are shaped like people bought at Michaels or thick dowel cut into small lengths as knobs.
Yet another picture!
This picture shows the wooden wheels and wooden people used as knobs for the oven and faucet. You can click to see a bigger picture.

Faucet- I know lots of people buy or use real faucets so that is always an option. If you have an old faucet sitting around, by all means use it!  I use a white 6" wooden letter "L" or "J." I have bought them both at Michaels and at Joannes. They cost about a dollar. However, I have recently noticed that they are harder to find and that the fonts for these wooden letters are changing.  I use the block letter style because it is symmetrical as opposed to flat on one side. Thicker 8" paper machae letters might also work. Wooden letters are my faucet of choice because of the scale, ease of  installation and price.

Burners- I like to cook with gas and I think budding gourmets everywhere would agree with me. So, I cut and paint and glue all those little bits of dowel to make the raised gas burners. A thin dowel is available for about $0.75-$1 at hardware stores. Recently, I got smart though and bought a pack of  50 pair of chopsticks for $1 at General Dollar. The chopsticks are soft enough that I figure I can use a craft knife to cut them. I think I will use about 8 pairs to make four burners, but I may need even less. Maybe you can get some free chopsticks the next time you eat out?

On the other hand, you could just as easily paint your burners on and that would save a few dollars and a few steps. Or, if you have old CD's you could use those as modern burners. Coasters might also work. There is lots of room to get creative!
Chopsticks and Door Handles from the $ Store

Oven Handle- I now buy my handles in a four pack at the dollar store in their hardware section. That makes them about $0.25.  Home Depot has nice simple handles for a dollar or so. Depending on your cabinet, you may be able to repurpose the drawer hardware.

Hinges- If you want an oven door that opens down, you will need some hinges. You can buy these for a buck or two at a hardware store. Or you can make leather hinges out of an old belt.  If your cabinet has doors with hinges, you can recycle those! I got a pack of two hinges for a dollar at my Dollar General.

Corner braces- I often add small corner braces under the edge where the oven door sits just for extra strength.Sometimes I am able to get these at the dollar store and other times at Home Depot or Lowes.

Plywood- I use a $4-$8 piece of plywood that I get cut for me at Lowes or the Home Depot. If you are going the tool free route, you can either have a hardware store cut the wood for you, or you can glue several layers of cardboard together to create a firm and sturdy shelf. This is one thing you will need to hold off on buying until you have your cabinet and can measure for the size accurately.

Curtain Rod- I use a 3/4" dowel for the curtain rod. If you are going the tool free route, you may want to buy a small cafe curtain rod.

Fabric- You will want to measure the width of your cabinet and get a scrap about 1 1/2 the length of the cabinet. This will make your curtain gather nicely. I use a sewing machine to make my curtain, but you would not need to do that. You could hand sew it or even probably hot glue it!

Glue/ Putty- Your heavy duty glue of choice. I use Elmers Wood Glue and or Gorilla Glue. I also use Elmers Wood Filler if needed to patch up dents and fill in cracks or holes.

Extras- This is where it gets fun. I like to put a little hook for aprons and pot holders on the side. This is the hook I use because I think it looks less pointy and safe. I also like to add a magnetic chalkboard on the other side. I usually buy a wooden frame and cut out a cookie sheet, put it in the frame and make it into a chalkboard. It's cheap, but not easy. I recently learned about these magnetic boards and I think they are great!

Tools:
 These tools are handy, but not necessary! It is easier with power tools so you might want to ask around to see if you can borrow some.
Power Drill
Power Screw Driver
Hand Saw
Jig Saw
Heavy duty scissors
Utility knife/ exacto knife

If you are going power tool free,
The only tools you really need are a screw driver, a hammer (or a big rock, seriously- it would do), and a thick nail.

Sink- You need a bowl with a rim. For the first three kitchens I scoured Goodwill for just the right bowls. Not any more. Time is too precious. Now, I go to a restaurant supply store and buy a nice bowl with a wide rim (important to allow bowl to hang/ balance in place.) Ironically, the restaurant supply place is cheaper than Goodwill!  Dollar store cake pans work well too. If you are going tool free, I would suggest a cake pan because if it's low profile.

Misc:
screws
sponge/rags
degreasing cleanser
sand paper
Chalkboard paint to make a memo board on the side-optional
permanent marker
masking tape

Feeling Overwhelmed? I swear the gathering of materials is the hardest part. From here on out there will be lots of pictures and options! I think we will finish before six weeks, but just wanted to play it safe.

Play Kitchen Build Along Flickr Group I encourage you to share photos in our Flickr group. It's a great place to get ideas and encourage each other with comments.


OK, feel free to leave any questions in the comments. I will update this post with answers so that everyone can benefit from shared knowledge. Go forth and gather! We'll meet back here next Wednesday to get building!


Updated: Lesson 2 will be about measuring to buy the wood for the shelves and how to create an oven.

Updated: Stephanie asked a good question about the cabinets all being made of wood. Many do have some laminate. My last two had quite a bit of laminate on the tops and this current one is particle board on the sides. No worries! It will work! There is almost no sanding and with priming your paint will stick just fine.

Updated: About a minimum size- I sold both the blue and green kitchens without keeping any notes on the size. I did go out and measure the drawer from the green kitchen (the smallest I have made) and the drawer is 15" across. The counter extended about an inch beyond the drawer and there was about a two inch frame on either side of the drawer. I am guessing that the width was about 20"-21." I think it fit the sink and four burners just fine. Most kids dishes are small fry pans or sauce pans.

Lesson 2

Lesson 2 Tool Free

My Play Kitchen Inspiration


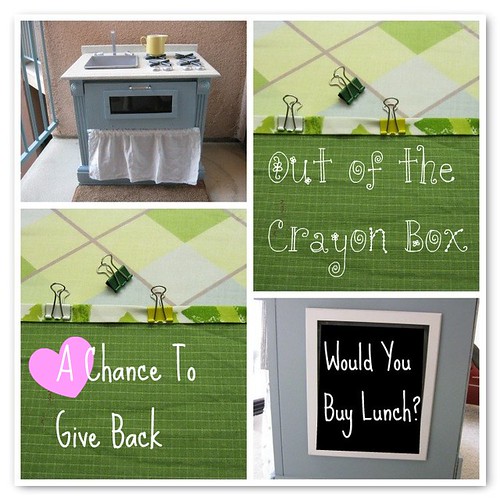
Out of the Crayon Box


* If you make a play kitchen from this free tutorial, I'd really appreciate if you would add a picture to my Play Kitchen Build Along flickr group and link to this tutorial on your blog! Thanks!

Monday, November 2, 2009

DIY: Handmade Christmas

About three years ago I switched over to an almost completely handmade Christmas. While I can't share this year's projects yet, here are several from years past and my DIY Christmas story.

Mixy Matchy Placemats
Mixy Matchy Placemats for my cousin whose girls were learning to set the table.

At the time I had off from work during November. "Off track time" (as we call our non traditional school breaks) sounds great, but actually sometimes it was a really lonely time for me. All of my friends work during the day. Infertility, malls, the holidays- the combination can get really ugly. So, I turned my craft therapy into a full on Santa's workshop and for so many reasons, it was one of the best choices I have ever made.

Gingerbread men for a Dallas Fan
 Cookies for a Dallas Cowboy's Fan.

The tradition stuck. It is time consuming, but it helps me feel connected to my family. I think of the recipients while I create. I hope that even if they don't love, need, use their gifts, at the very least they know I love them very much.
journal cover
Collage covered marble notebook for a friend who journals.

A handmade Christmas saves me money-mostly because I don't go to the mall and see/buy things for myself. Truly. Limiting my Christmas shopping also saves me from feelings of lack that the mall by design brings on. It allows me to be part of the Advent Conspiracy. (Read on, but then check out this video. It always gets me.)
B-Day Bunting
Reusable birthday bunting.

This year our school is on a traditional calendar and I will be celebrating all the December holidays with my beloved Crayons. There will be Christmas shows, report cards and parent conferences. It will put a crimp in my crafty ways. However, I am still commited to continuing my handmade Christmas. A more humble version to be sure.

Here are three things I have learned along the way:
1. Multiples are good.

Heat/Cold Therapy Set
Rice Heat Therapy Bags (tutorial here) -good for one...
Stack of Rice Heat Therapy Bags
and all! Seriously, the big bulk bag of rice made this project super thrifty!

Tote Bags
By the time I made two of these tote bags for my little cousins, I was on a roll. Becoming good at a pattern makes it quicker and much more enjoyable. This goes for any craft as well.

2.The difference between cheap and thrifty is the thought behind it.

Chic Flic Movie Quote Pillow
This pillow hardly cost anything to make, but I added favorite movie quotes to the patchwork making it very personal. The collage notebooks cost about a buck, but the personalization made it so much more.
Notebook for Berry

3. Men love cookies.

Gingerbread

Speaking of handmade Christmas, did you see that I am hosting a Cute & Thrifty Play Kitchen Build Along?
Yup. For the next six weeks, every Wednesday I am going to post step by step directions on how to build your very own play kitchen out of a repurposed nightstand, end table, cabinet or small dresser.
From this:
Small chest
Donated Nightstand
To this:
New Bowl
Simple Blue Kitchen

In time for Christmas!

I even have plans for a "no tools" variation! Get the details here.

Be sure to check out all the other terrific DIY ideas at ASPTL and 12 Weeks of Christmas at Reds Writings.


DIY Day @ ASPTLTwelve Weeks of Christmas