Wednesday, March 31, 2010

I am taking the plunge!

Lately, I have been thinking that I spend a bit too much on craft supplies. And, with a week of furlough days coming my way in June, it is time to tighten the belt a little more. So I was really happy to see Dollar Store Craft's April Challenge. I think I could craft for a good long time without buying much, but this is an all out buy nothing pledge. Blogging about it would make it easier and a whole lot more fun.

No doubt it will get the creative juices flowing!


Today is March 31! I gotta go stock up on a few things I know I need! LOL. I swear tomorrow I will go cold turkey!

RIP

Jaime Escalante & Edward James Olmos
"Jaime exposed one of the most dangerous myths of our time — that inner city students can't be expected to perform at the highest levels. Because of him, that destructive idea has been shattered forever."
-Edward James Olmos

Thank you Mr. Escalante.

Tuesday, March 30, 2010

Toy Roll Up Re-Visited

I like to have small yet thoughtful gifts on hand for when we visit friends with kids. I know I don't need to bring a gift every time but, I like making stuff and this is as good an excuse as any! Another benefit is that sometimes a gift can distract the kiddies long enough that I might enjoy some adult conversation with their parents.

Here is a variation on Sharla's Car Cozy.

It's an ocean animal roll! (Got a better name?)

I bought the animals at a really charming independent toy store in the Pacific Palisades. It cost about $4 and has very detailed little sea creatures. I later saw a similar version at the Dollar Tree.

If this doesn't amuse the kiddies long enough for adult conversation, at least it's something I'd like to play with. As long as I get to be the shark, that is.

I'm not one for fussy little pockets. Who wants to mess with getting little animals in individual spaces when the food finally arrives? So, I made this with lots of folds and layers for the animals to "swim" in, but one big pocket for clean up.

The sandcastle was drawn on with a disappearing pen and then sewn over with my sewing machine. It came out just as I imagined-whew!

The "waves" are folded strips of fabric with the raw edges showing. I layered them and then sewed them together in the middle. This made them one big sheet.
These are they folded layers. Just some fabrics I had in my stash. The whole thing is just under 8"X11".


I sandwiched the ocean layers in between the sand and the back -rights facing rights and sewed them together leaving a bit for turning. Then I hand sewed it shut and added the sandcastle embellishment. Finally, I added a hair tie for the elastic closure. I used to use ribbon, but again, I noticed that my friends really don't have time to fuss with ribbons and ties when they are wrangling the wee ones. Another advantage to using hair elastics is that they come in so many colors! My sewing machine sews right over these hair elastics with no problem.


This toy set came with a dozen sea creatures. I will most likely, make two and split the set up. Six is plenty for the space of the play mat. I am on the look out for farm animals and especially horses. There are a lot of possibilities for this kind of travel friendly toy!

Today I am linking up with "Get Your Craft On!"


Hope you are having a great week!

Sunday, March 28, 2010

Craft Club- Steampunk Softies

Oil BuzSmiling Robot"I Need Some Hot Oil"

The steampunk robots are done!
They are joined by a skeleton lady...
Skeleton
a pair of steampunk Sponge Bob Square Pants...

Steampunk Sponge Bobs
and a steampunk fairy.
Steampunk Fairy

The Crayons were *amazed* by the Citra-Solv transfer. I was amazed by how well they did with sewing. We might have to try more sewing projects.

Comfort Socks Drive

“If you can't feed a hundred people, then just feed one.”
 Mother Teresa

Or if send a pair of socks!

You can send your socks directly to Comfort Socks:


 Comfort Socks
  
PO Box 477

  SupplyNC 28462

Thanks to everyone who has already sent socks! 


Thursday, March 25, 2010

My First Quilling Students

My First Quilling Students

My dear friend Alli has started her own quilling blog! She has several adorable quilling projects for Easter posted. Be sure you check it out and give her some comment love too!

Anyway, kind heart that she is, she donated a whole box of quilling paper and curling tools to my craft club!!

So last Friday, when no parents showed up for parent conferences (funny how that happened she says with a knowing smile) I was alone in my room. Three girls came wandering in looking for something to do. Lucky timing! I put them to work trying out my quilling lesson.  They were the perfect guinea pigs because they represented grades 3, 4, and 5 and none of the girls had ever even heard of quilling.

In no time at all they were quilling with success. They each made a flower and we glued them to some old business cards. Two business cards glued together makes a pretty nice gift tag.

Now, the true quilling test would be at craft club...with the boys.

No worries. All the boys happily made quilled flowers. The project was to make flowers and leaves for a spring branch. I gave everyone red paper to start and then the girls asked for other colors. Soon the boys wanted other colors too.

A few years ago I took my third graders to the Ghetty Villa in Malibu. As they roamed the halls of antiqueties they called out, "Hey look it's Poseidon!" and "There are the sirens!" We got many stares from the "upper crust" folks. Several people stopped me and asked me how these kids knew so much about Greek Mythology. To which I replied, "They learned it at school." I felt so happy for them making it in another world, really.

That's how I felt when we were all sitting around quilling.

Wednesday, March 24, 2010

Five Dollar Challenge- Kids Craft! Easy Mini Easter Baskets

Mini Easter Baskets from Peat Pots
It's two for one today! While in the 99 Cents Only store, I happened upon these cute little peat pots.
Peat Pots
Since I am not a gardener, I was not familiar with these babies. So much goodness for so little money! I have 30 students this year, so this was a jackpot! We could make an entire class craft for just about $4! Makes my heart sing!

Supplies: Peat pots, each basket uses 1 1/2 peat pots, hole puncher, brads, craft paint, Easter grass, any other embellishments you like. I used some curling ribbon. I also used a hot glue gun on one of the baskets.

Step one: The Handle
I think pipe cleaners would also make great handles, but I didn't have any. So, I improvised and cut an inch rim off a peat pot and used it as a handle. Then I used the hole puncher to make holes for the handle and on each side of the basket. Just for fun, I used scallop craft scissors for one of the handles.
Handle Cut from Peat Pot

Step two: Paint your pot and handle. I used regular acrylic craft paint. At school I will use regular tempera school paint. Allow it to dry for a while. These pots are really absorbent and they take a while to dry. It would be fun to embellish these with stickers, tissue paper flowers, quilled flowers-anything really.
Brads Vs. Hot Glue for Handles

Step three: Attach the handle. My students will be using paper brads to attach their handles. I decided I liked the skinny little rim that I had cut off one pot and hot glued that as a handle.

Step four: Fill with grass and candy!
Peat Pot Easter Basket Place Marker
Since these are so easy and so economical it would be fun for kids to make one for each place setting. I remember once I made school ice cream stick Pilgrims for our Thanksgiving place markers. I felt so important contributing to the holiday table.


Cost break down:
16 peat pots - 0.9999 (Yes, that is how 99 Cents Only prices things!)
curling ribbon- Stash-I had it at home, but I got it at the 99 Cents Only a while back
Easter Grass- ditto
paint- stash
brads and hot glue- stash

When I make these with my class on Friday I will buy two more packs of peat pots, grass and jelly beans for a grand total of $4! Whoo Hoo!


Now the real question is: How much will I spend at the dollar store after visiting all of the other challenge participants???

Five Dollar Challenge: Spring Pinwheels

It's the $5 Dollar Challenge over at Living With Lindsay!

I was spinning my wheels* all week to find another $5 craft to enter in the contest. These things just get my competitive and crafty juices flowing. Then right there in the middle of  99 Cents Only it hit me- pinwheels! I think pin wheels are an iconic symbol of spring and especially refreshing if you aren't too into Easter decor.
Pin Wheels
My home is mostly primary colors so there is a limit to the pastels I use.

To make these I purchased three pinwheels, and a package of double sided scrapbook paper at my local .99 Cents Only store. Total spent $4.
 Pin Wheels and Scrapbook Paper
At home I gathered my drill, a block of scrap wood to drill on, my 2" scallop punch and some Easter grass that I use over and over from year to year. I also used a 3" bit of pool noodle left over from my pool noodle wreath.

Step one:  Dissect the pinwheel.
Disected Pin Wheel
Step two: Make a pattern from the pinwheel. I traced mine onto a piece of double sided scrapbook paper that was folded in half. This way I would get both patterns traced at once.
Pin Wheel Pattern
I was careful to mark the holes for drilling.

Step three: Make the holes. I like to use my drill, but you could also use a needle or something to make the holes.
Drill Holes

Step four: Thread the pinwheel onto the stem following the example of your dissected pinwheel.
Fit Paper onto Pin Wheel Stem
This is where I was so happy I had found double sided scrapbook paper.
Pinwheels
Step five: Cut a scallop in a coordinating paper and add that to the stem. Experiment with all kinds of places to display the pinwheels. First I tried my houseplants.

Then I decided I wanted to plant just the pinwheels like flowers. I went into my scrap bin and grabbed the last 3" of my pool noodle to use in place of floral foam. I just knew there was a reason to save that scrap!
Pool Noodle Trick
I drilled a few holes in it and stuck the pinwheel stems right in. It works like a charm! Then I covered it up with some Easter grass.
Pinwheels
The colors match our bathroom perfectly!
Pitcher Full 'O Pinwheels
Cliff likes them in this pitcher on our coffee table.

As always, you can click on any picture to see them larger.


This was an easy 1/2 craft that has brought a breath of fresh air into our apartment! Wouldn't these be great for party decorations!

* Can not resist a pun. Sorry!

Be sure to visit the other $5 Challenge participants at Living With Lindsay!

Monday, March 22, 2010

$5 Dollar Store Decor Challenge!

Winter Decor & Giant Dollar Coat Rack

This is our little entry way nook. The repurposed futon to shoe bench is serving us well and I personally love the drawer front coat rack. I especially loved it with my festive Christmas winter ice skates. When it hit 90 degrees the other day, I knew I could no longer justify my winter decor any longer.

Meanwhile, Cliff has never been too fond of the drawer front coat rack. I think it was a bit too "repurposed" looking for him. (Boo! That's the part I like!)

Anyway, I have been kinda keeping my eye out for a new coat rack idea. The universe was happy to provide lots of inspiration too. This post about a DIY Eames Hang It All Coatrack has been in my "Google Stars" folder for a long time. Then at Ikea I saw this Logga coat rack and thought that I could hack that to make my own DIY Eames coat rack. I didn't put it in my cart right away and my normal ADD mixed with Ikea over-stimulation got the best of me. I completely forgot about it.

Clearly, this project was meant to be because what should I spy at my Giant Dollar on Vine Street?
Giant Dollar Coat Rack
Check it out! This coat rack is practically begging for an Eames makeover!
Mixing Colors
Oh, the joy of mixing colors...

Wet Paint
I could not get enough of these! I took a bajillion pictures, but couldn't really capture the lusciousness of the colors and the dripping paint. So much fun. The skewers came from the dollar store as well although I had not bought them for this project. They were perfect for dipping the wood balls "Bakerella style."

I sprayed the frame with some leftover white spray paint and then slid the balls back on. Easy peasy! Not all of my craft paint was glossy, so I gave them a shot of clear sealer (from my stash) as well.
Eames Inspired Coat Rack
Here it is! A breath of fresh -spring- air!
Eames Inspired Coat Rack
Hello my pretty!

Let's see, I had the paint and sealer. So this project cost $2! One dollar for the rack and another dollar for the skewers. Whoo hoo! Bonus points- Cliff likes it! We won't need Micheal's help just yet.

Are you participating in Lindsay's challenge? There is still time!


Sunday, March 21, 2010

Long Live Play TIme!

One of my favorite quotes about childhood is "Every mighty oak was once an acorn."
This transformation is for my favorite little acorns- the Our Fair School Pre-Kinders!


Pre-K Play Kitchen
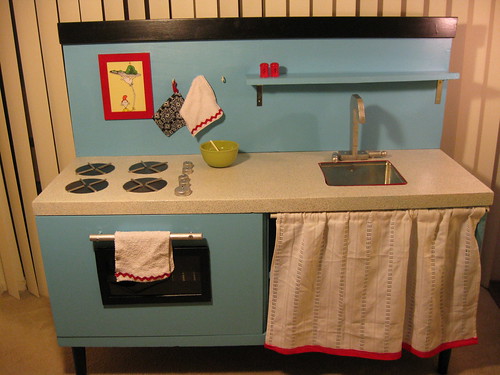
 This is by far the biggest kitchen I have made. (I finished after dark thus the lights for photos.) To give you an idea of the scale here is a shot of  play kitchen to apartment ratio:
Photo Studio for Pre-K play kitchen


I've made arrangements with our custodian to sneak it in their classroom Monday morning.
Pre-K Play Kitchen Oven
 Typically I am a purist about oven doors opening downwards. However, this oven is so large, I left it as is for safety's sake.
Cookie Tin Sink
I used a cookie tin for the sink. I don't think it works as well as the bowls with a lip, but I had it on hand and I liked the square shape for this kitchen.
Pre-K Kitchen Counter
The teacher in me thought an alarm would sound when I cut this picture out of a thrifted Dr. Seuss book. It's almost criminal! It was the very last page and the story is not at all damaged. I kept the book for my own collection. I have about 100 picture books, but not Green Eggs and Ham- go figure!

I made a dish towel from a wash cloth like Sharla from My Little Gems. I followed this tutorial for salt and pepper shakers.Using buttons for the top was genius! They have holes and more importantly, I had them on hand. After 5 play kitchens that trended towards girly, I think I really nailed "gender neutral." Oh, and I made my own 'j' shaped faucet with my jigsaw and a bit of scrap wood. I think it fits the scale of this kitchen better than my usual store bought 'j's.'

Here's an approximate cost break down:
Cabinet- craigslist-$20
Paint- HD oops $2
Assorted scrap wood- HD scrap bin $3
Dowel -HD $1.50
Brackets- Giant Dollar $2
Picture frames (One is the oven door window) 2 for $1 -Ikea bought at Goodwill
Wood turnings for faucet handles- Michaels $1
Valspar Stone Spray Paint - Michaels $4 after 1/2 off coupon
Primer and black and silver paint- stash
Fabric and trims -stash
Screws, washers and glue- stash
Total- approximately $34

I can hardly wait for Monday! I feel like it's Christmas and I am Santa!

Are you interested in building your own play kitchen? I have a complete tutorial here! 
There is awesome inspiration at the Play Kitchen Build Along Group on Flickr!

I should be asleep but I am wired from the post project high, gonna check out the Weekend Wrap Up at tatertots & Jello 'till my eyelids drop!

Monday, March 15, 2010

Craft Club Project 2- Steampunk Robot Softies

My Steampunk Robot
I am a big fan of Steampunk art. It really captures my imagination and I admire the vast creativity. I knew my Craft Club Crayons would think it was neat too.Their steampunk images are coming along nicely. So far they have several robots and a steampunk Sponge Bob.  I can hardly wait to share the finished results. In the meantime, here is a tutorial.

I collected a variety of steampunk images to view. I found these all on Google images.

Here are our inspirational images:
Steampunk Robots
Steampunk Charlie Brown
Steampunk Willy
Steampunk Crow
Steampunk Dog
Robots
Cup of Robots
Pair of Robots

From there, we discussed some of the common ideas in Steampunk like stitching, rivets, metal, gears, pins etc. Because I want craft club to be free of anxiety and drawing gears would make me anxious, I googled "gears", "clockworks" and other steampunk stuff. I cut in pasted those images into a word document and made a page of all sorts of images that the kids could cut out and use in their drawings.

I modeld drawing a robot and added some gears and steampunky stuff to my image. Then when I was done I traced over some of the lighter parts with a black felt tip marker.
My Robot Photo Copy
The red arrows point to all the images I pasted on to my robot.
Next step, photo copy.
Citra-Solv Transfer

Then Citra-Solve transfer on to muslin. (You can read my post on that process here.) I was thrilled that the lighter details came out so clear! As always, you can click on any of these pictures to get a better view over at Flickr.
Sewn
To make our robots into little softies, I simply laid another piece of muslin over the top of the image and sewed around the image. The fabric was thin enough that I could see through easily.

Next, I cut 'er out and stuffed her up. Simple stitches finished her off.

Head Shot

I think the Crayons will be able to do every step except for photocopy (not allowed in the teachers room) and the sewing machine part. They will be able to do the transfer and the hand sewing.