Showing posts with label Artsy Crafty Ambitions. Show all posts

Sunday, March 18, 2012

Getting My Crafty Feet Wet

So, it's not so easy to craft with a baby. I know that many of you are probably thinking, "Duh!"

With so many blogs named things like "While She Naps" and "Nap Time Crafts" etc... I kinda thought there would be more time. Maybe if I had a designated space to craft in, it would be easier. Much of my craft energy is sucked up just thinking about the time it would take to set up and clean up. That's when I just say, "Nah" and go on Pinterest instead. The weekends fill up so quickly now too. It really is a whole new world. I knew it would be. I just didn't know in what ways.

Anyway, I have made three things lately that are blog worthy. Probably even worthy of their own posts, but as they say, "Those were the days."

Project 1. Cookies for my niece Ava's first birthday. My sister in law stayed home this year. Awesome opportunity! No paycheck. Womp, womp, womp. So when first birthday time came around I offered to help with the party in lieu of a birthday toy or outfit type gift. The cookies that I made were the party favors.
This was a whole family effort. Cliff watched the baby while I worked pretty much round the clock. Marilee did get in on the action during some of her feedings though. The party colors were pink and purple and timing was perfect to get Easter m&m's for the "cherry" on top.

 I had grand packaging ideas courtesy of Pinterest.  In the end, I stapled the bags shut and hot glued a scalloped cut out over the staples. I mailed out 60 of these babies and only 11 broke in transit. Not too bad. My SIL needed about 40 for her party.

Project #2 My other niece, Elle, also turned one this month. (Both nieces are only a day apart in age!) While I would have loved to do something just as grand for my little Elle, I simply didn't have the time or energy.
I decided to give them something sentimental. The inspiration pin:


Cute right? There are so many changes in the first year that I thought it would be great to capture them in one place. Also, what do you do with all the cute snapshots other than put them in an album? I wanted those little moments to be available for more frequent glances.

Here is my version:
I am not even going to apologize for the photography. It is what it is these days.

I chose a shadow box frame. I used the scalloped punch that I already had and mounted the photos with thick mounting stickers that stand out a bit. Elle's room is pink and white, so I used pink and white scrapbook paper for the background. I had planed to make a flower for one space similar to the star above, but I couldn't vote any of the pictures off of the island. This Auntie loved them all too much.


Sleeping, crying, the little hands. I know I want to remember all these little things!
I spy a Molly Monkey! Yes, it turns out it's a favorite!

This project was quick and easy to make. I lifted the pictures from my brother's flicker and facebook accounts. That took the most amount of time. The rest was a breeze.
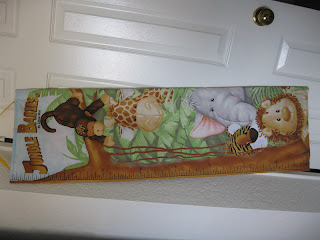


Project #3 hardly deserves to be called a project. It comes from one of those pre-printed panels and was sewn together in minutes. Although, I would like props for dragging out the ironing board. That thing hasn't seen the light of day this year.

I was super psyched to find this panel because Marilee is going to a birthday party this weekend and I needed something extra for the gift. My colleague volunteered at the LA Zoo for quite a while and was especially involved in the new elephant exhibit. So this is perfect for them.

I had emailed my friend about sizes and such and she told me:
They like primary colors and especially spring green. The baby is thin, so elastic waistbands are a must. They prefer gender neutral stuff and they love animals.

Source: crazy8.com via J on Pinterest


I am pretty excited about the gift. I found this adorable spring green panda sweater at Crazy 8 and paired it with some black leggings.

Animals- check!
Spring green-check!
Elastic waistband- check!
Gender neutral- well, c'mon how cute is the bow?

Crazy 8 is my new favorite kids store. I haven't bought Marilee anything from anywhere (except for socks) because we have gotten tons of  gifts and  hand-me-down motherload from my niece Ava and a few other friends. But, I have gotten a few things for Ava as thank you treats and the prices are fantastic! Also, I like that the clothes look like they are for children. Baby Gap can be hit or miss. Sometimes it's awesome. But I went there once when I was pregnant and everything looked like a shrunken version of Banana Republic. I don't need my babes to look like they are going to a cocktail party after a full day at the office.

It feels good to be back in this space. Summer is just around the corner. We have grand travel plans, but hopefully, I'll get back to crafting too. It really is part of who I am and I miss it! How have all of you been?

Tuesday, January 31, 2012

For the Love of a Mobile

Marilee is at the stage where she will look at a mobile for a good 10 to 15 minutes. In my world that is a lifetime! Naturally we want to have mobiles all over the house. We were gifted a crib mobile with a music box, so we moved this mobile to over her changing area.

IMG_3557
I saw this idea first on Pinterest and wrote about making one here. It's terrific because the breeze from our heater makes it move and twirl quite a bit.

Recently we set up a pack and play in the office and I wanted to add a mobile in there as well.
Mobile Supplies
The Michaels dollar aisle yeilded some cardboard birds and some assorted wooden shapes. Then this Sunday we were given a present with such beautiful wrapping paper I was completely inspired.Mobile 3
Mobile 2
A little Modge Podge, paint and wrapping paper and we were in business. I do plan on adding some ribbon to the embroidery hoop as in the mobile above, but otherwise I am quite pleased. Most of this was done while nursing so that alone is an accomplishment!

I go back to work tomorrow and I am feeling pretty good about it. Cliff is going to be the modern stay at home dad and I think he is looking forward to that new job too.  Mostly, I feel incredibly blessed to have a good job in this economy and a sweet family to come home to.

Friday, January 27, 2012

Favorite Picnik Projects Before They Close


This week I am going to repost some of my favorite projects using Picnik. I believe their last day is April 19. There is time to make any number of projects if you don't delay.

Anyway, this post actually comes from my old school blog, My Many Colored Crayons. This was one of my favorite projects ever. Enjoy!

Sky Blue's PortraitRed Ribbon Week Door Contest
Portrait of a Drug Free Future!
It's Red Ribbon Week at OFS and this year we are celebrating with a door decorating contest. I have a slight problem with bragging about the Crayons and today is no exception. Check out this door!! See our Red Ribbon bracelets? The little "red ribbons" contain student writing on why they pledge to be drug free. I think it has a good chance at winning!

And, I really want to win which is silly since the prize hasn't even been announced.

I was inspired by a portrait project in this month's Family Fun magazine which unfortunately is not linked yet. However, their project had multiple
steps and involved acrylic paint. It just seemed a bit complicated when multiplied by 25 students. Last week was the Hispanic Heritage Month Dance. This week is the book fair and OCR testing, so teaching them how to draw a self portrait was out of the question.
Goldenrod's PortraitRose's PortraitSpruce Green's Portrait

My version of Cheater Self Portraits used few supplies and worked out well for fourth graders with little experience with water colors.

Here's our tutorial for Watercolor (Cheater) Self Portraits:


Supplies:
drawing paper cut to 8.5" X 11"
water colors
a digital picture
a computer with internet access

1. Take a picture with your digital camera. I think a close up or a relatively simple scene would work best.
(This picture is not of a student but, from an ad.)

2. Go to Picnik and upload the photo(s) for free! Choose their
"create" menu and then scroll down the special effects until you find the one that is called "Pencil Sketch." Apply that effect to your picture.

3. Print the picture out on the drawing paper. At work I have access to a laser printer. At home I used an inkjet and I found worked well even with water colors.

4. Paint the picture with water colors. Less is more. It's nice to let a little of the print come through. It makes the details like a nose, much easier.
I gave my students two copies so that they could practice controlling the paint and mixing colors. I am pleased with the outcome. It took two hour long sessions to complete.

Update: That was the post from way back in 2009. Naturally, we did win the door contest and the prize was a new Connect Four game. Sweet! Later I went on to make another watercolor of my colleague's daughter. I thought it came out super cute.

Water Color Girl

I had always planned on making several others as Christmas gifts for various people. And, of course, now I want one of my own kiddo. I wonder how many I can get done between now and April 19?

Wednesday, January 25, 2012

Last Chance for Picnik- Pictures into Embroidery Transfer

Did you hear? Picnik, the free photo editing site associated with Flickr, is shutting down on April 19, 2012.Boo hoo! I love that site and use it a lot. Of course, I never did pay the $28 for the premium membership. So, I guess I am part of the problem. Sigh. Anyway, until April 19 all their premium features are now available for free! This week I decided to feature some of my old projects using Picnik.

Here is a post from May 2010.

I really love the Sublime Stitching patterns by Jenny Hart. Her motto is "Not your grandmother's embroidery!" There are so many fun patterns. The flickr group is loaded with eye candy. This Etsy store, Sew Lovely Embroidery, also has wonderful modern designs.

However the other night I had the itch to stitch right then and there. You know how it is when an idea strikes! So, I came up with my own way to convert a picture into an embroidery pattern that was simple enough for me to do.

This pin up cowgirl was my starting photo. I found the picture on Google and uploaded it into Picnik. Then under the "Create" tab I clicked on "effects." Next I chose "pencil sketch." And the result was the photo below.

From there, I clicked on the "Edit" tab and chose "Exposure." I moved both the "Exposure" and "Contrast" settings as far as I could so that it would look like an even simpler drawing.


The result was this. Notice how most of the background is gone now and the details are sharper? This was good, but I knew I wanted it even simpler. So, still in Picnik, I chose the "Create" tab and went to stickers. I used the rectangle under "Geometric"  (and slid the color to white) to cover up the fire and the photographer's name. Then I went to text and added the "Dinner!" Finally, I downloaded it to my computer and printed it out. I was very careful to print it in "mirror image" so that I could use Citra-Solv to transfer my pattern to the fabric.


To do the Citra-Solv transfer I photocopied my print out and taped the photocopy print side down to my fabric. I used regular old scotch tape. Be sure not to cover any of the design with tape. Then I took a paper towel with a bit of Citra-Solv on it and rubbed it all over the design. Lastly, I burnished the paper by rubbing the entire design really hard with the edge of a spoon.
Voila!

Embroidered Cowgirl
I had a lot of fun changing up the colors for this design. Here is the finished project:
Embroidered Dishtowel

Update: Since this process worked so well, I went on to create this Texas tote.
Texas Tote
You can see that full post here.


Sunday, November 20, 2011

First Thanksgiving Outfit- Inspired By Pinterest & Project Runway


First Thanksgiving Outfit
Originally uploaded by Jane Little

So, here I am just two days away from "D-Day!" With nothing but tons of time on my hands, I have been trolling Pinterest and watching Project Runway online. It's really kind of crazy. Also, I cleaned out my craft closet last night which inspires me to craft like nothing else.

Looks like we may be home in time for Thanksgiving. There were two adorable Thanksgiving shirts I pinned. However, the images are gone now. I guess people are cracking down on pinning.  I guess I can see why, on the one hand. It can be annoying to be copied. On the other hand, the people who are going to copy are not the same people who are going to buy anyway. Like me for example, I am not going to buy a Thanksgiving outfit because I am going to have a baby in two days and it wouldn't get here in time anyway! LOL.

Also, because I can make it myself in less than three minutes, in the size I need and with scraps I have on hand.

So imagine these cute t-shirts with simple turkeys with ribbon feathers.

I just happened to have this little brown cap that says "Got Candy?" on the back. It is for a photo op with my mom who 1. loves candy and 2. bought stock in Hershey's. I got the hat and matching onesie at the dollar store and all I want out of the outfit is this one picture with grandma.

But, I figure this cap can be reversible since we won't be going anywhere anyway.

The cap is too tiny for ribbon loop feathers and frankly too tiny for embroidered details. So I used snips of ribbon and painted the face on with a toothpick. Then remembering Tim Gunn's rant about glue guns on Project Runway, I decided to glue gun the whole thing together.

I tried to color match to this swaddle blanket I picked up at Goodwill just because it had Thanksgiving colors.

So there you have it a first Thanksgiving outfit.

I can hardly wait!

Friday, November 11, 2011

Finally Getting My Creative Mojo Back

I must be nesting, because at long last my creative spark has returned. Oh sewing machine, how I have missed you!

Color Books For the Nieces

Back in August I thought I would get a jump start on Christmas. I wanted to have all my Christmas done before the baby came. You know, just in case it's really true what everyone says: "Your life is going to change!"

I also wanted to use what I had on hand to save time, money and energy. So I decided on I Spy books for my 8 month old nieces. Well, without much creative energy it was a real drag. I got a good start, but it wasn't too much fun and seemed endless.

Then my mojo came back last week and well, here you go!  Soft color books!
IMG_3698

Each color has a big picture with some interesting textures and an I Spy page.
Color Books
I tried to use as many interesting textures as I could. Mass producing things isn't really my thing. I get easily bored and prefer to mix it up. So, I tried to pick a few personal things for each I spy page. For example, my niece Ava loves to see her brothers off on the school bus. So her yellow page has a school bus. Meanwhile my niece Elle's book has a John Deer tractor in honor of our Grandpaw.
IMG_3700
Cliff was really patient with the mess I made making these. He also requested one for our own daughter.  Yes, I did make one for her too! I figured it was now or never!
IMG_3701

These literally took months to make, but I think the end result is worth it.

Sunday, October 30, 2011

Happy Halloween -Sort of Pinterest Style

Oct. 30 -23 days till D-day! 
Crazy busy weekend getting ready for what might be my last day of work before the baby comes! Whoo hoo! Well, I thought Halloween was going to be my last day, but my sub got sick and I still have tons of things I wanted to complete and prepare for her. So, I may just work another couple of days to get stuff done and spare myself from writing sub plans. Writing sub plans is more work than actually teaching sometimes. I am going to play it by ear tomorrow.

Any leftover energy I might have had for crafting is used up making a baby. Thank goodness Pinterest has been there to inspire me. I would never of thought of this cute pose all on my own. Here is the original pin. Love the lighting and the pose is better too. But you get what you get and you don't get upset when you pull over to the nearest city parking lot p' patch and ask a complete stranger to imitate a professional photographer! Can I hear an "Amen?"

In other news, I continue to have the highest of hopes when it comes to making my beloved Crayons festive treats. I actually thought I had found something easy enough to make as directed. But, no. I was too busy to go to the grocery store this weekend and ended up having to use what was in my pantry.
The Pinterest Inspiration Cupcake:


My Cheesy Imitation
IMG_3688

I truly thought I had the ingredients to make the "slime" frosting, but alas I was out of corn syrup.

I will say this. God sent me a little angel to remind me that cheesy cupcakes, overwhelming to-do lists, sick subs, blah, blah, blah- I have no *real* problems. As I walked into the dollar store on the way home from church to pick up bug toppers for these cupcakes. A voice yells out, "MISS LITTLE!!! MISS LITTLE!!!" And low and behold there is some child that I don't recognize screaming my name across the store. She runs up to give me a  hug and exclaims with such excitement, "I didn't know you lived in this neighborhood too!"

Well, I don't and if she goes to my school, as I assume she must, she shouldn't live around here either. We are bursting at the seams overcrowded and I know that technically I should report any out of district students. Anyway, I am going to look the other way on that one because tomorrow is supposed to be the first day of my maternity leave and what's one more student in a school of 700?

So she follows me around the store dashing between my aisle and her mother's aisle filling her in on who I am so loudly the whole store must know I am one of the FOURTH GRADE TEACHERS!!!!

While helping me search for bugs, she tells me that she won't get to trick or treat this year because by the time they get home on the bus it will be too dark. So I say, "Well that's OK, we are having a big parade at school tomorrow with lots of candy."  Then she tells me that she can't participate in the parade because she doesn't have a costume. They can't afford one this year. Mind you folks, we are in the dollar store. 

Doesn't that make your heart break?

Never fear. I may have the dumbest looking non- Halloween cupcakes in the world, but I do have a BIG box of costumes in my classroom and an appointment with one little girl whose name I don't even know first thing Monday morning. 

Who says Halloween isn't a Christian holiday? Not me. I think I just got schooled by the big guy Himself.

Monday, August 29, 2011

That Was Easy! Nursing Cover

Last week Cliff's parents came to visit. We heard lots of little tales of our 6 month old niece. One such tale involved her nursing cover. My mother-in-law could not recommend getting a nursing cover more highly. It seems that when Cliff's sister is fixing to nurse the mere sight of the brightly colored cover gets my niece all excited.

So I set out to make a nursing cover. I can't say I was too excited. I seem to have an aversion to making straps. It's the turning that drives me bonkers. I hate turning tight tubes of fabric. But off to my stash I went in search of nursing cover fabric.

Wrap Around Skirt 
That's when I found this wrap around skirt. It was my mother-in-law's and she gave it to me with a bunch of other fabric. I love this vintage print and have been saving it for a special project. If it wasn't a size two I would probably wear it.

Anyway, it kind of looks like a nursing cover already.  A quick trim and a few adjustments to the already sewn straps and I could be done. All the hemming is done. I could make a slit in the top hem and slide the boning right in. This could be the easiest nursing cover ever!

As I studied it I tried to imagine myself wearing it out in public. Nursing underneath it. The fabric is a twill. That could be hot and heavy. Also, this print screams,"Look at this cool print! Notice me!" And that is pretty  much the *last* thing I want when nursing in public.
Nursing Cover
So I went back to the stash and found this beige and lavender print. I followed the tutorial from Diary of A Quilter.   It was so easy. From start to finish including clean up it was an hour. Not too bad. Turning the strap was indeed annoying because I get annoyed by that, but over all it made up so quickly I really didn't mind so much.

This pattern says, "Please respect my privacy."  Actually, it's called "Cherished Memories" by Robert Kaufaman. I hope nursing in private or public does become a cherished memory.


Tuesday, August 9, 2011

Extream Makeover: Car Seat Edition- The Reveal

IMG_3526


I did it! I was nervous and also challenged the whole time, but I love it and I am thrilled with the results. Once I built up the nerve to try and remake the hood, I realized that I wasn't bound to the orange, gray, tan color scheme. I found a large piece of green twill in my stash and bought the polka dot fabric from Joannes.  I recycled all the trim and bias tape from the old seat and just added a bit of homemade bias tape on the hood for detail.

IMG_3525

I took lots of pictures of the original seat as the tutorial suggested, but not necessarily the one I needed. Isn't that the way! So from time to time it was a real challenge to figure the best way to sew a certain seam, or bias tape, etc... Still, I found the challenge to be enjoyable. It's not often that I do something completely new.

I used the exact padding on the seat cover so that only the top fabric was changed. I used the black edging from the original car seat that has all the loops, elastic and holes to secure it to the seat. However, I greatly simplified the design on the hood which had a patchwork of clear vinyl, mesh, and several colors. Using the lining as a pattern I made the hood out of four solid pieces.

IMG_3525

The vinyl window was a real challenge with my machine until I remembered reading a post long ago about sewing vinyl with tissue paper. It worked like a charm. It was so cool to see how much my sewing skills have grown over my years blogging! However, this took hours and hours to do! I think it was a one time deal for me!

As for the safety issues of a replacement cover. Yes, I am aware that it may void my warranty and that the safety techs who will install it probably will comment on how it is less safe. I can only hope the CHP officer who installs it is as good looking as Ponch or John while he lectures me.

In all seriousness though, I did weigh all my options before choosing to do this. With all parenting decisions we all have to weigh which risks we will worry about and which we can just accept. We live in the heart of LA and unlike many Angelenos, we do very little driving. Very little. And the local driving we do experience is often at *very* low speeds. My husband works from home and his 18 year old car has less than 65,000 miles on it.  The reality is that parking where we live is expensive so we often walk to restaurants and museums. Most of the miles this car seat experiences will be via stroller.

Also, we have a brand new "My Ride 65" that will be our primary car seat once the baby is about 13 pounds or so. The reviews on that car seat (and my SIL's personal experience) state that it's a bit hard to adjust with a tiny baby and great with bigger babies.
Car Seat BeforeIMG_3521
So there you have it! My very first sewing project for Baby Girl!

Monday, August 8, 2011

Extream Makeover: Car Seat Edition

 I  have finally embarked on a sewing project for my own wee one!

We have been so blessed to receive tons of hand-me-downs for this lucky baby. We already have a crib, high chair, car seat and stroller! The excitement and generosity of our friends is amazing and I am so grateful.


Source: google.com via J on Pinterest

This is a stock photo of our car seat. Our friends Will and Kristen gave it to us along with a really cool stroller. We know it has never been in an accident, we have been in touch with Maxi Cosi checking for recalls etc... Everything checks out and we are set to go. Early on, when I thought  I might have a boy, I was totally content. But, after learning we were having a girl, I began itching for something a little more feminine. I started noticing little stains and scuff marks.


Then I saw this car seat makeover and tutorial on Make It And Love It and I was suddenly obsessed with the idea of pimping my ride.

At first, I was intimidated and felt limited by very intermediate sewing skills.

Then I learned that a replacement cover from Maxi Cosi was just $36. Not such a big risk after all.

I decided to just recover the seat part. The hood seemed way out of my range. I created a "pinboard" to save fabric ideas that might work with the hood colors.  To my surprise, there were a lot of girly orange fabrics out there. I even had some plain orange denim in my stash that would work well enough.
IMG_3501
I read the tutorial about a thousand times and studied every inch of the car seat's construction.  That's when I realized I would never be happy with just recovering the seat. It was a "If you give a mouse a cookie" situation. If I was going to go through all that work to recover the seat, I wanted the hood to look fresh and new too.
IMG_3516 
So I did it! I used my seam ripper and spent hours carefully deconstructing, photographing, and labeling each and every piece of that car seat cover and hood!

It was intense!  I learned so much from the whole process. The first thing I learned:

Source: etsy.com via J on Pinterest

The women on Etsy who make and sell custom car seat covers (such as this one above) earn every single penny they charge!


Tune in tomorrow for the results of my latest obsession.