Wednesday, March 16, 2011

Copy Cat Spring Wreath

 Visit thecsiproject.com
Inspired by this moss wreath at Frou Frou Gal  I created my own.  I first saw her wreath on Saturday and set this evening aside to make it. That's a remarkably fast turnaround for me!
Moss Wreath

To make this wreath I started with a cheap plastic picture frame, a bag of moss and a moss sheet from the Dollar Tree. I also used some Model Magic clay for the eggs. I picked that up a few years ago from the 99 Cent Only store and have used it here and there for a long time. The mini grapevine wreath is from my stash. I
Supplies
Here it is with the moss sheet glued on. Ignore the big eggs, they are for another project.

First Layer
From here I glued on bunches of moss to add volume. I also added some sticks and the nest. I made the eggs out of that air dry clay. I painted them and glued them right on. I added some newspaper scraps to give it the collected look of a real bird's nest. I hope to add some feathers if I remember to get some. This is the kind of project I'll be tweeking here and there for a while.

Spring Mantle
My cost for this wreath was $4.
Moss Sheet $1
Bagged moss $1
Frame $1
Ribbon $1

Clay, paint, sticks, hotglue are all from my stash.

I am linking up to the spring challenge at the CSI Project!

Monday, March 14, 2011

Craigs Easy

Living in Los Angeles has it's drawbacks. We have tons of traffic, pollution, high rent, 9.75% sales tax. 

However, we have some perks too. And for a born junker such as myself, the LA Craigslist is pure gold! Not every area has millions of  people who move a lot and are always needing to get rid of stuff -cheap.

This Saturday I decided to use Craigs Easy to troll the free section of Craiglist. Here are some gems I found.


First up, I wish I had room for this wonderfully chippy free hutch!
Craigslist is always good for some bizarre things. Even though I wouldn't allow this in my house if my life depended on it, I am glad we live in a world were people do make tin can waterbeds.  This guy welded over 4,000 soda cans to make this waterbed. Go ingenuity! Let's hope he's ditching this because he met a nice lady who said, "Um, no way, no how!"


Love this rocker. Again, I don't have space for it now. I did think about taking it and fixing it up for resale. Right now I have a lot on my plate with school and do not need the distraction of extra projects.
Did I just say that I didn't need extra projects? I did respond to this ad for free wood. I hope I get it too. Ana White's site gives me the serious "buildies" as she would say.

I also responded to an ad for a vintage office chair. I could make room for this and donate Cliff's current run of the mill office chair. Fresh paint and a new cusion and that chair would be amazing!

Using CraigsEasy it really is easy to zip through hundreds of ads in just a few seconds. It shows you just the pictures. I saw tons of great stuff for the right person. There were gliders and Little Tikes toys, unopened boxes of diapers, plants, desks and all sorts of building supplies.

Do you Craigs Easy? Have you scored any great free stuff lately?

Friday, March 11, 2011

Shower Gifts for Sweet Pea

I'm an Auntie!  Cliff's sister had her baby last Thursday and my brother's baby arrived (healthy, but teeny tiny) eight weeks early on Friday! I am nearly 40 and I became an aunt for the very first time twice in one week. So exciting!
Bib for Sweet Pea
Through it all, I wondered how I would feel based on our own long term struggles to have a child. Now that they are here, I can honestly say that I am filled with joy. Nobody could be more surprised than me. I love looking at the baby pictures. I am so proud of both of my sister's in-law who had to have emergency c-sections. I look forward to the day when I can chat with both of them about their birth stories. And, of course, one day meet my nieces. Each day I wake up and take my emotional temperature. I wonder "Is this the day that I become insanely jealous or sad?" So far the answer is no. Whew! So nice when what I want to feel, the right thing to feel, actually matches my feelings!

Anyway, Sweet Pea actually beat us to the punch arriving two weeks before her mama's baby shower. My gifts to her aren't nearly as cute as the ridiculously cute cherry themed shower gift that I made for Ava Jolin.
Car Seat Tent and Pacifier Bag
Still, I think they suit my sister-inlaw well.  She just recently told me that she is germ phobic. The first gift was a carseat tent made from this tutorial. Now not only will her preemie eyes be shaded, no creepy grocery shoppers can touch her.

The bib above is a nod to the knick name I gave her. I love her real name now that I know it. It is especially beautiful in cursive! So many loopy above the mid-line below the line letters! I am sure it will be revealed in future monogrammed projects.

I also added a pair of Robbeez and a board book. As an added tie on, I looped this Binkie bag right onto the gift bag. It would all be so much more fun to photo graph on an actual carseat and believe me, I thought about sneaking off to Toys R Us just to snap an action shot. LOL! However, as usual, I was sewing into the night right before my postal deadline!

Wednesday, March 9, 2011

Slip Covered Craigslist Bench

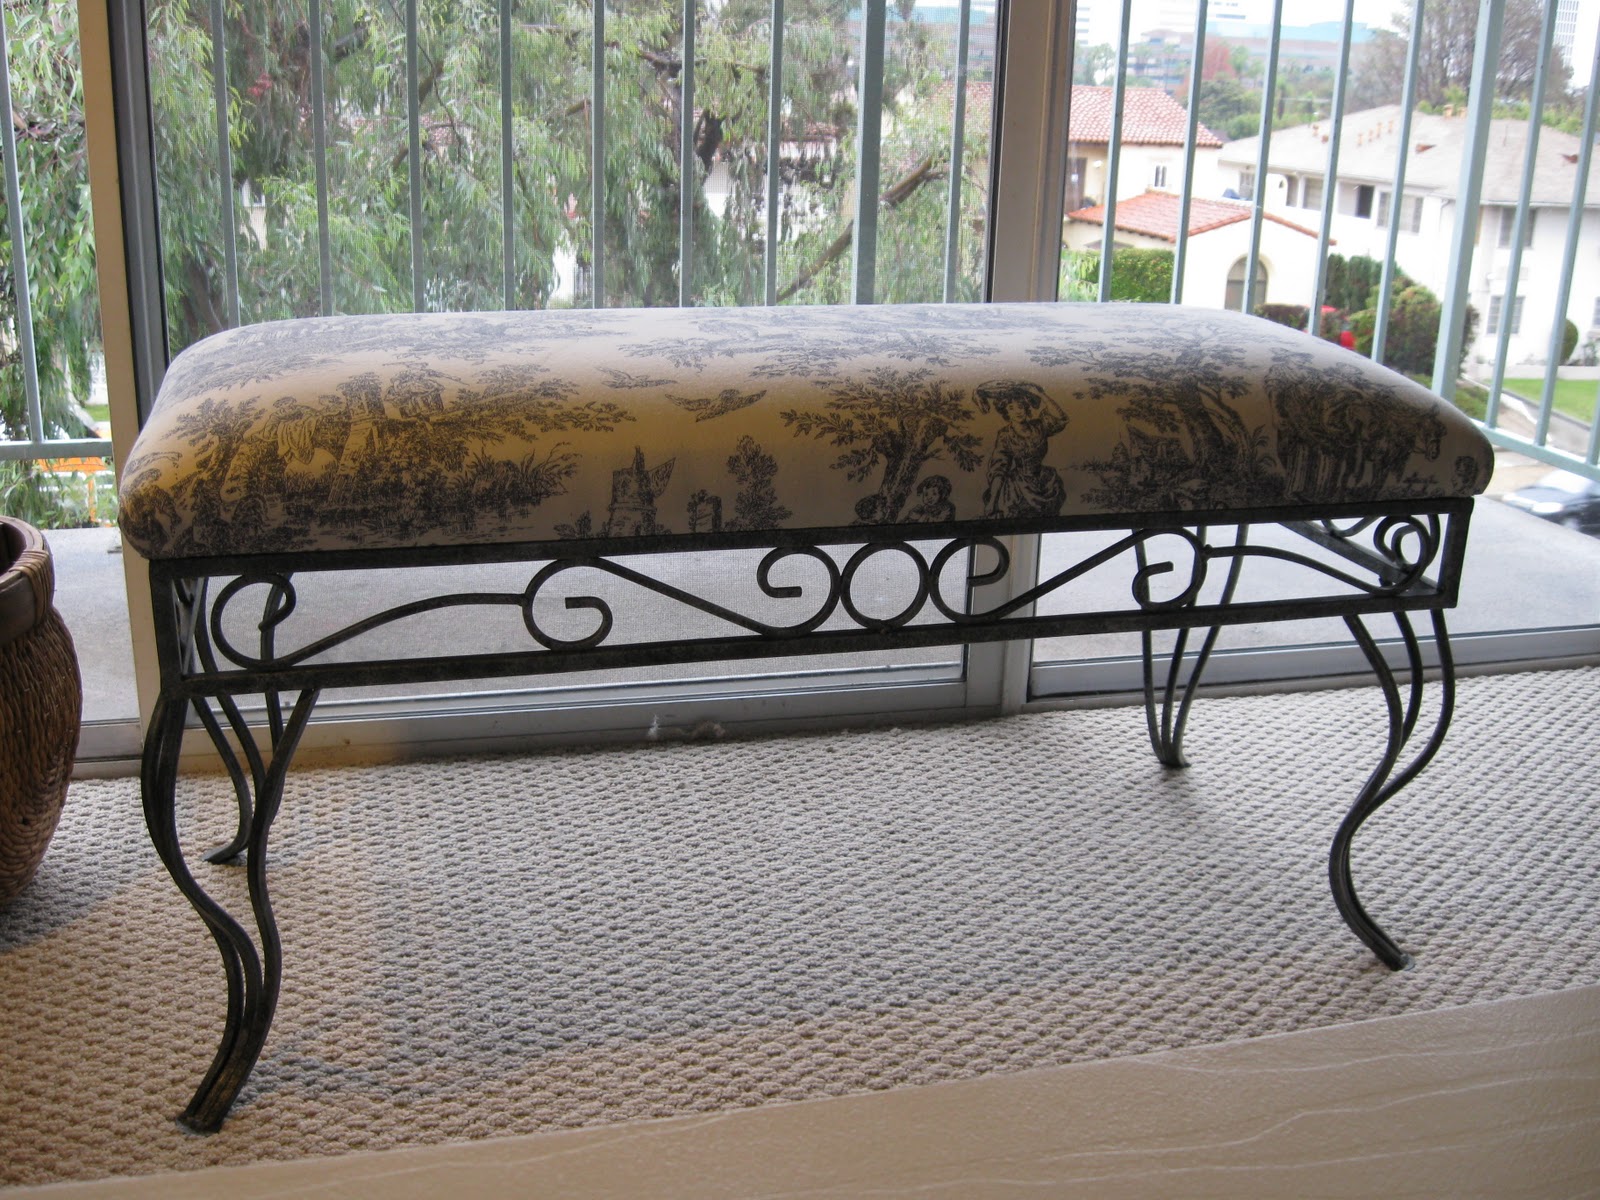
Visit thecsiproject.comThis week's CSI theme is "slipcovers" so I thought I would throw my hat in the ring with our slip covered bench. This bench was purchased so we would have some extra seating, now it's a favorite piece of furniture.

Just before Christmas we bought this bench on craigslist. I love the legs, but I was less than thrilled with the fancy scroll work or the fancy print.  It's just too delicate for our room.


So I designed a slipcover to cover it up. The result is that the cusion looks much thicker and the whole bench looks more substantial.

I made this simple slipcover with curtain fabric I already had in my stash. 

To make the slip cover, I lined a big rectangle of fabric with some scrap from an old shower curtain. I topstitched all the way around the rectangle. Next I lay the rectangle over the bench wrong side up. Then I pinned the corners into triangles to create tight corners. I sewed the triangle flaps and turned the whole thing right side out. Done!

From pretty, but too delicate to bright and bold in a few easy steps!

Visit thecsiproject.com

More slip covered projects here!

Wednesday, March 2, 2011

Green Upcycled Scarf

Visit thecsiproject.com


 It's been so damp and chilly this winter that I have worn a scarf nearly every day. I have long wanted to make a t-shirt scarf and St. Patty's Day seemed like the perfect excuse! Now that it's done, I can tell it's going to be a favorite. Worn t-shirts are so snug and soft.

I thought for sure I'd easily find an Old Navy St. Patty's Day shirt, but alas there were none in any of the thrift stores I went to. Even so, I managed to find several t-shirts for just a few bucks.

This was a really easy project and I made it while watching a few TV shows.
 First I cut an 8.5" X 11" sheet of freezer paper. Then I ironed it onto my t-shirts to make cutting the patches super easy. I reused the same piece of freezer paper for each patch. I lined up all my patches on the floor next to a scarf I already had to get the right length.

I decided to embellish some of the plain patches with cut outs. I used scraps of t-shirt with Wonder Under fusible web to iron them on. I made a lucky number 7, a shamrock and a horseshoe.  I sewed two rows of patches and then sewed each side together. I sewed the front and back right to each other. No turning. The edges rolled a little and I like the casual effect.

 This eagle patch isn't green, but since the eagle is our school mascot, I had to include it. I like that the scarf is decidedly "pinch proof" without being too St. Patrick's Day. I think I could get away wearing this past March 17th.

It's Green week at the CSI project!

Saturday, February 19, 2011

Baby Gift for Ava

Dress for Ava
My mother in law and sister in-law spend a week every summer at Viking Village in the Adirondacks. They decorate their cabin from top to bottom in watermelons. For many years I had my cherry kitchen. I am forever getting them watermelon things and they keep me supplied in all things cherry.

When this darling (perfect condition) Gymboree cherry dress jumped off the racks at me at Goodwill, I knew it was time to spread my cherry love to the next generation. Baby Ava may be surrounded by watermelons, but she can represent with the cherries.

First things first, I asked my sister in-law how she felt about used clothing. I seriously doubt this dress was ever worn. It is in mint condition, but you never know. People can be nervous about used clothing. She was fine with it.

Bloomers for Ava
I made some denim bloomers from this MADE tutorial. Easy peasy.
Shoes for Ava

And some cherry-esq shoes from this tutorial. Squeel! I love these! By the way, I was in such a rush to get these off to the post office, I didn't have time to do any kind of photo shoot. I quickly posed in front of Cliff's Macbook camera.
Cherries for Ava
Hey Ava, watermelon is fun, but cherries are so cheery! Is there anything cuter than a onesie? Yes, a onesie with a cute applique.
Doll forĀ  Ava
This is the face I'd like to make for my niece. Do you think babies can focus in on Skype? Doll inspired by this tutorial.
Gift for Ava
So there you have it. One thrifted dress inspired an entire shower gift!


Check out other frugal projects at Frugal Friday!
Also, I am going to try for this:

One Month To Win It

Monday, February 7, 2011

Heart to Heart Valentines Swap

2011 Valentines
Once again this year I participated in the Heart to Heart Valentines Swap. I was pretty much stuck for ideas until I saw this post and learned how to make picture holders out of little metal tart tins. I just so happened to have 14 of the tart tins!

Valentines
Here they are lined up like little soldiers. The photo is of my Aunt Janet and she is holding a quilled heart. The quote by ee cumings says, "I carry your heart, I carry it in my heart."  I figure the recipients can use the photo holder for their own picture after Valentines is over. The hardest part was thinking of how to package them. I ended up using Gorilla tape to secure the wire underneath. It's less permanent than hot glue, but I figured if it all popped apart in transit it would be very simple to fix. Simply press everything back in place.

Today I received my package! Oh my word! The amazing stuff inside! I will let Sarah share it on her blog, but I do want to say thanks to all the creative talent that participated!