Wednesday, March 9, 2011

Slip Covered Craigslist Bench

Visit thecsiproject.comThis week's CSI theme is "slipcovers" so I thought I would throw my hat in the ring with our slip covered bench. This bench was purchased so we would have some extra seating, now it's a favorite piece of furniture.

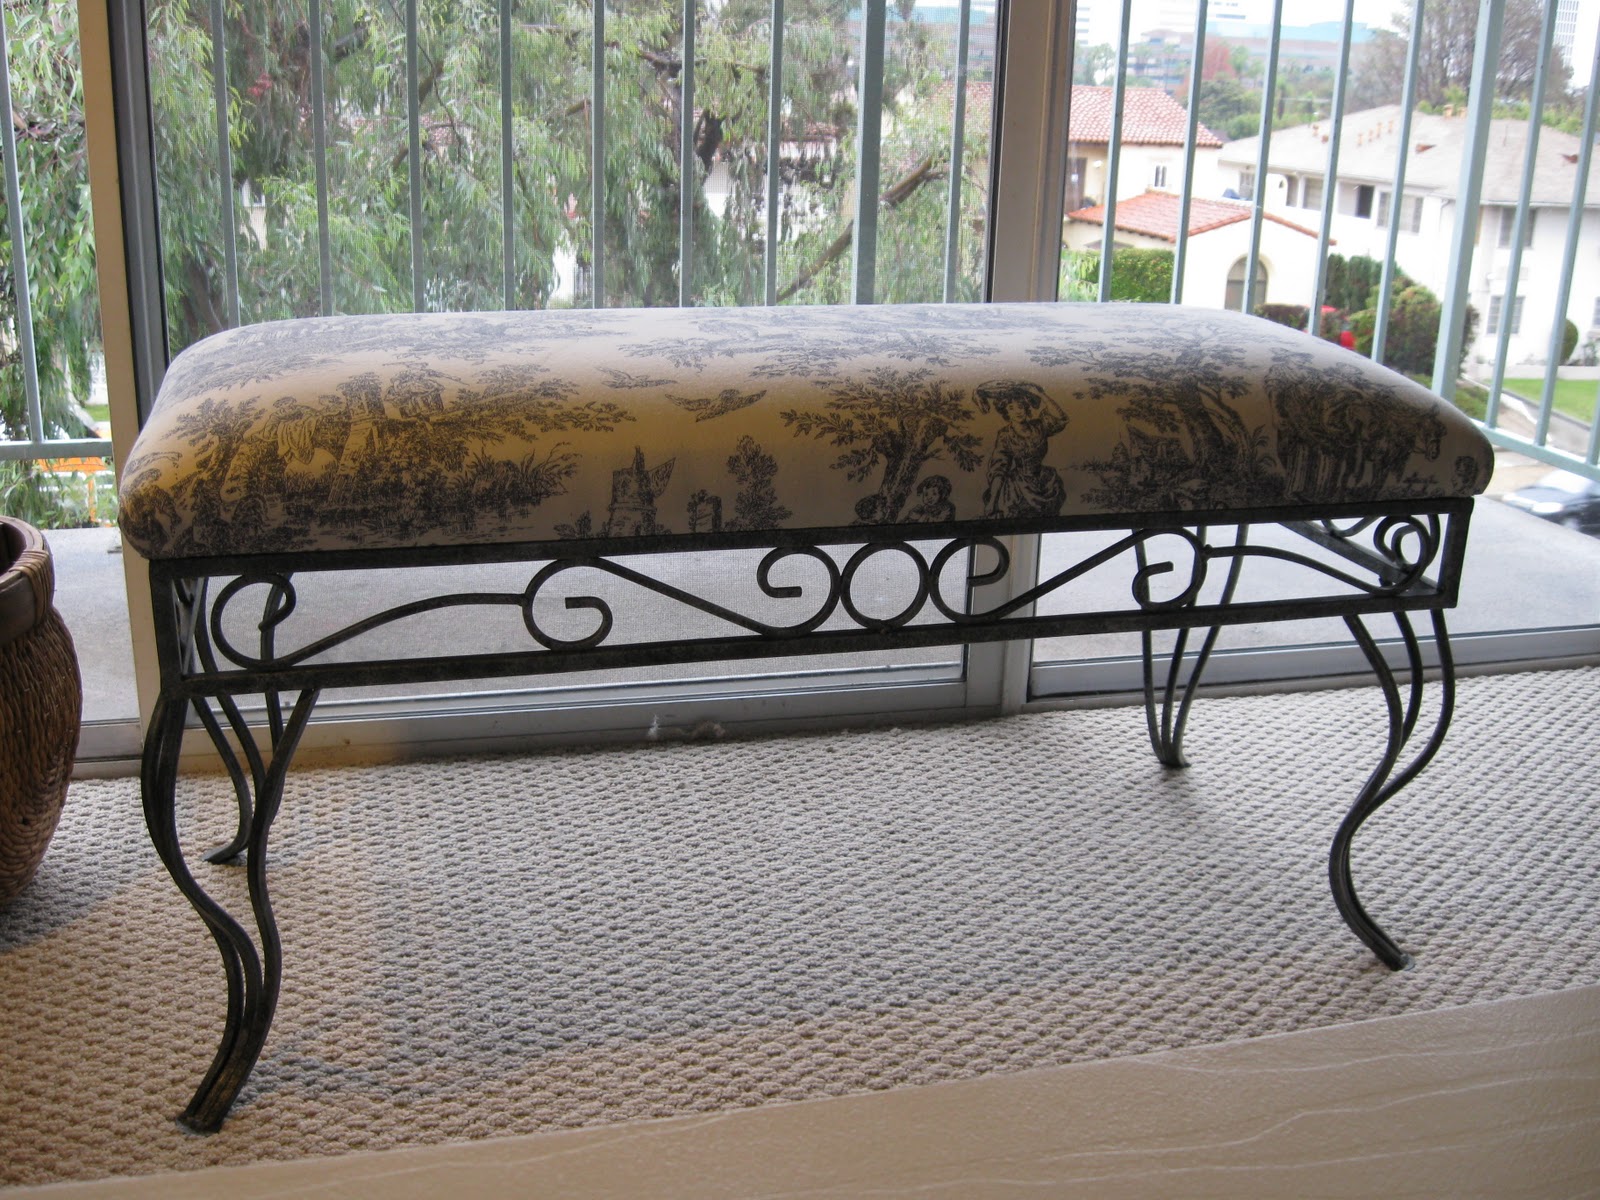
Just before Christmas we bought this bench on craigslist. I love the legs, but I was less than thrilled with the fancy scroll work or the fancy print.  It's just too delicate for our room.


So I designed a slipcover to cover it up. The result is that the cusion looks much thicker and the whole bench looks more substantial.

I made this simple slipcover with curtain fabric I already had in my stash. 

To make the slip cover, I lined a big rectangle of fabric with some scrap from an old shower curtain. I topstitched all the way around the rectangle. Next I lay the rectangle over the bench wrong side up. Then I pinned the corners into triangles to create tight corners. I sewed the triangle flaps and turned the whole thing right side out. Done!

From pretty, but too delicate to bright and bold in a few easy steps!

Visit thecsiproject.com

More slip covered projects here!

Wednesday, March 2, 2011

Green Upcycled Scarf

Visit thecsiproject.com


 It's been so damp and chilly this winter that I have worn a scarf nearly every day. I have long wanted to make a t-shirt scarf and St. Patty's Day seemed like the perfect excuse! Now that it's done, I can tell it's going to be a favorite. Worn t-shirts are so snug and soft.

I thought for sure I'd easily find an Old Navy St. Patty's Day shirt, but alas there were none in any of the thrift stores I went to. Even so, I managed to find several t-shirts for just a few bucks.

This was a really easy project and I made it while watching a few TV shows.
 First I cut an 8.5" X 11" sheet of freezer paper. Then I ironed it onto my t-shirts to make cutting the patches super easy. I reused the same piece of freezer paper for each patch. I lined up all my patches on the floor next to a scarf I already had to get the right length.

I decided to embellish some of the plain patches with cut outs. I used scraps of t-shirt with Wonder Under fusible web to iron them on. I made a lucky number 7, a shamrock and a horseshoe.  I sewed two rows of patches and then sewed each side together. I sewed the front and back right to each other. No turning. The edges rolled a little and I like the casual effect.

 This eagle patch isn't green, but since the eagle is our school mascot, I had to include it. I like that the scarf is decidedly "pinch proof" without being too St. Patrick's Day. I think I could get away wearing this past March 17th.

It's Green week at the CSI project!

Saturday, February 19, 2011

Baby Gift for Ava

Dress for Ava
My mother in law and sister in-law spend a week every summer at Viking Village in the Adirondacks. They decorate their cabin from top to bottom in watermelons. For many years I had my cherry kitchen. I am forever getting them watermelon things and they keep me supplied in all things cherry.

When this darling (perfect condition) Gymboree cherry dress jumped off the racks at me at Goodwill, I knew it was time to spread my cherry love to the next generation. Baby Ava may be surrounded by watermelons, but she can represent with the cherries.

First things first, I asked my sister in-law how she felt about used clothing. I seriously doubt this dress was ever worn. It is in mint condition, but you never know. People can be nervous about used clothing. She was fine with it.

Bloomers for Ava
I made some denim bloomers from this MADE tutorial. Easy peasy.
Shoes for Ava

And some cherry-esq shoes from this tutorial. Squeel! I love these! By the way, I was in such a rush to get these off to the post office, I didn't have time to do any kind of photo shoot. I quickly posed in front of Cliff's Macbook camera.
Cherries for Ava
Hey Ava, watermelon is fun, but cherries are so cheery! Is there anything cuter than a onesie? Yes, a onesie with a cute applique.
Doll for  Ava
This is the face I'd like to make for my niece. Do you think babies can focus in on Skype? Doll inspired by this tutorial.
Gift for Ava
So there you have it. One thrifted dress inspired an entire shower gift!


Check out other frugal projects at Frugal Friday!
Also, I am going to try for this:

One Month To Win It

Monday, February 7, 2011

Heart to Heart Valentines Swap

2011 Valentines
Once again this year I participated in the Heart to Heart Valentines Swap. I was pretty much stuck for ideas until I saw this post and learned how to make picture holders out of little metal tart tins. I just so happened to have 14 of the tart tins!

Valentines
Here they are lined up like little soldiers. The photo is of my Aunt Janet and she is holding a quilled heart. The quote by ee cumings says, "I carry your heart, I carry it in my heart."  I figure the recipients can use the photo holder for their own picture after Valentines is over. The hardest part was thinking of how to package them. I ended up using Gorilla tape to secure the wire underneath. It's less permanent than hot glue, but I figured if it all popped apart in transit it would be very simple to fix. Simply press everything back in place.

Today I received my package! Oh my word! The amazing stuff inside! I will let Sarah share it on her blog, but I do want to say thanks to all the creative talent that participated!

Wednesday, February 2, 2011

CSI Typography Contest II- Special Dates Glasses

I made these glasses for Cliff for Christmas. The glasses are from Ikea.
 Prepping for Etching               
I created stencils by using the Ellison press at school to punch out the numbers on labels. Then I filled the stencil with etching creme. I had to let the creme sit much longer than the directions said. I wonder if my bottle was expired? Anyway, they are pretty subtle but I love them. I love being reminded of these important dates.
 IMG_3246
The first one has our wedding date and the second one says, "11-15-85."  I thought the year would be a dead giveaway, but Cliff couldn't remember the significance. And, that is how Christmas turned into a pop quiz for my dearest. (Truth be told, I had to consult my high school diary for that date, so maybe it wasn't so obvious after all.)

November 15, 1985 was our first first-date. I was 14 and Cliff was a senior. I was so sure my parents would never let me go on a date with a Senior.  I had a huge crush on him and I thought it would be fun to see their reaction. So, I told them, "I have a date with a Senior." and waited for the chips to fall. The joke was on me. My mother said, "Oh, we know his parents. They are way more strict than us. You can go."

We went on a few dates and that was it until 1-1-01 which apparently is in the dishwasher.

This is another entry for the CSI Typography Contest. 
Visit thecsiproject.com

Hope you are having a great day!

CSI Typography Contest

Visit thecsiproject.comI spent last weekend at the Craft & Hobby Association (CHA) convention. I was helping out at the Quilled Creations booth most of the time, but I did get around to many of the other vendors. From across the room I saw this red head and I thought, "Hey! I know her!" Sure enough, it was Beckie from Infarrantly Creative. (And, I actually don't "know" her, but I do read her blog everyday so I feel like I know her.)  Anyway, we started chatting and bonded a bit over our love for transforming junk.

Beckie told me she was super busy getting sponsors for her various blog projects and she wasn't kidding! Look at this prize package for this week's CSI Project!

I am fixing to do another special typography project soon, but I don't think it will be done by Friday noon. So I am tossing my hat in the ring with this favorite project. It was a special love note for Cliff.


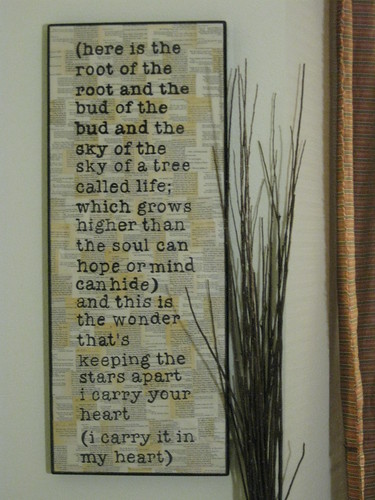
When I saw this great quote art on Ohdeedoh I started looking for the right canvas to make our own quote art.


I found this frame for just $4 at a local thrift store. It looked like it was a framed canvas. However, when I took it apart it was just a thick frame and a thin fabric wrapped cardboard.


 It was perfect for this project!  I recently saw someone who used a cut up book to make a text mosaic and loved the idea for the background. Perfect since my husband is a writer.

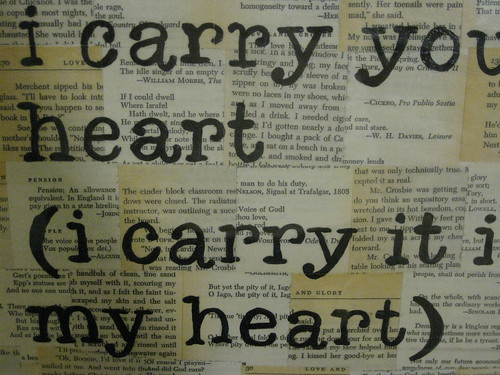
I used the Elison press at school to cut two old books into squares for the text mosaic. I used an old book of quotes and a book called Love and Glory. If you look close you can see lots of fun quotes, my name as one of the characters in Love and Glory and of course the word "love" many times. I chose the books mostly for their shades of age.

I used Modge Podge to glue the squares in an alternating pattern. I tried to select a variety of shades of yellowing.

Next I printed out a snippet of ee coming's poem i carry your heart printed in a large American Typewriter font. I scribbled with a dark pencil on the back to make carbon paper.


I secured it to the canvas with painters tape. This worked really well and did not damage the collage at all. I used a pen and pressed hard to trace the words.

I call this method the poor woman's Silhouette. 

Next I used a Sharpie marker to fill in the letters. They are not perfect, but I am pleased with the overall effect.


I'd say it took two episodes of Glee (on Hulu) and two episodes of Dancing with the Stars to make this project. I can think of many other cool backgrounds. Perhaps a smaller photo or scrapbook paper.

I hope you didn't mind the repeat!

Thursday, January 27, 2011

Ken Baily Inspired Painting

A few years ago, while on vacation in Santa Fe, I discovered this little housewares store called Mindy & Clyde Cupboard Company.

Their signage had me at hello.  How darling is that logo? The inside of this store is just as charming. Vintage dishes, tablecloths, and housewares galore. The owner was super friendly and we chatted about dogs and dishes. Anyway, I bought a planter just to get the bag! Then I proceeded to save the bag for the next 3 years. I always knew that I was going to "make something" out of it.


And, I finally did.

With the high ceilings and vast white in this apartment I knew I wanted something big and graphic for our one blank wall. I thought of a  Ken Baily painting. They combine my love of advertising and dogs. That's when I remembered my Mindy & Clyde bag and I decided to make my own painting. First off,  it's custom for our colors and the size of our space. Secondly this painting reminds me of  our trip to Santa Fe. It was our best vacation to date.

So that is the sweet story behind our new "art" and now here are the behind the scenes details.

This jumbo sized painting started it's life as the backing of an IKEA Billy bookcase. After the move, I relegated that bookcase to our pantry closet. The backing was falling off, so I removed it and bolted the bookcase straight to the wall.

Not one to waste, I saved the 30" X 38"board specifically for an art piece for the dining area wall.

To give it the thickness of a real artist canvas I cut and nailed thin pine furring strips to the back.
Faux Canvas Back

Then I covered the whole thing with Modge Podge and manila paper from school. This gave it a bit of texture and covered the furring strips.

Second Coat
I  painted a layer of red spray paint, a layer of  brown left over kitchen paint, a layer of white spray primer
and finally a layer of Rust-oleum "Moss" spray paint.  I sanded the whole thing down to give it a worn look.
 You can see the texture and worn finish here.
To size the image I scanned the bag and turned the picture into a "pencil drawing" on Picnik.
Logo
Under the "properties" tab in the print menu there is a "page layout" tab. In that tab there is a multipage printing section which includes "poster printing." I used that function to print the picture to size. Then I taped all the pictures together.


I cut out the frame and colored heavily with a pencil on the back of the design. I traced over the entire design to transfer it to the "canvas." Next, I painted the design with acrylic paint. This had to be done in daylight as the lines were very faint and hard to see. During this stage, I was really wishing I had a Silhouette machine! (Although, now that it's done, I don't mind the uneven hand painted quality.)

When the painting was done, I sanded it down to distress it further.
These are all night time photos. I will update with some daylight pictures soon.

At just about $6 for the furring strips and spray paint, this project definitely qualifies for "Frugal Friday" at the Shabby Nest! I am off to check it out now! Have a great day!


Here is another party I am going to join. With this one I hope to win some really adorable baby shoes for one of my nieces to be. Also, amazing ideas! I've spent an hour browsing and added half a dozen projects to my to do list!
Visit thecsiproject.com

Love the CSI Project! Lots of great ideas there!