

This is our little entry way nook. The repurposed futon to shoe bench is serving us well and I personally love the drawer front coat rack. I especially loved it with my festive
Meanwhile, Cliff has never been too fond of the drawer front coat rack. I think it was a bit too "repurposed" looking for him. (Boo! That's the part I like!)
Anyway, I have been kinda keeping my eye out for a new coat rack idea. The universe was happy to provide lots of inspiration too. This post about a DIY Eames Hang It All Coatrack has been in my "Google Stars" folder for a long time. Then at Ikea I saw this Logga coat rack and thought that I could hack that to make my own DIY Eames coat rack. I didn't put it in my cart right away and my normal ADD mixed with Ikea over-stimulation got the best of me. I completely forgot about it.
Clearly, this project was meant to be because what should I spy at my Giant Dollar on Vine Street?

Check it out! This coat rack is practically begging for an Eames makeover!
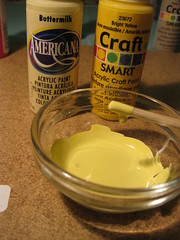
Oh, the joy of mixing colors...
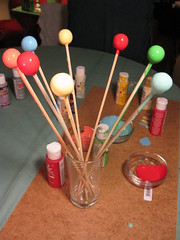
I could not get enough of these! I took a bajillion pictures, but couldn't really capture the lusciousness of the colors and the dripping paint. So much fun. The skewers came from the dollar store as well although I had not bought them for this project. They were perfect for dipping the wood balls "Bakerella style."
I sprayed the frame with some leftover white spray paint and then slid the balls back on. Easy peasy! Not all of my craft paint was glossy, so I gave them a shot of clear sealer (from my stash) as well.

Here it is! A breath of fresh -spring- air!
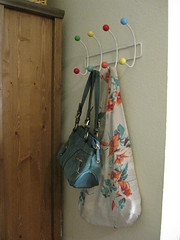
Hello my pretty!
Let's see, I had the paint and sealer. So this project cost $2! One dollar for the rack and another dollar for the skewers. Whoo hoo! Bonus points- Cliff likes it! We won't need Micheal's help just yet.
Are you participating in Lindsay's challenge? There is still time!
So cute! Much better colorful :)
ReplyDeleteThose colors are awesome. Well done!
ReplyDeleteLooks fabulous! The colors you used are wonderful! Great job!
ReplyDeleteThis is so fun. I can relate to your comment about taking a zillion pictures of a project only to discover that the photos never do the process justice!
ReplyDeleteLove that transformation!! Great entry!
ReplyDeleteOkay, whoa! This rack totally beats the $179 one to which you were referring.
ReplyDeleteThose colors are so delicious I could just scream!