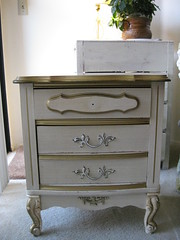
A generous woman named Rachel had this nightstand for sale on craigslist. It was listed for $10 and I asked her if she would donate it to my play-kitchens-for-homeless-lunch-money cause. She agreed. Isn't craigslist the best?
I turned it into this:

Thanks to everyone who encouraged me to paint it green. I think it's my favorite yet. Certainly it's my favorite color combination.
My plan is to list it on craigslist for $100 on Thursday. I have a few touch ups to make and I find Thursday is the best day to list things as people prepare for weekend pick ups, garage sales, etc... As usual 100% of the money will go to the homeless lunch program at Hollywood UMC.
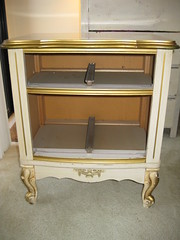
Construction was very much like the others. The inards formed two shelves and I just replaced the cardboard with plywood for the shelves. I used the drawer front and scraps from the drawer to make the oven door.
For some trash to treasure goodness the magnetic chalkboard is made from an old baking sheet (also free from a craigslist curb alert) and the knobs are spray painted soda bottle caps. The cherries were cut from a paper napkin and Modge Podged right on there. With every kitchen I get more creative and economical. I don't think the cuteness has suffered though.
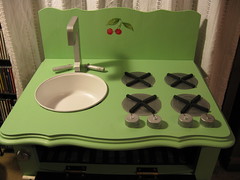
The oven is a bit small, excellent for pizzas and pies I say!
For many more details on how to build a play kitchen see my notes in the Play Kitchens flickr collection.
(Updated to add: This link has been fixed!)
Cost Break Down
24"X 24" plywood sheet for shelves and back spash- $4.95
dowel for curtain rod and sink knobs- about $2
square dowel for burners about $1
hinges- $1
door handle - 4/ $1 so $0.25
bowl - $2
letter J for faucet -$1
wooden picture frame -$1
From my stash:
paint -Glidden's "Sea Spray"
chalkboard paint
primer
woodglue
screws
fabric
white and silver spray paint
black craft paint
cherry paper napkin


That is so adorable! It's going to provide some little girl with hours of fun! Great job.
ReplyDeletepk @ room remix
Totally freaking fabulous. If I lived closer this one would be mine.
ReplyDeleteYes, that green and red is a great combo. That was really nice of that lady to donate the dresser ... you are coming across some great bones for the kitchen. I love the detail of the chalkboard on the side. Well done, friend!
ReplyDeletethat is so adorable, you are very talented!
ReplyDeleteIt turned out great! You're really becoming an expect at them!
ReplyDeleteSorry, that was supposed to be EXPERT at them!
ReplyDeleteADORABLE! Yep, loving the color combo :)
ReplyDeletewow that turned out FANTASTIC, how creative!!
ReplyDeleteSo, so neat!!! You did a great job, and it's so cool that you donate your proceeds. :)
ReplyDeleteAbsolutely fabulous!! You are right you are getting more and more creative with each one!! I love the green/red combo. You heart is so big!!
ReplyDeleteI just stopped over from Restyled home. Wow, this is one of the best ideas ever! Adorable.
ReplyDeletelove the green! I posted your pics and blog on my FB page!!
ReplyDeleteMy favorite thus far!
ReplyDeleteHoly cow! That's amazing! Seriously! I have the same bedroom set from my grandma, I just got rid of a nightstand just like that! The rest of it is in my girls' rooms!
ReplyDeleteBut wow, great job!
Rachelle
Love it!!!
ReplyDeleteGreat Job! So cute, and I love this color combo too. Make me want to do my own kitchen in those colors!
ReplyDeleteYOWZA! I am so in love with that! Please, please, please do a tutorial!
ReplyDelete-Erin
That is SO SO SO cute!
ReplyDeleteSo freakin' adorable! Love it - great job :)
ReplyDeleteYou blow my mind with these creative play kitchens! My Susie Homemaker kitchen was nothing compared to your work! Some little girl is going to have some wonderful childhood memories.
ReplyDeleteDiane
another STINKIN super kitchen! love it!
ReplyDeleteI am new to your blog and I cannot tell you how impressed I am with EVERYTHING!! This kitchen is adorable and I am shocked that you made such a transformation! Beautiful
ReplyDeleteWhat an awesome idea! That is the absolute cutest thing!!
ReplyDeleteThat is one of the most brilliant things I've seen!! I LOVE it!!
ReplyDeleteI think this is the best play kitchen I have ever seen. Love it, love the creativity behind it and adore the color.
ReplyDeleteI totally dig this idea!!! The color you chose is perfect, and I love the chalkboard on the side. Very good job!
ReplyDeleteWhat a greay idea! I might try this charitable idea too. How fabulous!
ReplyDeleteNow how cute is that?!? And it couldn't have been simpler! Great Job!
ReplyDeleteI love your blog!
I'd love to have you stop by mine (I'm new at this!)
http://www.cutest-little-things.blogspot.com
I love it! I'm inspired to start doing something similar in my area!
ReplyDeleteI love it! I saw an entertainment center to kid kitchen and fell in love with it, so we're gathering the stuff to remake a changing table/cabinet into one. All of yours has been great for additional inspiration. I'll let you I finish mine so you can see the pics. Thanks, Polly http://www.helpinglittlehands.blogspot.com
ReplyDeleteMy daughter would love this!! I really enjoyed looking around your blog-- What great ideas!!
ReplyDelete*Eliza’s blog*
How Adorable! And what a good cause. It makes me happy to imagine a little girl happily playing with this!!!
ReplyDeleteWow- amazing! FYI- the link in your text to your flickr collection opens an email message instead of going to flickr...
ReplyDeleteHi! We loved your post over at KiwiLog and decided to feature it as part of our weekly mom blog round-up. Thanks!
ReplyDeleteSo excited and full of ideas to make one for my dd for Christmas!!! I had one idea looking at this green one. If you got a piece that had the drawer on top and larger drawer or cabinet on the bottom, could you switch around the drawer workings so that the drawer was on the bottom (and could be the under-oven pan storage, like on a real oven setup, and you wouldn't have to make any modifications on the drawer) and the larger area on top could be made into the oven?
ReplyDeleteThanks for posting these great tips on green kitchen remodeling. Eventually, being environmentally sensitive won’t be such a niche topic.
ReplyDeleteWe made the kitchen today from our bookshelves that were going to be trashed. Thanks for the inspiration!
ReplyDeletehttp://nocirciswholeson.wordpress.com/2012/03/12/diy-play-kitchen-from-bookshelf-actually-2-bookshelves/