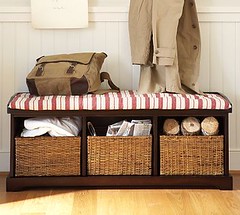
My Dream Solution: I would love to have this:

However, it's bigger than my tiny nook or my small furniture budget. "Hey!" I thought, "I have a saw and tools! I could make one from scratch!"
Like any good frugalista, I balked at the cost of buying new boards at the Home Depot. So, I came home and looked for wood.

Found some! It's the last of our old futon frame! My woodworking style is what one might call "cobbled together" anyway.
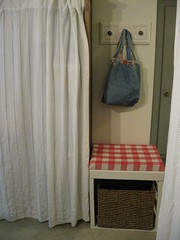
My DIY Solution: I made this shoe bench:

I made a flickr set with lots of notes to show/tell how I did it. Here are some highligts:

For one thing, we were in the middle of bad heat and worse air quality. So, the balcony workshop was moved right to the kitchen table. My table top is formica, so it's all good.

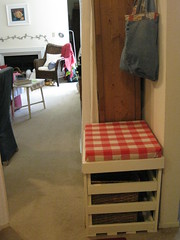
Basically I made a cube out of these boards from the frame. I didn't have enough for a solid frame, so I made it open like this. This is a picture of the early stages of framing. I just drilled holes and used screws to put it together.
I made a cushion from the bench cushion I just retired.


It's far from perfect. I can already see where I could have made it better (I have added that info to my notes in the flickr set) but, I have been using it for a few days now and it works like a charm to keep that nook neat and organized. I am glad I took the plunge and went for it. Total cost $7. Now that's frugal!
Get your DIY fix at ASPTL! More Frugal Friday at Shabby Nest
Hey it looks good. Way to make it from scrap wood too.
ReplyDeleteThat turned out fabulous! I love organization projects, especially when they can also be cute!
ReplyDeletehow very clever. cute results!
ReplyDeleteIt is adorable! Nice work!
ReplyDeleteLooks AWESOME!
ReplyDeleteI'm a children's author. The title of your blog and your interest in elementary education caught my eye.
ReplyDeleteLove you blog! Please stop by and see me!
That is so clever and I love that you went and scavanged for wood from your house instead of buying it I never think to do that but now I will!!
ReplyDeleteThis is similar to the one my husband made me, I featured it in my DIY Day post last week. Except I wasn't nearly as thrifty as you, great job!
ReplyDeleteThat is awesome! I'm thinking I need to figure out how to use power tools so I can expand my DIY repertoire!
ReplyDeletenice job! I like it ALOT more than the old bucket!!!
ReplyDeleteLooks great and you can't beat $7!
ReplyDeleteFantastic solution! So crafty to use all that extra wood . . . really brilliant!
ReplyDeleteWow, you're the woman. I have got to get over my fear of power tools. Thanks for stopping by!
ReplyDeleteThat turned out great!
ReplyDeleteSO cute! And smart! Great creative job, girl!!
ReplyDeleteAlyshia
You always make the best stuff! You're so creative and skilled!
ReplyDelete:)
Have a great weekend!
Roeshel
Great job! It looks like the mini version of the larger Pottery Barn.
ReplyDeleteInnovative, fun... that just blows my mind! You are a visionary indeed, picture the project & tackle it! Ps, love the fabric!
ReplyDeleteVery, very clever. I'm impressed!
ReplyDeletethanks for coming by & your kind words.
ReplyDeleteyou are so creative. love your tutorials.
everytime i drive by junked furniture along the curb i look to see if there's anything to make a play stove or kitchen out of. thanks for inspiring all of us.
Very creative solution, and it looks like you purchased it somewhere rather than making it yourself. Great job! Have a good weekend...
ReplyDeletepk @ room remix
I bought one of those storage benches with the little baskets and guess what? The baskets aren't big enough for my husband's shoes anyway!! You did good!
ReplyDeleteWow! Way to use your resources! It turned out great!
ReplyDeletethis turned out so cute!
ReplyDeletestop by my Goodwill party every Wednesday and link up your thrifty finds!!